

The request form consists of required and optional fields of various types; required fields are selected with a full stop next to the field name. Depending on the settings, some fields may be automatically pre-filled, with or without the option to edit them. The content of the form varies depending on the settings of the request module and the permissions of the user creating the request (limited access to certain fields).
When submitting a request, the form contains the basic fields required to create the request; some fields will only be viewed once a company has been selected, whilst the remaining tabs will only be viewed once the record has been saved.
Key figures
If you are submitting a request as a ‘solver’ or ‘operator’ user, the following fields may be available on the form for submitting a new request (depending on the CDESK system configuration):
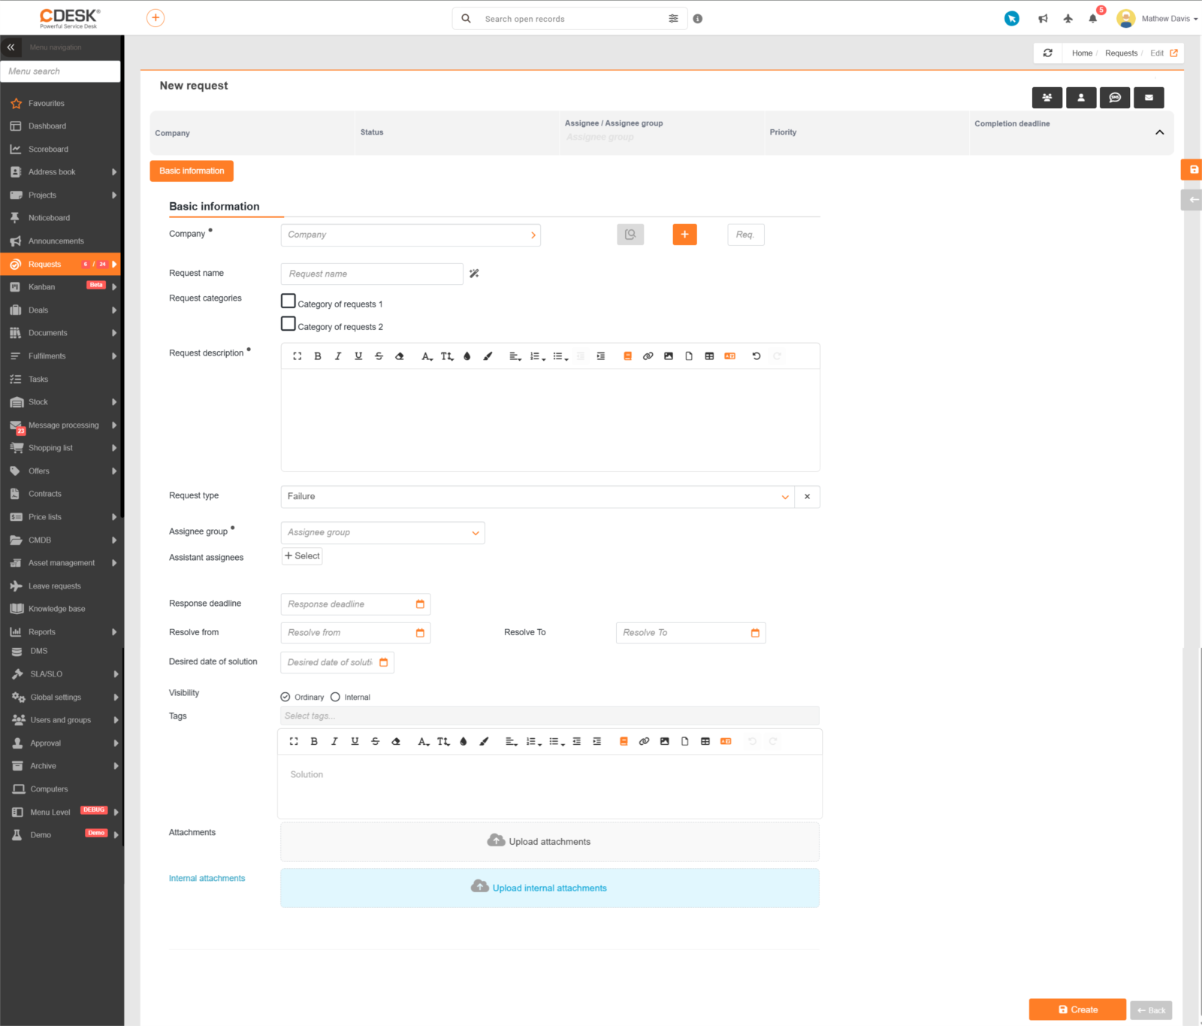
- Company – the field is pre-filled with the company you have assigned. If you have multiple companies assigned (visible), clicking the > icon in the company row will view a window with a list of companies and the option to filter the records.
- Weight – a field into which you can insert a number (including decimals) to influence the order in which items are displayed in the list of requests. When you select filtering by company in the list of requests, the requests will be sorted by req. weight from highest to lowest. If priority display is enabled, records will be sorted into categories (unassigned, awaiting response, overdue, etc.), but within each category they will be sorted by weight.
- Branch – the branch selection field will be available if the company has a branch defined in the CMDB configuration database. This field can be enabled in Global Settings → Requests → Basic Settings. The ‘Branch’ field is part of the authorization system and you can make it visible or hidden for specific users or groups (these settings are available in the user details on the ‘Authorizations’ tab, under ‘Requests’ → ‘Field Access’ → ‘Branch’).
- Place – the place selection field will be displayed if the company has a place defined in the CMDB configuration database. If the ‘Branch’ field is enabled, the location selection will only be offered after a branch has been selected. This field can be enabled in Global Settings → Requests → Requests. It is also part of the permissions and can be made visible or hidden for specific users or groups (these settings are available in the user details on the Permissions tab, under Requests → Field Access → Place).
- Request code – a field for entering a request code, which can be used for the so-called classification of requests. The request code can also be used to filter the list of requests.
- Requirement Name – a name that succinctly captures the essence of the request being entered. The request will be viewed under this name in the list of requests and in other CDESK modules linked to requests.
- Request category – the option to classify the request into categories. Categories must be defined in advance under Global Settings → Requests → Types, Categories and Service Areas, Request Categories section.
- Organisational unit – the option to assign a request to an existing organisational unit. The organisational unit can also be used to filter the list of requests. The values available for selection are obtained from the connection to AD.
- Request description – a field for entering request details, with the option to format the text. Images can also be inserted into this field.
- Deal – a list of deals belonging to the selected company is displayed; selecting a deal creates a link to the request. The linked request will also be viewed in the Order under the Requests section. The Order field is only viewed if the Orders module is enabled in Global Settings → Orders.
- Project Order – a selection from the list of project orders belonging to the selected company – selecting a project order creates a link with the request. The linked request is also viewed in the project order under the Requests section.
- Request type – offers a selection of request types, which must be defined in advance under Global Settings → Requests → Types, Categories and Service Areas, in the Request Types section, where it is also possible to enable this field and specify which types will be offered to the operator for selection.
- Service Area / Level 2 – selection of service areas, which must be defined in advance under Global Settings → Requests → Types, Categories and Service Areas, Request Service Areas section, where you can also enable these fields.
- SLA – this field is only viewed if you assign multiple objects with different SLAs to a request. It offers a choice of SLA, according to which the request deadlines are to be set. Once the request is saved, the selected SLA is applied and this field is hidden. You can find more information on the use and settings of SLAs in the separate SLA documentation section.
- Assignee group – selection of an assignee group. The Assignee group field is only accessible when the ‘Restrict resolver selection by assignee group’ function is enabled. The selection of available teams depends on the type of user account:
- administrator – can view and assign a request to any of the groups
- operator – can only see the groups that are visible for the selected company*
- Customer / EasyClick account – can only see the groups assigned to that company (settings for visible and assigned companies are configured in Users and Groups → Users → user details → Companies tab or in Address book → Companies → Operators tab).
The assignee group is pre-set according to the following criteria:
1. If you create a request from a template that has a default assignee and also has a default service area for which the environment administrator has set a default assignee group, the assignee group from the configured service area will be pre-filled on the request.
2. If you create a request from a template that has a default assignee group and also has a default request service area for which no default assignee group has been set, the assignee group from the template will be pre-filled on the request.
3. If you are not creating a request from a template and the environment administrator has set a default assignee group for the selected service field, the assignee group from the service field will be populated on the request.
4. If you are not creating the request from a template and no default assignee group has been set for the selected service area, the assignee group assigned to the company will be pre-filled on the request.
- Assignee – selection of an assignee. The selection of available assignees depends on the type of user account:
- administrator – can view and assign a request to all assignees
- Operator – can only see assignees who are visible to the selected company*
- Customer / EasyClick account – can only see assignees who are assigned to that company (settings for visible and assigned companies are configured in Users and Groups section → Users → user details → Companies tab, or in the Address book → Companies → Operators tab).
The selection of an assignee for a request depends on several settings:
1. If you are creating a request from a request template that has a default assignee and also has a default request service area for which the environment administrator has set a default assignee, the ‘Assignee’ field on the request will be pre-filled with the assignee from the specified service area.
2. If you create a request from a template that has a default assignee and also has a default service area for which no default assignee has been set, the assignee field on the request will be pre-filled with the assignee from the template.
3. If you are not creating the request from a template and the environment administrator has set a default assignee for the selected request service area, the assignee from that service area will be pre-filled in the ‘Assignee’ field on the request.
4. If you are not creating the request from a template and no default assignee has been set for the selected service area, the assignee assigned to the company will be pre-filled in the ‘Assignee’ field on the request. If the company has several selected assignees, the first assignee will be pre-filled in the ‘Assignee’ field. The customer account can change the pre-filled assignee.
- Change after missed response to – if the assigned assignee or group of assignees misses the response deadline for a request, the request will be reassigned to another assignee or group. If you wish to retain the original assignee even after the response deadline has passed, leave this field blank. This option can be enabled in Global Settings → Requests → Basic Settings.
- Supporting assignees – allows you to assign supporting assignees or a group to a request, in addition to the main assignee. They will be notified of changes to the request (depending on notification settings) and will also be able to access the request as an assignee. This field can be enabled in Global Settings → Requests → Basic Settings. It is also part of the authorization system, and you can enable or disable access to it for specific users or groups (these settings are available in the user’s details on the Permissions tab, under Requests → Access to fields → Assignees).
- Responsible person – allows you to assign a responsible person to a request, who is accountable for the assignees’ results and is notified, for example, in the event of missed deadlines. This field can be enabled in Global settings → Requests → Basic settings. The ‘Responsible assignee’ field is part of the authorization system and you can make it visible or hidden to specific users or groups (these settings are available in the user’s details on the Permissions tab, under Requests → Field Access → Responsible Assignee).
- Who is requested – select who submitted the request. By default, the currently logged-in user is selected. If you are creating a request based on an enquiry (e.g. by telephone) from another user or customer, you can select a different operator or customer account. This field can be enabled in Global Settings → Requests → Basic Settings. It is also part of the permissions and you can make it visible or hidden to specific users or groups (these settings are available in the user details on the Permissions tab, under Requests → Field Access → Requested By).
- Requested For – if the request was initiated by someone other than the person specified in the ‘Requested By’ field, use this field to specify that person. They do not necessarily have to be registered CDESK users. Depending on the settings under Global Settings → Requests → Basic Settings, you can also enter free text. The ‘Requested For’ field is part of the permissions and you can make it visible or hidden to specific users or groups (these settings are available in the user’s details on the Authorizations tab, under Requests → Access to fields → Requested For).
- Urgency – the urgency of the request is specified by the customer. They select from a selection list defined in Global Settings → Requests → Basic Settings, Request Urgency section. The Urgency field is available if the ‘Prioritisation by Urgency and Impact’ function is enabled in Global Settings → Requests → Basic Settings.
- Impact – the impact is determined by the assignee of the request. They select from a selection list defined in Global Settings → Requests → Basic Settings, under the Request Impacts section. The Urgency field is available if the ‘Prioritisation by Urgency and Impact’ function is enabled in Global Settings → Requests → Basic Settings.
- Priorities – request priorities are defined in Global Settings → Requests → Basic Settings, in the Request Priorities section. If an SLA is defined, changing the request priority may also result in changes to the TTO, RT, TTAS and TTR deadlines. If the ‘Prioritisation by Urgency and Impact’ function is enabled in Global Settings, the request priority may be automatically populated based on the specified urgency and impact.
- Assignment deadline – Time to Own (TTO) – the date by which the request must be assigned to a specific assignee (not a group of assignees). TTO calculation is enabled in Global Settings → Requests → Basic Settings, in the Request deadlines section. It is also necessary to enable Request deadline calculation for a specific company in Address book → Companies, in the SLA section. The ability to change a deadline depends on the settings in the SLA.
- Response deadline – Response Time (RT) – the date by which an assignee must respond to a request, for example by changing the request status, adding a fulfilment, or posting a discussion post. The ability to change this deadline depends on the settings in the SLA.
- Alternative solution deadline – Time to Alternative Solution (TTAS) – the date by which an alternative solution must be provided to the company. TTAS calculation is enabled in Global Settings → Requests → Basic Settings, in the Request Deadlines section. It is also necessary to enable ‘Request Deadline Calculation’ for a specific customer in the Address book → Companies section, under SLA. Rescheduling of the deadline depends on the settings in the SLA.
- Completion deadline – Time to Resolve (TTR) – the deadline by which the assignee must resolve the request. The completion deadline can be specified as a ‘from–to’ range. The option to specify a ‘from–to’ resolution interval can be enabled in Global Settings → Requests → Basic Settings, in the Request deadlines section. Rescheduling of the deadline depends on the settings in the SLA
- Fixed fulfilment dates from – this field is only viewed if the company has ‘Request Deadline Calculation’ enabled in Address book → Companies, in the SLA section. When the toggle is in the ‘Enabled’ position, it locks the Alternative Solution Deadline (TTAS) and the Fulfilment Deadline (TTR), even if the request is in a status where time is not counted towards the TTAS / TTR. Toggling the switch to the ‘disabled’ position activates the rolling of these request deadlines. Disabling the counting of time towards the TTAS / TTR deadlines is performed in Global Settings → Requests → Basic Settings, under the Request Deadlines section.
- Desired date of solution – the date by which the end user wishes the request to be fulfilled. If this date is earlier than the Completion Deadline, no change is made to the request and it is at the assignee’s discretion whether to bring forward the Completion Deadline. If this date is later than the Completion Deadline, the Completion Deadline will be automatically adjusted to match the desired date of solution. The ‘Desired date of solution’ field is enabled in Global Settings → Requests → Basic Settings, under the Request Deadlines section.
- Visibility – the visibility option for the request; the available options are:
- Ordinary – the request is also visible to the assigned customer, who receives notifications (unless customer notifications are disabled)
- Internal – the customer will not see this request and customer notifications are automatically disabled
- Tags – these act as labels that make it easy to search for related documents in CDESK. Enter keywords that describe the selected request. Tags that have not yet been applied will be created once the request is saved.
- Solution – this field is only accessible once the request has been saved. It is a text field where you can record the solution. The Solution field is activated in Global Settings → Requests → Basic Settings. It is also part of the authorization system, and you can make it visible or hidden to specific users or groups (these settings are available in the user’s details on the Permissions tab, under Requests → Field Access → Solution).
- Internal note – this field is only accessible once the request has been saved. It is a text field where you can enter a note relating to the request. This will not be accessible to customer accounts unless you grant them the relevant permissions (these settings are available in the user details on the Permissions tab, under Requests → Access to fields → Internal note). The Internal Note field is enabled in Global Settings → Requests → Basic Settings.
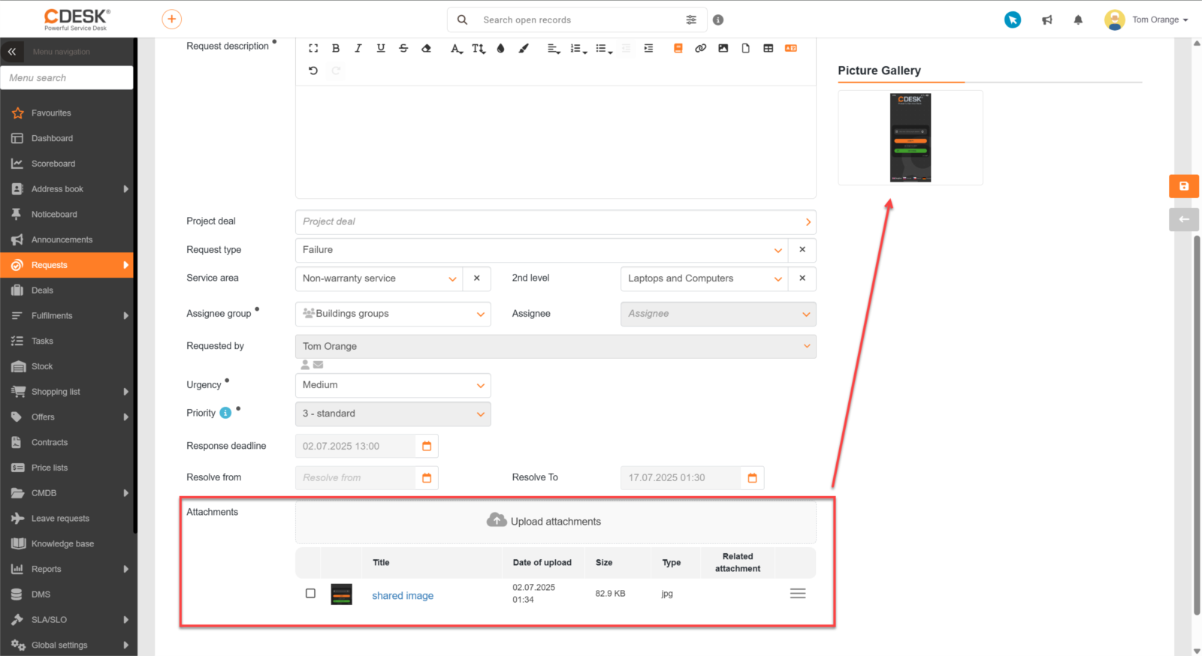
- Attachments – the option to attach a file (e.g. an image, video or document). You can attach a file either by dragging it onto this field with your mouse, or by clicking on it to select a file from your computer. It is possible to add multiple attachments; the list of attached files will then be viewed below this field.
- Internal attachments – the option to attach files that will not be accessible to customer accounts unless you grant them the relevant permissions (these settings are available in the user’s details on the Permissions tab, under Requests → Access to fields → Internal attachments). The internal attachments field is enabled in Global settings → Requests → Basic settings.
- Image preview – if you have added an image to an attachment, you will be able to view its preview in this section once the request has been saved.
Items from the CMDB configuration database
It is also possible to assign items from the CMDB to a request. Objects can be assigned directly on the Basic Data tab under ‘Items from CMDB’ or on the relevant tab of the request form. The option to assign items from the CMDB to a request is only available if this option is enabled under Global Settings → Requests → Basic Settings → the ‘Items from CMDB’ section.
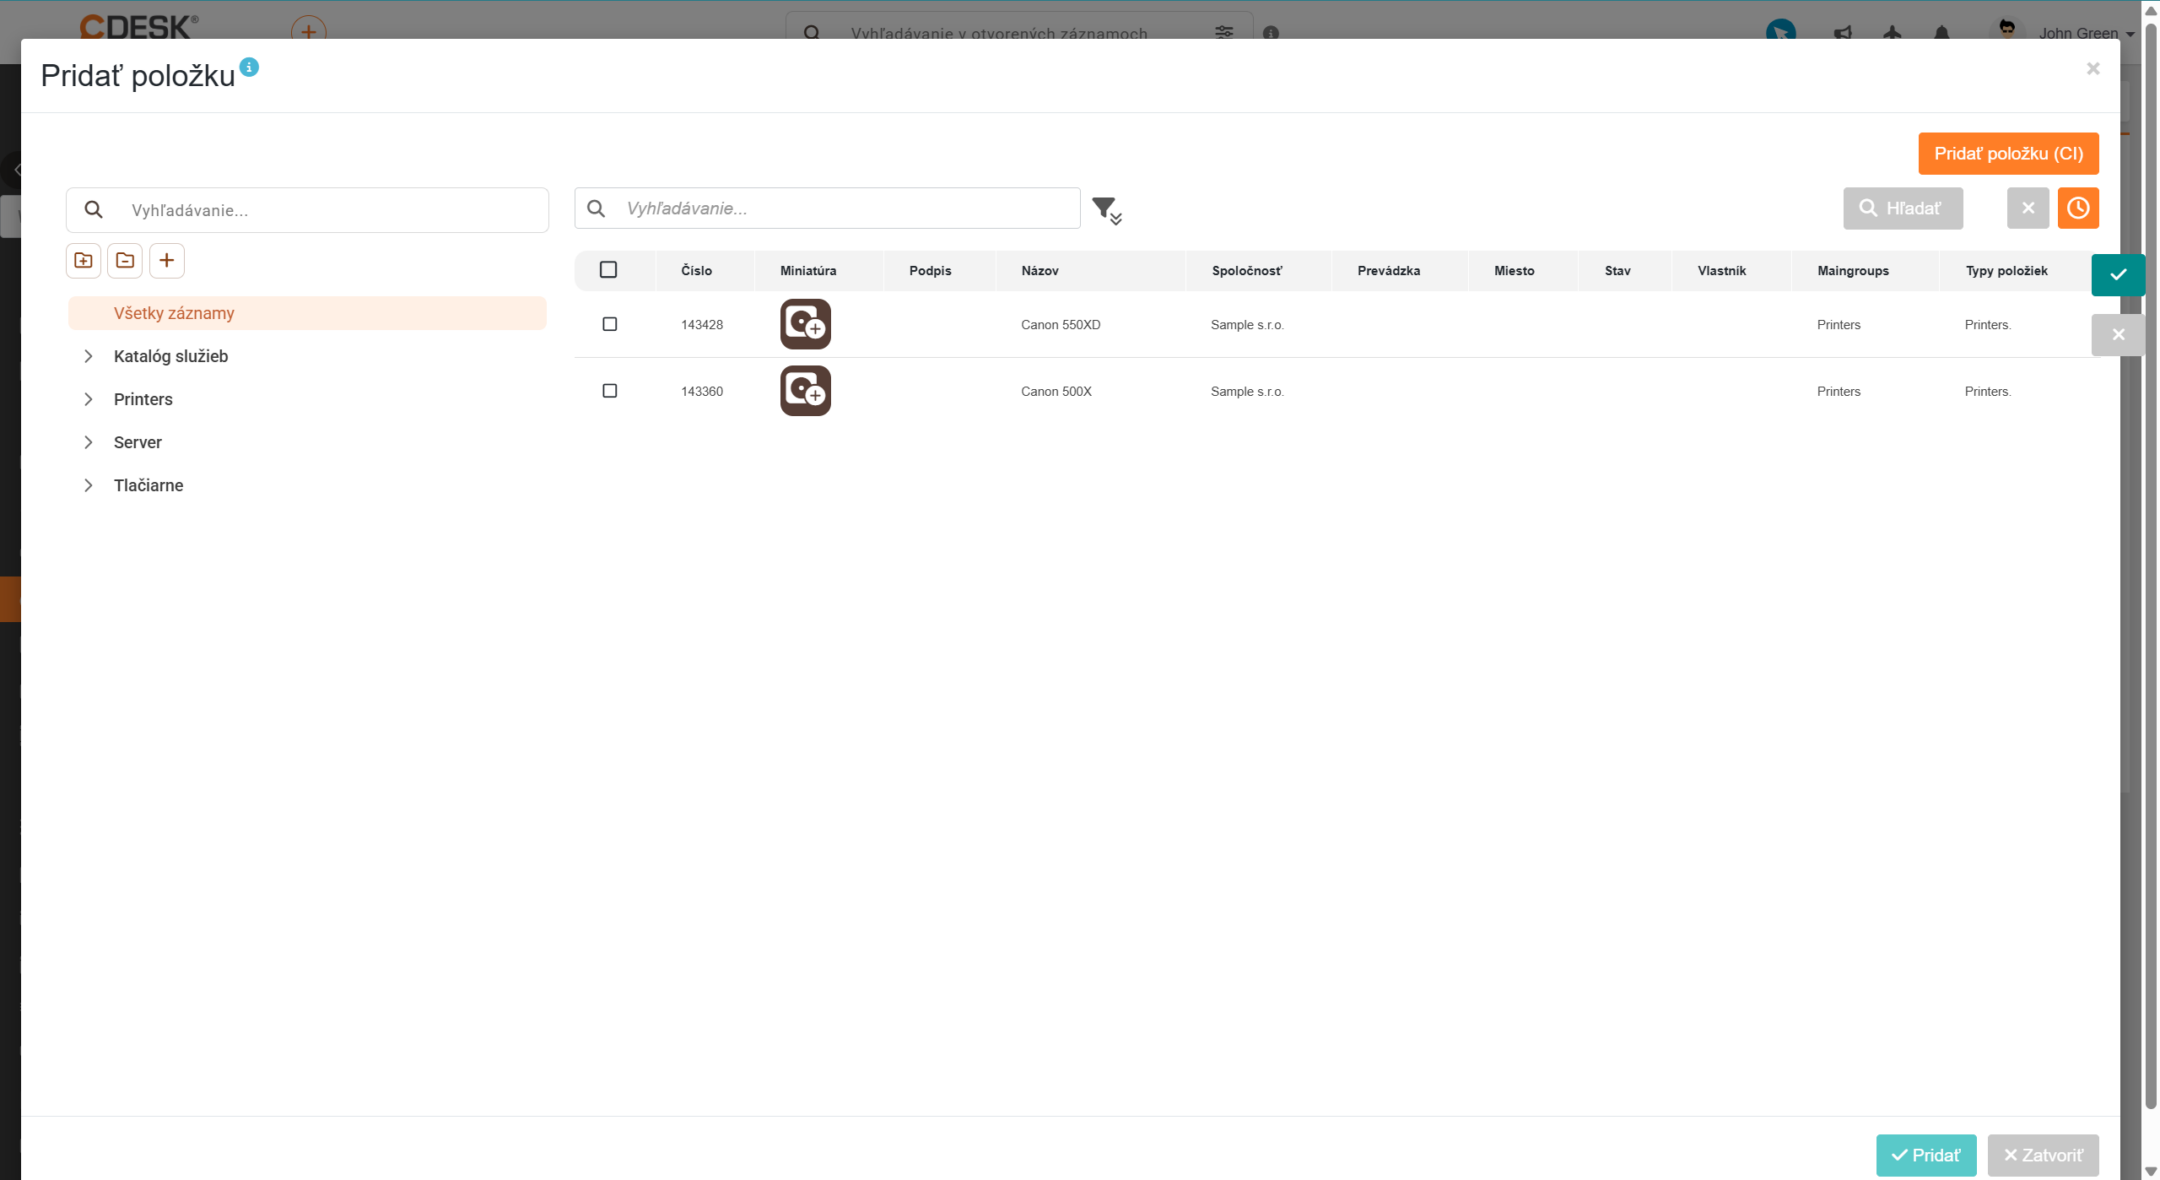
The assignee can only assign items to a request that are registered to the company for which the request is being created. Clicking the + Add Item button views a modal window for selecting objects. Items can be assigned by selecting the box in the row containing the required item and clicking the Add button. If an SLA is recorded for the assigned item in the CMDB, the request will be governed by the object’s SLA – for this reason, the request deadlines will also change.