
Beta verzia novej dokumentácie.

User settings

The module settings can be found under Global Settings → Users. Only users with administrator permissions can access these settings; other users can only access them if they have the relevant permissions. These are general settings that allow you to customise user account management – logins and passwords, two-factor authentication, licence allocation, data display, organisational structure and custom fields in the user form. Save any changes by clicking the Save button.

Note: Some settings will only appear once the following conditions have been met: Place where contact details are displayed (after enabling the display of contact details), Users exempt from 2FA (after enabling required 2FA) and the entire Organisational Structure section (if organisational structure lists are available in your environment). They are included in this guide for the sake of completeness.

Basic settings

  • Display contact details in forms – when this option is enabled, a person’s contact details (such as telephone number and email address) will be displayed in selected form fields, so that the assignee can see them whilst working. Once enabled, additional settings will appear:
    • Where to view contact details – specifies where the contact details will appear – offering the options: ‘Assignee field’, ‘Requested By field’, ‘Requested For field’ and ‘Footer information’.
  • Automatic licence assignment for accounts – allows you to select a licence that will be automatically assigned to newly created accounts, so you do not need to assign it manually. The coloured marks A, O and W next to the name indicate which account types the assignment applies to (administrator, operator and assignee).
  • Password strength – when this option is enabled, users will be required to apply a password of at least 8 characters, including at least one number and one uppercase letter.
  • Allow users to change their passwords – determines whether common users are permitted to change their own passwords. Only the administrator can change these settings.
  • Support for encrypted password entry – when this option is enabled, the system can accept passwords in encrypted form and the decryption method selection becomes available (see below for details).
    • CDESK decryption method – in this field, select the decryption method (RSA). Depending on the method selected, you will either upload a file containing the RSA public key in PEM format, or generate it directly in CDESK and download it for use with an external application. Click the ‘Test decryption’ button to confirm that the system correctly reads the encrypted text (inserted in BASE64 format).
  • Show mobile number when selecting an assignee – when enabled, the assignee’s mobile number will also be displayed when they are selected. The additional option ‘View number next to selected assignee’ will then display the number even after they have been selected.
  • Organisation affiliation option (internal/external) – distinguishes between internal and external workers and is used for native filtering within user lists. This is particularly important for C-Monitor users who require a unified view of both sections – the affiliation filter is shared and functions identically in both CDESK and CM.
  • User identity over time – once enabled, the system retains the user’s historical identity in records. The settings are available for the Requests, Work orders, Fulfilments and Approval modules. Upon first launch, the identity for older records is populated in the background, which may take several minutes.
  • Mandatory 2FA – Two-Factor Authentication (2FA) is an additional identity authentication step during login. Once this option is enabled, all users will be required to set it up, which will significantly enhance access security. Once enabled, the ‘Exclude users from 2FA’ settings will appear, where you can select accounts to which this requirement does not apply.
  • Quantity of days until stored 2FA expires on a device – determines how many days the system will remember a trusted device before requesting the second factor again (default: 30 days). A higher value is more convenient; a lower value is more secure.
  • Add a link to the login screen labelled ‘Create a customer account’ – when enabled, a link will be viewed on the login screen allowing customers to create an account themselves. When used in conjunction with the Google or Microsoft Entra ID connector (Global Settings → Connectors, API), it is also possible to create an account via the ‘Sign in with Google’ or ‘Sign in with Office 365 / Entra ID’ buttons.
  • Personal number format – enter a pattern according to which user personal numbers are generated to ensure they have a consistent format.
  • User name display format – this determines how the name is viewed in the system. The settings offer the options Full name, Full name <EMAIL> and Full name [personal number]. This helps to distinguish between people with the same name.

Organisational structure (conditional settings)

If organisational structure lists are available in your environment, their settings are viewed at the top of the user settings.

  • Enable Organisational Structure – by toggling the switch to the ‘On’ position, the organisational structure details (department, supervisors and subordinates) will be made available for users, and additional settings for department levels will also be displayed.
  • Organisational units where the manager is not subject to approval by a supervisor – allows you to select units where the manager does not need to be approved by their supervisor. These settings are only available if the organisational structure is enabled.
  • Level of org. unit: Division / Section / Department – you specify numerically which level of the tree corresponds to a division, section and department, thereby standardising the naming of levels across the entire system.

User-defined fields

In this section, you can extend the user form with custom fields (properties) beyond the standard ones, so that you can add data specific to your organisation to the account records. To assign a custom field, click the + Assign custom field button. A window will open displaying a list of fields defined under the CMDB Configuration Database module (Configuration Database → User-defined fields). Select the required fields by ticking the boxes next to them and click the Assign Selected button to add them.

If the list does not contain the required field, you can create it directly in the selection window. Use the + Simple Custom Field button to create a basic property, and the + Composite Custom Field button to create a composite property that combines several basic properties.

The included fields are added to the list and will be viewed in the same order as they are listed in the user form. You can change the order by dragging the icon. You can delete or edit a field from the list via the context menu in its row (options: Delete, Edit). You can group fields into your own custom tabs using the + New Tab button. There is a search bar above the list. The List with settings / Field location toggle determines whether detailed field settings are viewed, or just their names and order.
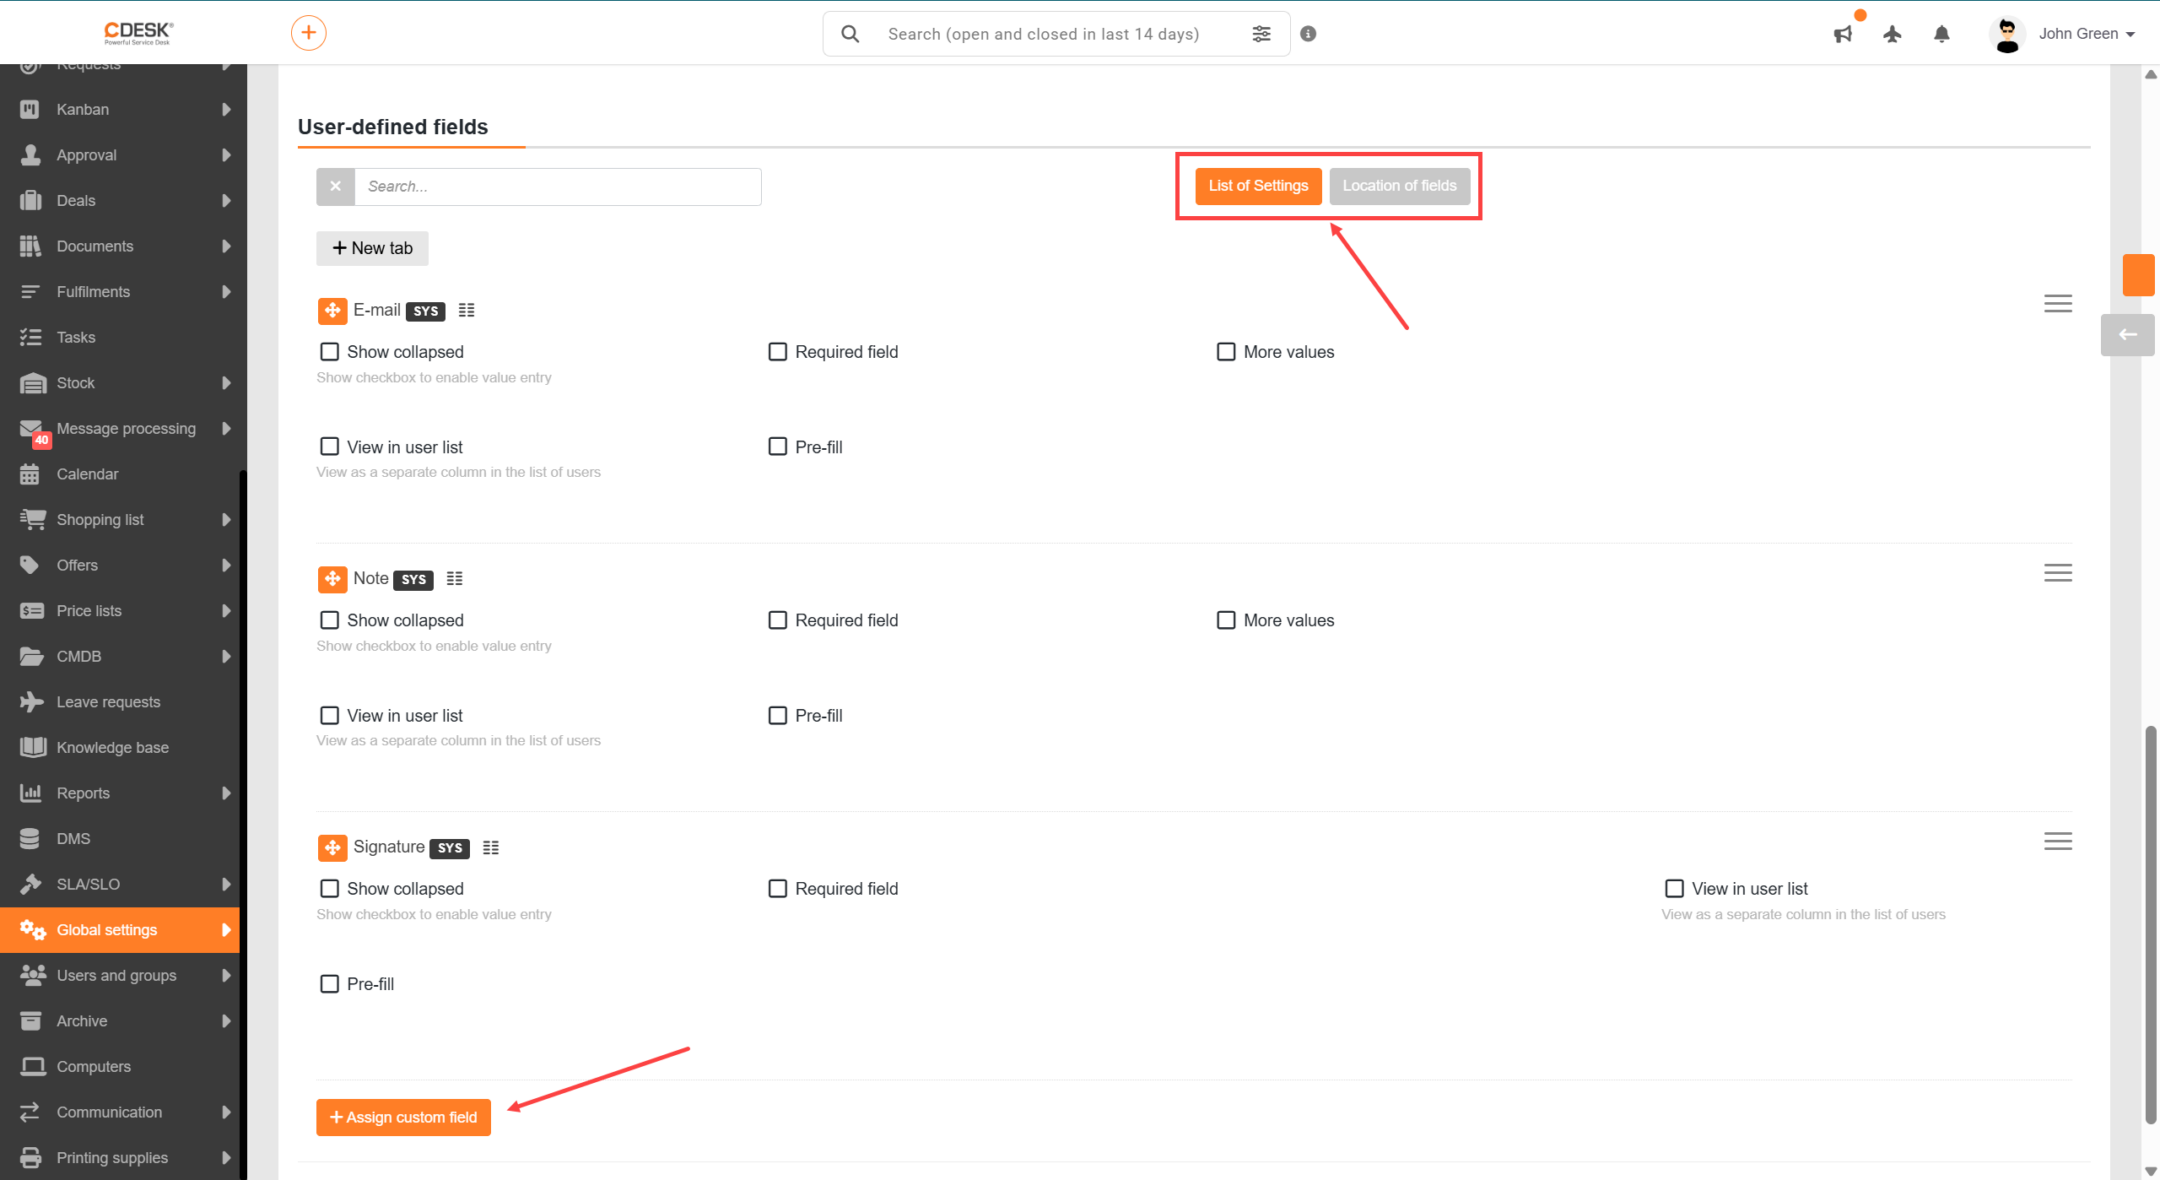
Each assigned field can be configured using the following settings:

  • View collapsed – if ticked, only a tick box will be displayed in the form instead of the full field. The field will only expand once it has been ticked.
  • Required field – the field will be selected as required in the form. The record cannot be saved until you have filled in the field.
  • Multiple values – allows you to enter values in the field more than once. When enabled, the ‘Limit’ field becomes available, allowing you to restrict the quantity of values.
  • View in user list – allows you to view this field as a separate column in the user list.
  • Pre-fill – allows you to define a value that will be automatically pre-filled when a new user opens the form.
Figure: Global settings for user-defined fields in the ‘Users’ section