Beta version of the new documentation.

Universal billing via Deals

Billing via Deals operates independently of Requests. Fulfilments that will be billed via Deals can be linked to any object. This billing method is suitable for service contracts, retainer agreements, project work, and other situations where work is invoiced based on the deal rather than individual requests.

Generally, the following documents can be generated in CDESK:

  • final invoice, which is recorded in the accounting system for tax purposes. The entry is made manually or the entire invoice is transferred to the accounting system via the ERP connector, including the automatic issuance of materials from the warehouse.
  • fictitious invoice – as a basis for creating a live invoice in the ERP, with a detailed breakdown of work generated from CDESK.

Creating an deal – the foundation of any billing

The first step is to enter the Deals. You can find all the details in the text Deals – Creating an Deal.

Supported job types and flat rates for billing via Deals

You can add accounting items to an deal on the Accounting tab. If the tab is not displayed, check the relevant permissions. You can set permissions to access the tab at Users and Groups → Users → specific user → Permissions tab → Deals → Access to tabs → Accounting.

Accounting Entity – To invoice an deal directly through CDESK, you must first select the accounting entity defined at Global Settings → Accounting, under Companies – Accounting Entities.

You can add jobs and recurring fees for invoicing in the Jobs and Flat Rates section. To create a new entry, click the + icon. If you wish to add an item from the price list, use the +From job price list button. Clicking this will open a window for selecting items. For more information on creating entries in the price list, see the text at under “Price List of Jobs and Flat Rates” at. The button for adding jobs and flat rates from the price list is only displayed if you have permission to access Price List for Jobs and Flat Rates. You can set permissions in Users and groups →Users →specific user →Permissions tabPrice ListsPrice Listsjobs andflat rates.

Image: Selecting items from the price list

Hourly-paid work

For work that you bill based on hours worked at a specific hourly rate, use the Work at an hourly rate item.

To create a new record, click the + button. After clicking, a new window will open. Required fields are marked with the * symbol.

Image: Setting up hourly pay
  • Job Type – select the “Hourly Rate” option.
  • Job Name – the name of the item that will appear in the fulfilment details when selecting an accounting item, and will also be used as the line item name on the invoice.
  • Option to select
    • In all fulfilment types – the item can be selected in both non-complaint and complaint fulfilments.
    • Only in non-complaint fulfilments – the item can be selected only in non-complaint fulfilments.
    • Only in complaint fulfilments – the item can be selected only in complaint fulfilments. These are fulfilments that are not invoiced. Information on complaint-related fulfilments can be found in the Fulfilments section.
  • Hourly rate – hourly rate in the currency set as default in Global Settings → Accounting, under Currencies. This is the price excluding VAT.
  • VAT – pre-filled default VAT, with the option to change according to the defined VAT levels in Global Settings → Accounting, in the section VAT Rates.
  • Permanent – select whether you want the item to remain available even after invoicing.
    • Yes, multiple invoicing – allows for ongoing invoicing of hours worked under this accounting item. Example: work on a project may take several months, but you need to invoice the customer for hours worked on an ongoing basis at the end of each month.
    • No, one-time invoicing – after invoicing, the accounting item is archived and can no longer be selected for fulfilment. At the same time, the accounting item is hidden in the list of jobs and flat rates. If everything within the accounting item has been invoiced, you will only find it in the invoice archive.

Explanations of other settings common to all accounting items can be found in the Common settings for accounting items section.

Services charged at a unit price

For jobs that you bill based on an agreed-upon unit price and the actual amount of work performed. For example, you may have agreed to install electrical outlets at a specific unit price and bill based on the actual number of outlets installed. At the same time, you can track how long it took you to install that number of outlets.

To create a new record, click the + button. After clicking, a new window will open. Required fields are marked with the * symbol.

Image: Configuring the "Unit Price Tasks" option
  • Job Type – select the option Task at unit price.
  • Job Name – the name of the item that will appear in the fulfilment when selecting an accounting item and will also be used as the line item name on the invoice.
  • Option to select
    • In all fulfilment types – the item can be selected in both non-complaint and complaint fulfilments
    • Only in non-complaint fulfilments – the item can be selected only in non-complaint fulfilments
    • Only in complaint fulfilments – the item can be selected only in complaint fulfilments. These are fulfilments that are not invoiced. Information on complaint-related fulfilments can be found in the Fulfilments section.
  • Unit price – unit rate in the currency set as default in Global Settings → Accounting, under Currencies. The unit to which the price is linked is selected below in the Unit section. You can configure the units offered in this list in Global Settings → Accounting under Units.
  • VAT – This field is displayed only if the accounting unit is a VAT payer. The default VAT is pre-filled, with the option to change it according to the defined VAT levels in Global Settings → Accounting, under VAT Rates.
  • Permanent – select whether you want the item to remain available even after invoicing.
    • Yes, multiple invoicing – allows for ongoing invoicing of performed tasks. Example: you have agreed on cleaning a space for a certain unit price and you invoice based on the actual cleaning performed. In CDESK, you simply mark the actual cleaning sessions performed, and the invoicing process automatically calculates how many cleaning sessions you performed during the invoiced period.
    • No, one-time invoicing – after invoicing, the accounting item is archived and can no longer be selected for future services. At the same time, the accounting item is hidden in the list of jobs and flat rates. If everything within the accounting item has been invoiced, you will only find it in the invoice archive.

Explanations of other settings common to all accounting items can be found in the Common settings for accounting items section.

You can add an item to the deal using the Add button. Selecting Close closes the window without adding the item.

Fixed-price fees

This account is primarily intended for one-time invoicing of services provided at a unit price, such as pump repair or server installation. You can also use this account for recurring invoicing of fixed fees.

To create a new record, click the + button. After clicking, a new window will open. Required fields are marked with the * symbol.

Image: Configuring the "Fixed-Price Fees" option
  • Job Type – select the option Fixed-Price Fee.
  • Invoice Line Items – the line item name that will appear in the fulfilment details when selecting an accounting item, and will also be used as the line name on the invoice.
  • Option to select
    • In all fulfilment types – the item can be selected in both non-complaint and complaint fulfilments
    • Only in non-complaint fulfilments – the item can be selected only in non-complaint fulfilments
    • Only in complaint fulfilments – the item can be selected only in complaint fulfilments. These are fulfilments that are not invoiced. Information on complaint-related fulfilments can be found in the Fulfilments section.
  • Fixed price – fixed rate in the currency set as default in Global Settings → Accounting, in the section Currencies. You select the unit to which the price is linked below in the section Unit.
  • VAT – This field is displayed only if the accounting entity is a VAT payer. The default VAT is pre-filled with the option to change it according to the defined VAT levels in Global Settings → Accounting, in the section VAT Rates.
  • Quantity – enter the numerical value of the quantity of fixed-price fees.
  • Unit – enter the unit in which fixed-price fees are recorded. You can configure the unit list at Global Settings → Accounting, in the section Units.
  • Permanent – select whether you want the item to remain available even after invoicing.
    • Yes, recurring billing – allows you to repeatedly bill a fixed fee. Example: This way, you can bill a simple flat rate if you bill every month.
    • No, one-time billing – after billing, the accounting item is archived and it will no longer be possible to select this item for services. At the same time, the accounting item is hidden in the list of jobs and flat rates – you can only find it in the invoice archive.

You can add an item to the deal using the Add button. Selecting Close closes the window without adding the item.

Explanations of other settings common to all accounting items can be found in the Common settings for accounting items section.

Flat rate without prepaid hours

The flat rate without prepaid hours is designed for invoicing services where a fixed amount is charged for a specific period, such as a month. Under this service, you do not provide the customer with any prepaid time. The amount of time worked under such a flat-rate service will not affect the invoicing amount, as the service has a fixed rate. You can use the time-tracking records to evaluate the profitability of the service provided.

To create a new entry, click the + button. A new window will open. Required fields are marked with an asterisk (*).

Image: Setting up a flat rate without prepaid hours
  • Job Type – select the option Flat Rate.
  • Flat Rate Name – the name of the item that will appear in the fulfilment details when selecting an accounting item, and will also be used as the line item name on the invoice.
  • Option to select
    • In all fulfilment types – the item can be selected in both non-complaint and complaint fulfilments
    • Only in non-complaint fulfilments – the item can be selected only in non-complaint fulfilments
    • Only in complaint fulfilments – the item can be selected only in complaint fulfilments. These are fulfilments that are not invoiced. Information on complaint-related fulfilments can be found in the Fulfilments section.
  • Flat-rate price – price in the currency set as default in Global Settings → Accounting, under Currencies.
  • VAT – This field is displayed only if the accounting entity is a VAT payer. The default VAT rate is pre-filled and can be changed according to the defined VAT levels in Global Settings → Accounting, under VAT Rates.
  • Number – specify how many times the flat rate will be billed within the accounting period.
  • Unit – select from the list the unit in which it will be billed (e.g., pcs).
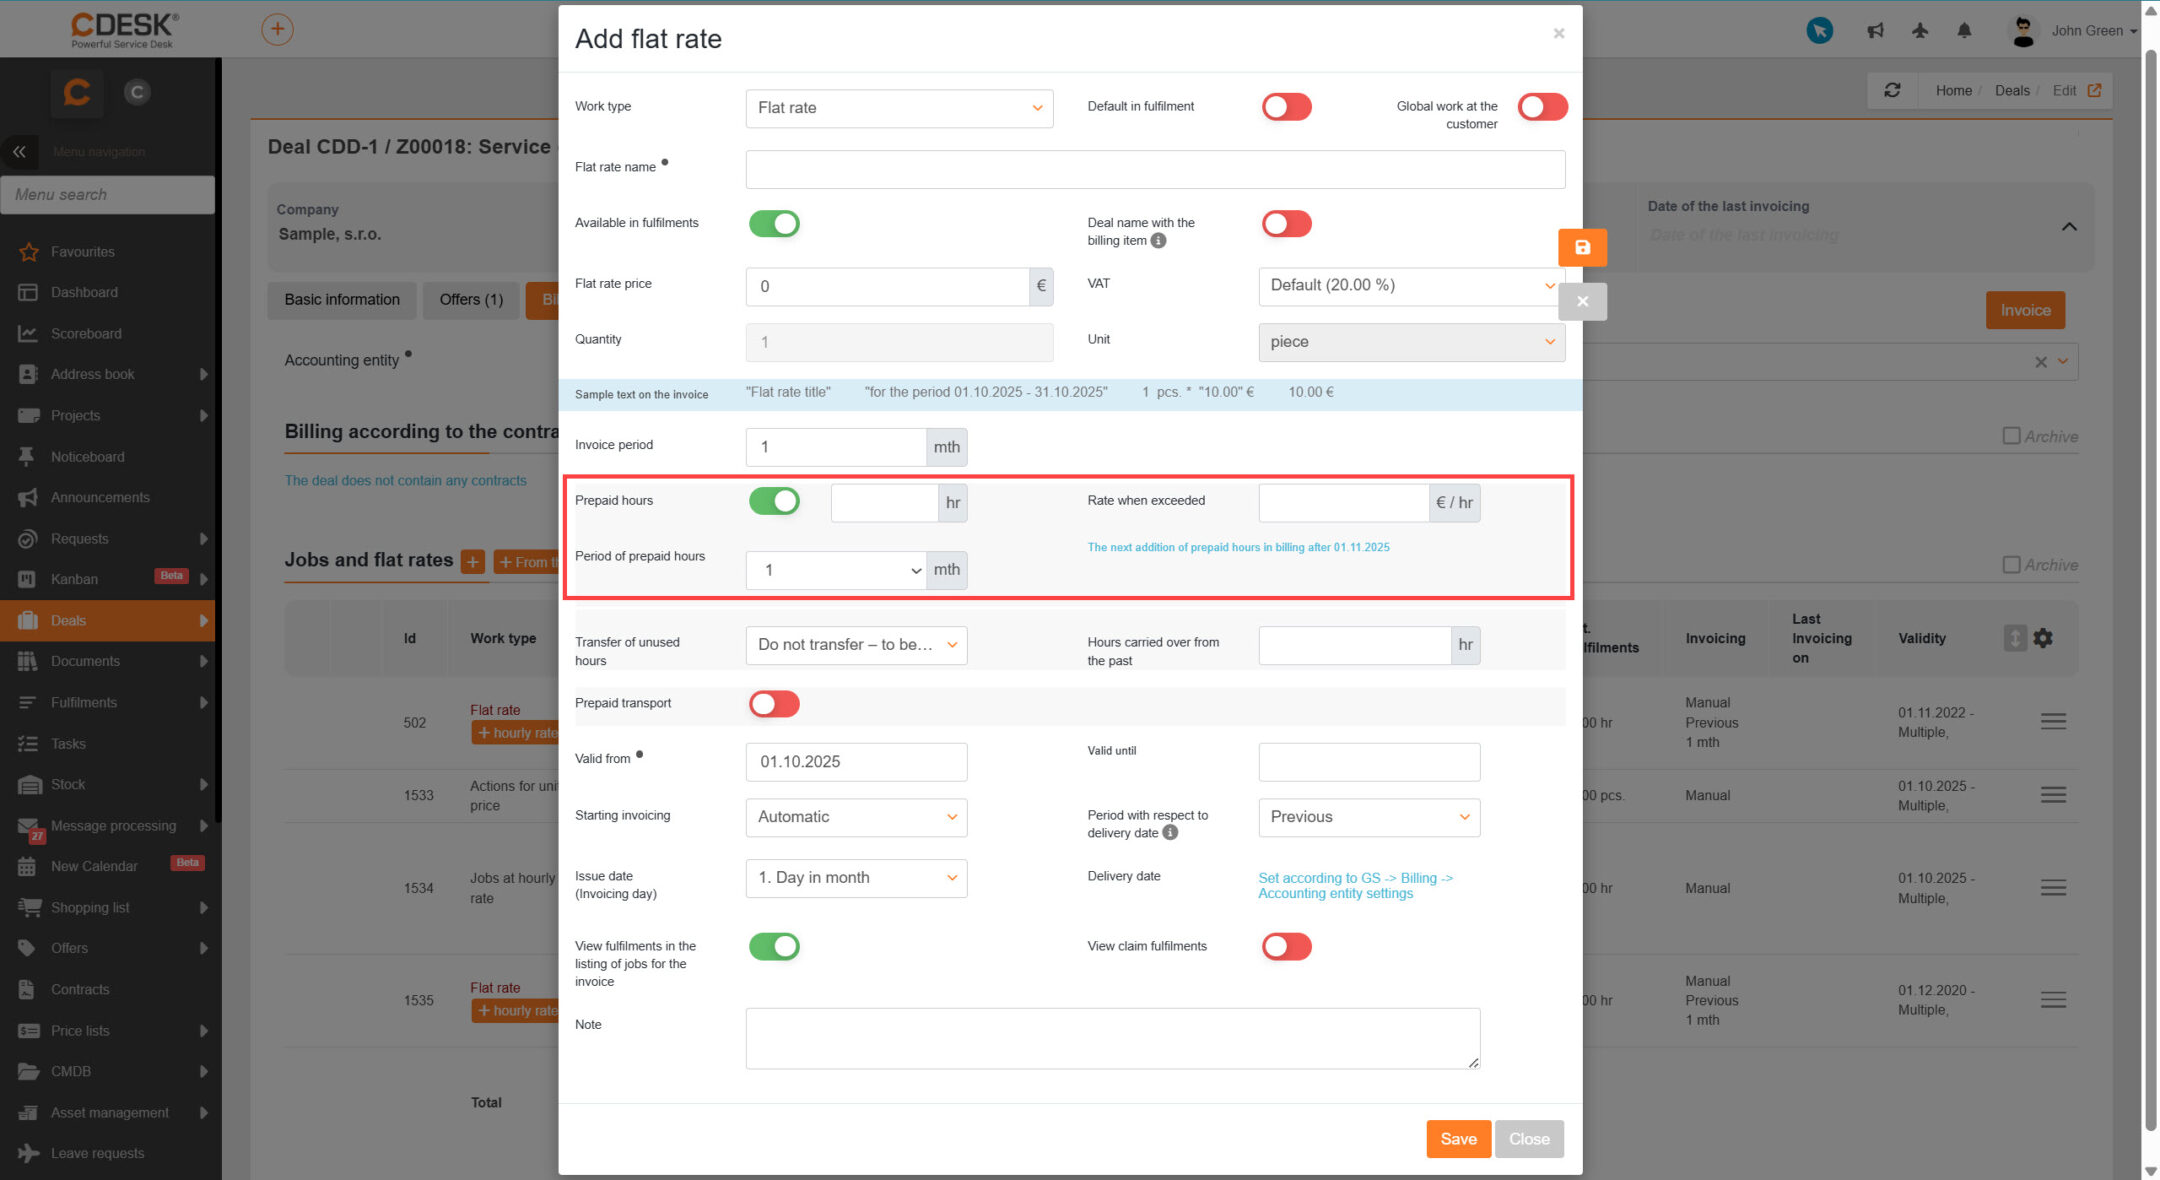
  • Prepaid hours – to create a flat rate record without prepaid hours, set the switch to the off position .
  • Billing Interval – specify the interval at which the flat rate should be billed. The numerical value is in months.
  • Prepaid Traffic – it is likely that you will not use prepaid traffic with a flat rate without prepaid hours. You can read more about prepaid traffic in the section Flat Rate with Prepaid Hours.
  • Valid from – select the date from which the flat rate will be charged and billed.
  • Valid until – select the date until which the flat rate will be charged and billed. This field is optional. If you leave the field blank, the flat rate will be charged until the end of the deal.

Explanations of other settings common to all accounting items can be found in the Common settings for accounting items section.

You can add an item to the deal using the Add button. Selecting Close closes the window without adding the item.

Flat rate with prepaid hours

You bill the customer a fixed amount at regular intervals, under which you commit to providing a certain amount of time—prepaid hours. Time worked in excess of the prepaid hours will be automatically billed at the rates you select in the billing items associated with this flat rate (see Billing Beyond Prepaid Hours at Different Rates). The system configuration allows for additional options for managing prepaid hours, such as carrying over unused hours, resetting unused hours, and more.

To create a new entry, click the + button. A new window will open. Required fields are marked with an *.

  • Job type – select the option Flat rate.

The meaning of the individual fields that appear in the window after selecting the Flat rate option is described in the text above in the Flat rate without prepaid hours section.

  • Prepaid Shipping – It is likely that, with a flat rate that includes prepaid hours, you will also agree on prepaid shipping with the customer. Setting the toggle to the “On” position will enable the fields for entering the shipping range that the customer has prepaid. It is deducted from the shipping amount specified on the fulfilments.
Image: Setting up a flat rate with prepaid shipping
  • Prepaid Distance – Enter a numerical value in kilometers if you want to track prepaid distance as part of your flat-rate plan. If the distance traveled is also recorded when performing linked tasks, the value entered for the task will be deducted from the prepaid mileage. Instructions on how to record the distance traveled on a task can be found in the Tasks section.
  • Prepaid time – enter a numerical value in kilometers if you want to record prepaid time for transportation within the flat rate. If transportation time is also recorded when performing linked tasks, the data entered for the task will be deducted from the prepaid transportation. Instructions on how to record transportation time for a task can be found in the Tasks section.
  • Prepaid fixed-rate transportation – if you record fixed-rate transportation on linked tasks, enter the available number of fixed-rate trips here. For fixed-rate transportation, neither the distance traveled nor the duration is taken into account. Instructions on how to record fixed-rate transportation on a task can be found in the Tasks section.
  • Prepaid parking fee – if you record parking fees on linked fulfilments, enter the prepaid parking fee here. Instructions on how to record the parking fee on a fulfilment can be found in the Fulfilments section.

To set up a flat rate with prepaid hours, you must enable the toggle switch in the Prepaid hours section. Once the toggle switch is set to “On” , additional fields for configuring prepaid hours will become available.

Image: Setting up a flat rate with prepaid hours
  • Prepaid hours – specify the number of prepaid hours included in the flat rate.
  • Overage rate – specify the hourly rate after prepaid hours have been exceeded.
  • Carryover of unused hours.
    • Carry over to the next period – unused hours will be carried over to the next period, giving you more prepaid hours in the next period.
    • Do not carry over, forfeit – unused hours will not be carried over to the next period. In each period, you will have the same number of prepaid hours available, regardless of whether you use them all or not.
  • Hours carried over from the past – if the customer has unused hours from the past that they want to carry over to the new plan, specify the amount. This setting is also suitable for adjustments for future billing.

For explanations of other settings that apply to all accounting entries, see the section on Common Settings for Accounting Entries.

You can add an item to the deal by clicking the Add button. Selecting Close closes the window without adding the item.

Billing for hours exceeding the prepaid allowance at different rates

If you create only the accounting item Flat Rate with Prepaid Hours, time exceeding the prepaid hours will be billed at a single rate. To bill this time at multiple rates, you must create additional accounting items under the flat rate of the type Work at an Hourly Rate. Work recorded in all accounting items belonging to the flat rate is summed chronologically during invoicing — i.e. fulfilments are sorted by time of execution, and the moment the total crosses the prepaid-hours threshold, the remaining fulfilments are invoiced according to which accounting item they belong to.

To add a new hourly-rate job to a flat-rate plan, click the + button next to the Flat Rate name. Clicking this button opens a window for entering hourly-rate jobs. The meaning of each field is described in the Hourly-Rate Jobs section.

Image: Button for adding hourly-rate work to a flat rate

After adding an hourly rate, the flat-rate line will display the symbol + hourly rate, which you can use to view all hourly-rate jobs assigned to that flat rate.

Common settings for accounting entries

Setting the default account in the fulfilment

When creating custom items, you can configure how the item will be displayed in linked forms. Use the toggles in the upper-right corner for this purpose.

  • Default in deal – if the toggle is in the on state , the item will be offered by default when entering a new fulfilment. Such an item is marked with the flag in the list of jobs and flat rates for the deal.
Image: An item that is filled in on a fulfilment by default
  • Global at the customer level – if the switch is set to On , the item will be offered in all of the customer’s fulfilment deals, regardless of the selected deal. If the switch is off , the item will be offered only in deliveries that you enter in a request or task linked to the given deal, or in a delivery entered directly in the deal.
  • Invoicing – select how the item will be invoiced:
    • Manual – the item can be invoiced from Deals → Invoicing manually, i.e., when the invoicing process is initiated by the user.
    • Automatic – the item will be invoiced automatically on the selected invoicing date of the month.
    • Automatic with confirmation – an invoice preview will be automatically generated for the item in Deals → Invoicing on the selected billing date of the month; the user will confirm the issuance of the final invoice.
    • Blocked – select this if you do not wish to invoice the accounting item during the next billing cycle.
  • Note – note for the item. It will not appear on the invoice or anywhere else in the CDESK system.

Invoicing of Materials

Invoicing includes stock issue slips that were added directly to the deal. Stock documents added to a fulfilment linked to a task or request associated with the deal are not included in invoicing.

You can add the material for posting in the Stock documents section. To create a new item, click the + button. To select from existing stock movements, use the > button.

Adding a new stock document – issue slip

To add a new stock document, click the + button. This will open a form for entering the parameters of the stock movement. The meaning of each field is described in the Stock documents section.

Image: Adding a new stock movement for an deal

To add a new stock movement to an deal, click the Create button. Selecting Back closes the window without adding a new item.

Adding from existing stock movements

To add an existing stock movement to an deal, click the button >. This will open a window for selecting stock movements available to the customer specified in the deal.

Figure: Selection of existing stock movements

You can select stock documents from the list by clicking the checkbox . Add the selected stock documents to the deal by clicking the Add selected button, located in the lower-right corner. Clicking the Cancel button closes the window and none of the selected items will be added to the deal. You can expand the offered list with additional items using the +New issue slip button. After clicking, a form for adding a new issue slip will open. The meaning of each field is described in the Inventory Documents text.

Creating an invoice

To create an invoice from an deal, go to the module Invoices, which is located under the module Deals. If the module is not in the menu, check the relevant permissions. You can set permissions to access the module at Users and Groups →Usersspecific user→ tab PermissionsDeals →Invoicing.

Selecting an deal for invoicing

The Invoicing section contains a list of invoices issued for approval (provided that you have selected “Automatic Invoicing with Confirmation” in Accounting), followed by a list of deals containing items ready for manual invoicing (i.e., those for which you have selected “Manual Invoicing” in Accounting). If you wish to review or edit an deal before invoicing, use the “” icon, which will redirect you to the selected deal in the “” tab under “Accounting” ().

Above the list, you may see invoices awaiting confirmation. These are marked with the DRAFT flag. You can delete all drafts at once using the Delete all draft invoices button.

Image: Deal Invoicing

To proceed with invoicing the prepared draft, click the “” icon located at the end of the row. A new window will then open for configuring the invoice.

If there are no drafts in the list or if you want to invoice a different deal or deals, select them in the list by clicking . After selecting them, click the Invoice selected button in the upper left corner. A window for setting the invoice date will then open. After setting the date, click the Invoice preview button. Selecting Close closes the window without creating an invoice preview.

Image: Window for setting the invoicing date

Adjusting the selection of fulfilments and product items for invoicing

The invoicing preview displays a list of accounting and product items for the deal and their associated fulfilments. Each item’s row includes an icon + to view details. For labor or flat rates, the fulfilments linked to that item are displayed.

Image: List of pending invoices

All items on the draft invoice, including fulfilments under accounting items, have a checkmark icon on the right side of the line. If you do not want a particular item to be billed, click to remove the checkmark.

Image: Unmarked items will not be billed

Export invoice preview

In the row with the deal name, there is a context menu with functions for creating various XLS reports. To export an invoice preview, select the Export invoice preview option.

Image: Button for exporting an invoice preview
Image: Export invoice preview

Export of flat-rate usage

In the row with the deal name, there is a context menu with functions for creating various XLS reports. To export an invoice attachment, select the Export flat-rate usage option.

Image: Button for exporting flat-rate usage
Figure: Export of flat-rate usage

Export invoiced fulfilments from the invoice preview

In the row with the deal name, there is a context menu with functions for creating various XLS reports. To export fulfilments to an invoice, select the Export invoice line items option.

Image: Button for exporting fulfilments to an invoice
Image: Exporting invoice fulfilments

Issuing an invoice

After creating a draft invoice and editing the items you want to invoice, you can begin creating the invoice. You can create the invoice from the draft-invoice preview using the Create tax documents button, located in the lower right corner below the list. After clicking, you will be redirected to the list of issued invoices. Find the invoice in the list. After opening it, the invoice form will appear. The meaning of each field is described in the text Invoicing.

Image: Button for creating tax documents

You can delete a draft invoice by clicking the Cancel draft invoices button, which is located in the lower-left corner of the list of draft invoices. After clicking it, you will return to the list in the Invoicing module. If you select the Back to invoicing option on a draft invoice, you will also return to the list in the Invoicing module, and a draft will be created from the draft invoice.