
Beta verzia novej dokumentácie.

General Settings

After enabling the Asset Management module in the global settings using the toggle switch and reloading the page, the Asset Management module will appear in the navigation menu. If the module does not appear in the navigation menu, you need to check the user’s permissions in the Users and Groups → Users → select a specific user → Permissions tab → Asset Management section.

After enabling the module, additional settings will be displayed. The module settings are divided into 5 sections –

  • General,
  • Inventory Orders,
  • Items from the Configuration Database,
  • Inventory Statuses,
  • Handover protocols.

All changes in this section require saving the settings to take effect in the system.

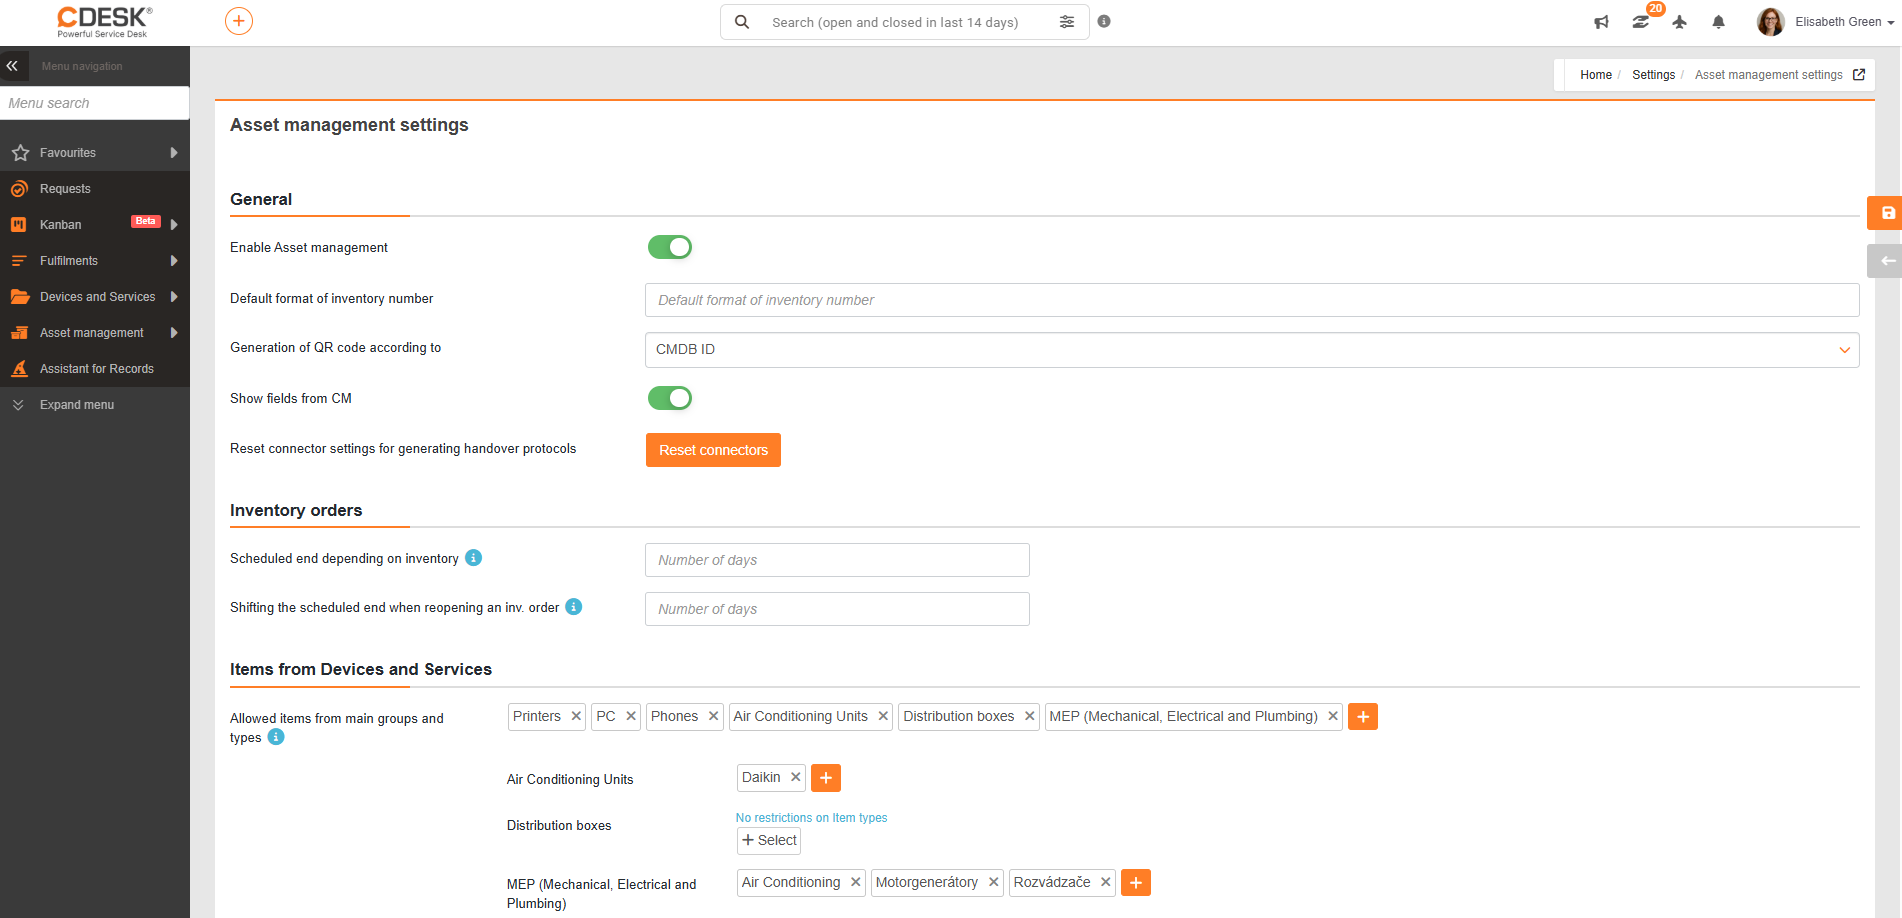
Figure: Global Settings for Asset Tracking

General

In the section General Settings, you can find the following settings:

  • Enable the Asset Tracking module – disabled by default; this setting must be enabled to use the Asset Tracking module. Only after enabling this toggle will the other configuration options appear. To display the module in the navigation menu, you must save the settings and reload the page.
  • Default inventory number format – used to set the inventory numbering format. You must enter the first inventory number to be used for all items in the asset list. The inventory number will be automatically assigned to all items that do not have their own defined inventory number format, and where no inventory number format is defined at the item type level either. A minimum of 2 and a maximum of 5 uppercase letters must be used, followed by at least 4 digits. No other characters are allowed between the letters and digits. The maximum string length is 18 characters.
  • Generating a QR code based on – selection options are based on Inventory Number or CMDB ID. The generated code will be unique for each item, will be displayed when the item is opened, and can be used for scanning in the mobile asset management app.
  • Display fields from CM (Customer Monitor) – enabled by default – data available from the Customer Monitor tool will be displayed in the asset item parameters via an existing connection to CM.
  • Reset connector settings for generating handover reports – after activating the asset tracking module, the system automatically creates the connectors NETRGRIF, which are used to print handover reports. The user can change their settings in the global settings. The settings will be reset to their original values for generating handover protocols. After clicking the Reset connectors button, you must Confirm.

Inventory Orders

  • Scheduled end date based on the inventory – option to specify the number of days by which inventory orders should be completed before the entire inventory is finished. If a scheduled end date is selected for the inventory, the specified number of days is subtracted from it and applied to all inventory orders.
  • Shift of planned end when reopening an inventory order – applies to both the planned end of the inventory and the reopened inventory order. Option to specify the number of days by which the end of the inventory is postponed, as well as the date on the inventory order.

Items from the configuration database

  • Allowed items from the main groups and types – used to select groups and item types defined in the module Configuration Database, which can be recorded in the asset list. If no group or type is selected, all items are allowed. Additionally, item types that are in the configuration database and have the setting Add to asset register enabled will be automatically added to this setting. Only created groups from the following categories are available for selection: Equipment, IT Monitoring, Vehicles, and General Category. By selecting from the top row, you can choose groups that will be displayed below, and then select item types. If a type is not included in any group, you must add the option “” in the group selection without assigning it to the “” group. Use the “” and “” buttons to add groups and types. All existing items of a given type will be automatically transferred to the asset list upon activation.

Record statuses

Asset register statuses represent the current status of an asset register item at a given point in its lifecycle (e.g., In use – unassigned, On loan, Disposed of).

The status code list defines the list of all statuses that can be selected for an asset record item. New statuses are added using the + Add button. Saved statuses can only be disabled in the “” column under “Status”; they cannot be deleted. Some preset basic statuses cannot be disabled. Items that had a status selected before the status was disabled will remain in that status. In the column Default, you can select one column that will be designated as the default for newly created items in the database.

The order of statuses can be easily changed using the button and by dragging them up or down. When entering a name, different language versions can be entered depending on the environment configuration. The status name can be changed by clicking on the name and then overwriting it.

Handover protocols

  • Set the serial number range for handover protocols starting January 1, yyyy – allows you to plan the serial number range for handover protocols in the new year
  • Send a copy of the signed handover protocol – allows you to add users to whom a copy of the handover protocol should be sent. The first user is selected by clicking the +Select button, and additional users are selected using the + button.