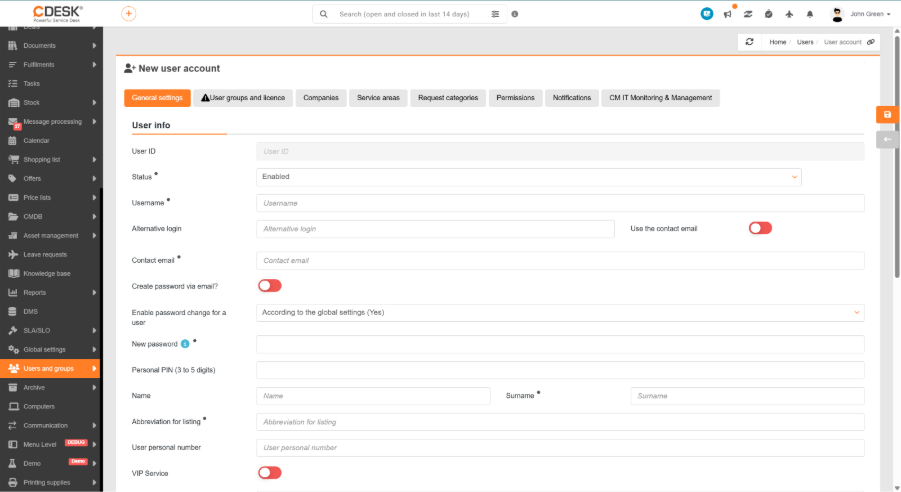
This section of the documentation explains the purpose of the fields and settings on the individual tabs of the user account. The ‘General Settings’ and ‘User Groups and Licence’ tabs are completed when the account is created, and the required fields are selected with the relevant symbol. The other tabs are used to configure what the user is permitted to do within the system and the range of data they can access – individual authorizations, supervisors and subordinates, visibility of companies, branches, request service areas and request categories, notifications, entitlement to leaves, cover arrangements and more. Separate tabs display the history of changes to the account and its links within the system.
Which tabs and fields are viewed depends on the account type, environment configuration and permissions, so some of them may not be available for every account. Furthermore, some tabs are only viewed once the account has been created, as they are linked to an existing record. All settings can be adjusted at any time to reflect changes in the user’s role.
General user settings
The home tab, which is also the most frequently used one, where you enter the basic details required to create a user account – personal identification details, login and password, and contact details. It is not possible to create an account without filling in these details, as it is precisely on the basis of these that the system uniquely identifies the user, allows them to log in and views them in other modules. Additional account settings, such as signatures for discussions, are also available on this tab. The individual fields are organised into separate groups according to their purpose.
User information
- User ID – an identification number generated automatically by the system for each user.
- Status – indicates whether the user account is active. A disabled account remains on the list of users, but the user cannot perform any actions or log in to the system. The account of the environment’s main administrator cannot be disabled.
- Username – a unique account name, which is also used to log in. The username must be at least 2 and no more than 50 characters long; it may only contain letters without diacritics, numerals, spaces and underscores. The username you have entered is valid if the symbol ‘
‘ is viewed at the end of the line.
- Alternative login – an optional second login, which must also meet the following conditions: the login must be at least 2 characters long and may only contain letters, numbers, a space, a hyphen, an underscore, full stop, comma and the @ symbol.
- Apply contact email – when enabled, the account’s contact email will be used as the alternative login.
- Contact email – the address for notifications and account recovery.
- Create a password via email – this option is only displayed when creating a new account. Instead of entering a password, the user will receive an email with settings to set one up.
- Allow user to change password – determines whether the user is permitted to change their password themselves.
- New password and Confirm new password – account password settings. If password strength checking is enabled, the password must be at least 8 characters long and include a number and both upper- and lower-case letters.
- Personal PIN (3 to 5 digits) – a PIN for use in the phone app.
- First name and Surname – the person’s first name and surname as viewed in the system.
- Short name – a shortened user identifier. It appears in statements, reports, emails and summaries.
- Personal number – a unique personal account number in the format set in Global Settings → Users.
- VIP Service – selects the account as VIP.
- Phone and Phone – the person’s contact details. The phone number is also used for SMS notifications.
- External ID – the account identifier in an external system. For accounts synchronised from external systems (AD/LDAP, Entra ID), a unique identifier (e.g. ObjectGUID) is received here.
- Automatic logout after (min) – the quantity of minutes of inactivity after which the system automatically logs the user out.
- Job title – selection of a role from the job title selection list. The selection list can be edited under Global settings → Job titles → Defining job titles.
- Default module to view after login – the module that opens for the user after they log in to the system.
- Google account email for sync – the email address used to sync the account with a Google account. It is also possible to apply the account’s contact email (the ‘Sign in with Google – apply contact email’ toggle).
- Entra ID email address for sync – the email address applied to sync the account with Microsoft Entra ID. It is also possible to apply the account’s contact email address (toggle switch: ‘Sign-in via MS Entra ID – apply contact email’).
- Enforce sign-in via an identity verification service – when this toggle is enabled, the account may only sign in via external authentication (Entra ID or Google), not using a username and password.
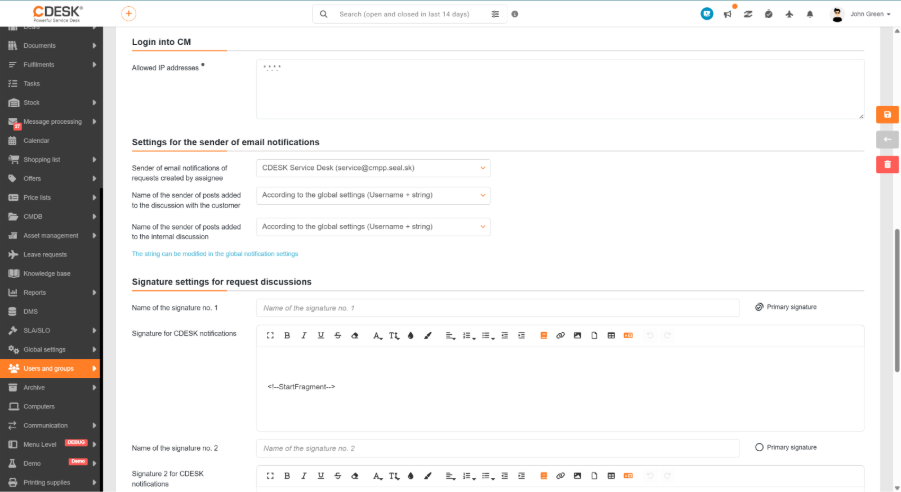
Logging in to CM
- Permitted IP addresses – a list of IP addresses from which the account is permitted to log in to the IT monitoring system (C-Monitor).
Settings for the sender of email notifications
- Sender of email notifications for requests created by the assignee – the sender’s name in notifications regarding requests created by this assignee.
- Sender name for discussion posts sent to customers – the sender’s name in discussion posts sent to customers.
- Sender’s name for posts added to internal discussions – the sender’s name for posts in internal discussions.
Signature settings for request discussions
- Signature name no. 1 – the signature name added to discussion posts relating to requests. You can set a primary and secondary signature and select one of them as the primary.
- Signature for CDESK notifications – the signature text added to discussion posts relating to requests.
- Signature name no. 2 – the signature name added to discussion posts regarding requests. You can set a primary and secondary signature and select one of them as primary.
- Signature 2 for notifications from CDESK – the signature text added to discussion posts relating to requests.
- Operator signature by PIN – the signature applied for answers submitted via PIN.
EasyClick settings (for EasyClick accounts only)
- Filter the list of EasyClick requests retrieved from the PC – a pre-set filter that determines which requests are viewed by the account in the EasyClick application.
- Pairing an EasyClick account with a customer account – once enabled, the CDESK login name must be the same as the operating system username (without the domain). The account also requires authorization to access other users’ requests.
Signature for print reports
- Signature – an image of the user’s signature that is inserted into print reports, such as work orders. Settings are only available for existing accounts.
Technical settings
- Windows login – the user’s login name in the operating system. If you enter your Windows login, you will be able to log in to CM automatically by double-clicking the C-Monitor icon (this only works with a C-Monitor technical licence; with a user licence, the EasyClick feature is required). This field is only viewed for accounts with access to CM.
Custom fields
Custom fields assigned in the Global Settings → Users section. They are filled in in the same way as standard form fields and are used to record data specific to your organisation.
User groups and licences
This tab is used to specify which groups an account belongs to, and thus which permissions it inherits. To assign a user to a group, select the required group (or groups) from the list of available user groups on this tab. Once saved, the account immediately takes the permissions of all assigned groups; removing a group will result in the loss of the corresponding permissions taken over by the account. You can include a user in system groups (such as Operators, Assignees or Clients) or in groups you have created yourself – information on creating and working with groups can be found in the Groups section of the documentation.
Please note: The environment’s main administrator account cannot be deactivated or deleted, and permission restrictions do not apply to it — it always has full access.
The same tab also displays the user’s licence and selects whether the user’s work is invoiced. The system automatically determines the licence level based on the number of advanced modules in which the account has authorization to create and edit data (perform actions within them). Authorizations relating solely to the visibility of data do not affect the licence – the decisive factors are the rights to add, edit and delete. Detailed information on licences, how they are calculated and how they can be managed can be found in a separate article on licences.
Companies
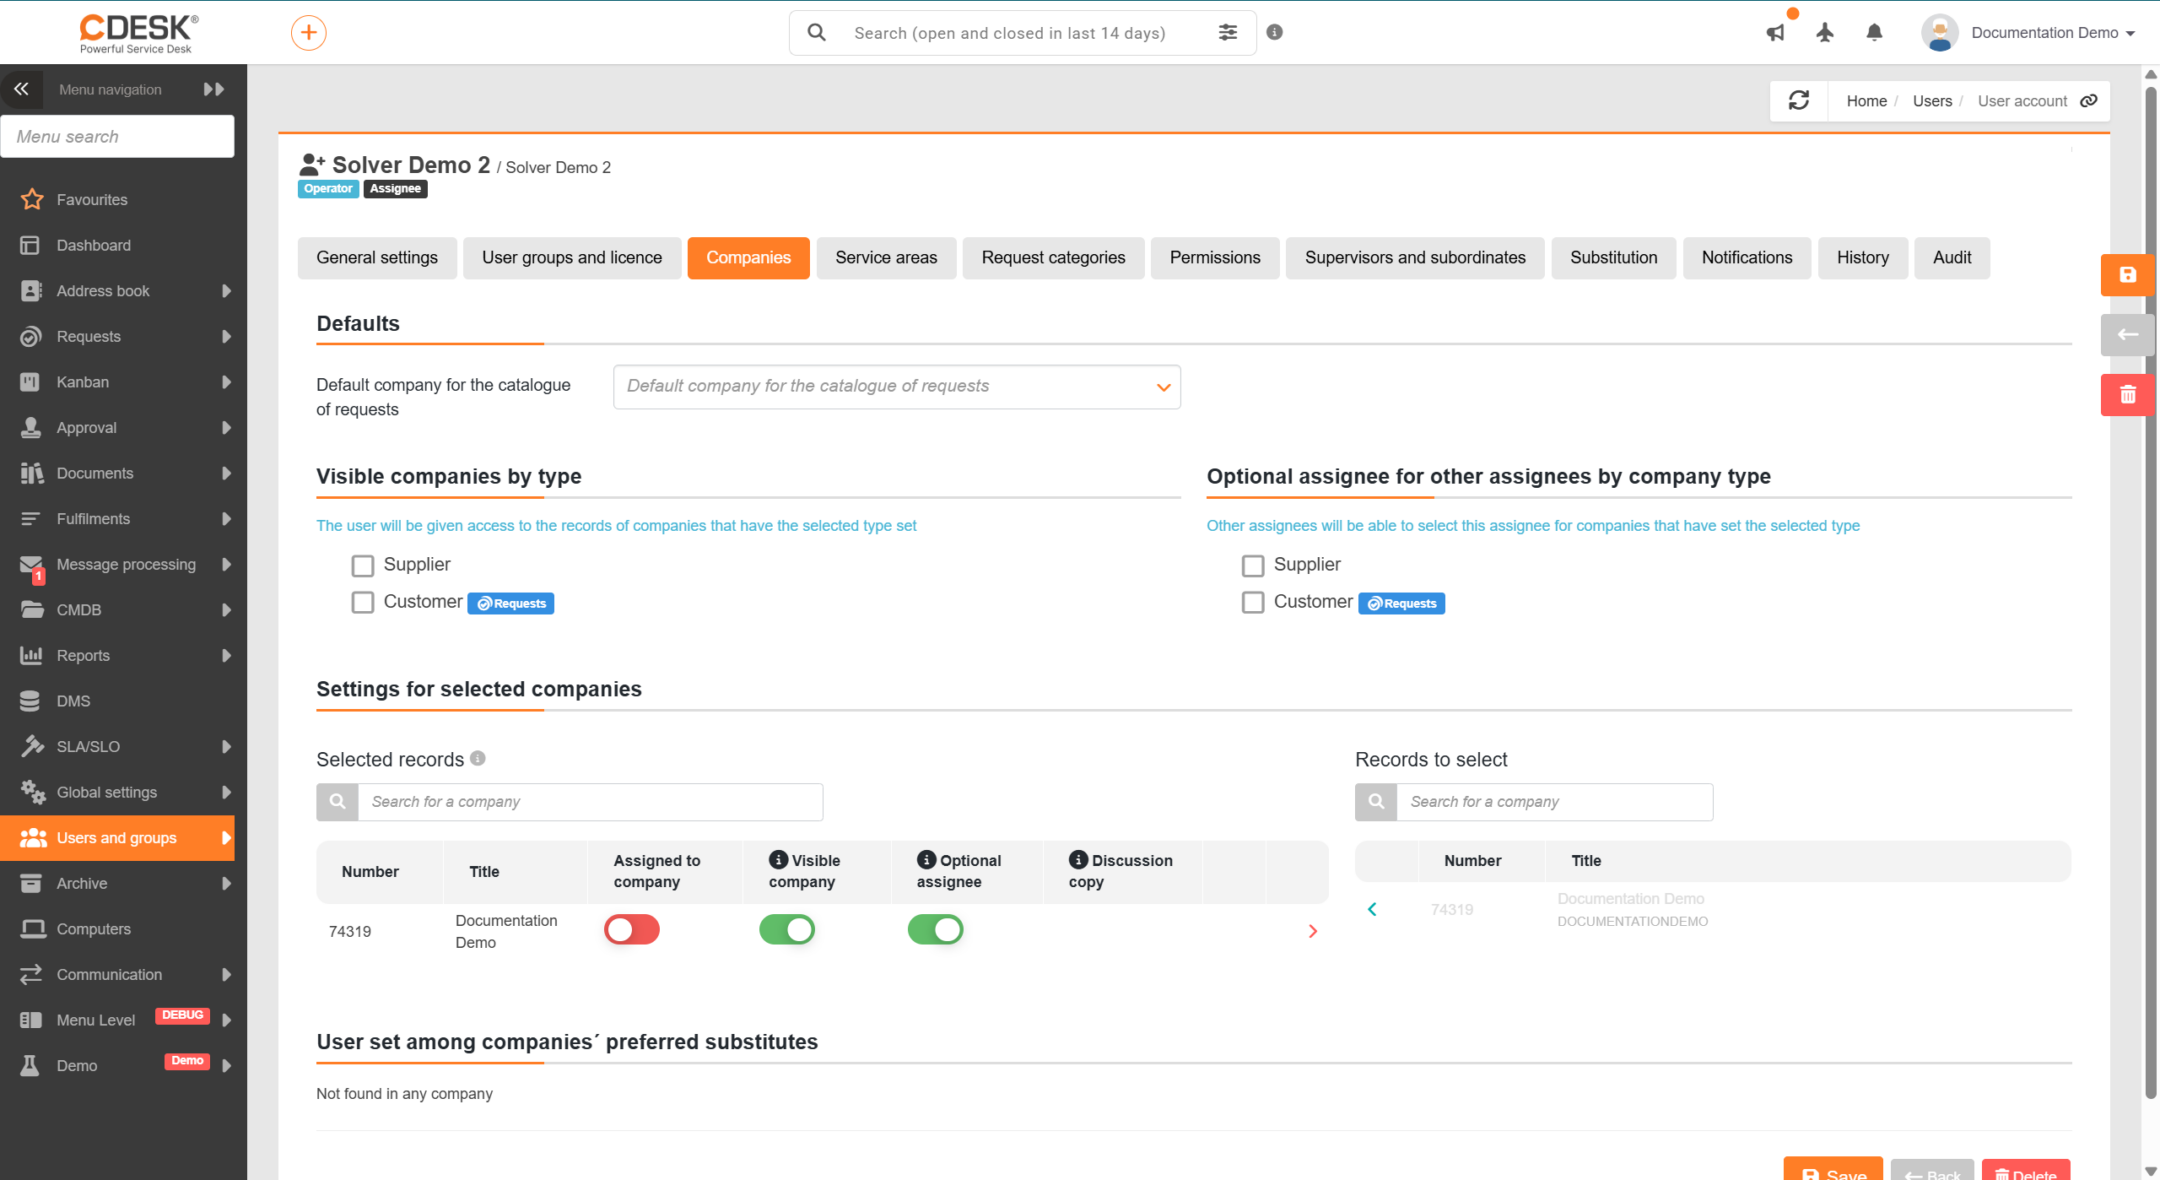
This tab is used to configure the account’s relationship with individual companies. First, add the company to the list of selected companies and then set the individual toggles for it. Each toggle has a different meaning and they are not interchangeable:
- Assigned to company – indicates the account’s link to the relevant company. For Customer and EasyClick accounts, this is a mandatory link, based on which the system determines which accounts belong to the company.
- Visible company – makes the records of the given company accessible to the account. These settings determine the visibility of the data.
- Optional assignee – the account is offered to other assignees in the assignee selection fields for the relevant company. This does not determine access to the company’s records, but rather the content of the selection fields. The toggle is available to operators and assignees. The order in which assignees are listed on the record can be managed via Company → the Assignees tab.
Once a company has been added to the list of selected companies, some options are preset according to the account type. For operators and assignees, ‘Company Visible’ and ‘Optional Assignee’ are enabled; ‘Assignment’ remains disabled and must be enabled separately. For customer and EasyClick accounts, ‘Visible company’ and ‘Assigned to company’ will be enabled. The default settings can be changed as required.
The toggles are linked. Selecting the ‘Assigned to company’ option automatically enables ‘Visible company’ and, for operators and solvers, ‘Optional solver’ as well. When assignment is enabled, the ‘Company Visible’ and ‘Optional Solver’ options cannot be disabled. However, the reverse is not true – a company can be visible to an account without the account being assigned to it.
Only when a company is assigned are two other settings available in the row. ‘Copy discussion’ automatically adds the account as a recipient to the discussion with the customer. ‘Block emails from CM’ suppresses the sending of emails from IT monitoring. Disabling the assignment will cancel both settings.
In addition to individual companies, settings can also be applied in bulk. The options ‘Visible companies by category’ and ‘Visible companies by type’ grant the account access to records for all companies in the specified category or type, respectively. The options ‘Optional assignee for other assignees by category’ and ‘by company type’ do not determine access to company records, but rather the content of the assignee selection fields. Individual settings for a specific company always take precedence over settings taken over by category or type.
Please note: If an account has no visible company – either directly, via a category or type, or by inheritance from a group – it will not be able to view any company records unless there is a direct relationship with that account, such as being an assignee. The exception is administrator accounts, which have access to all companies in the environment. For operator and assignee accounts, at least one of the three options must be enabled for each selected company. If none are enabled, a warning symbol will appear in the row with the note ‘At least one option must be enabled’.
Company visibility is one of the tools used in CDESK to manage access to data. The general principles governing the provision of functionalities and data – that is, how permissions, company visibility and other restrictions relate to one another – are described in the section of the documentation entitled ‘Managing Access to Data and Functions’.
For requests, company visibility is applied as one of the basic conditions for access – users primarily work with records of companies that are visible to them. The range can then be further narrowed down by request service areas, category or branch. Detailed information on managing the visibility of requests via companies and on other access conditions can be found in the ‘Permissions and Access to Requests’ section of the documentation.
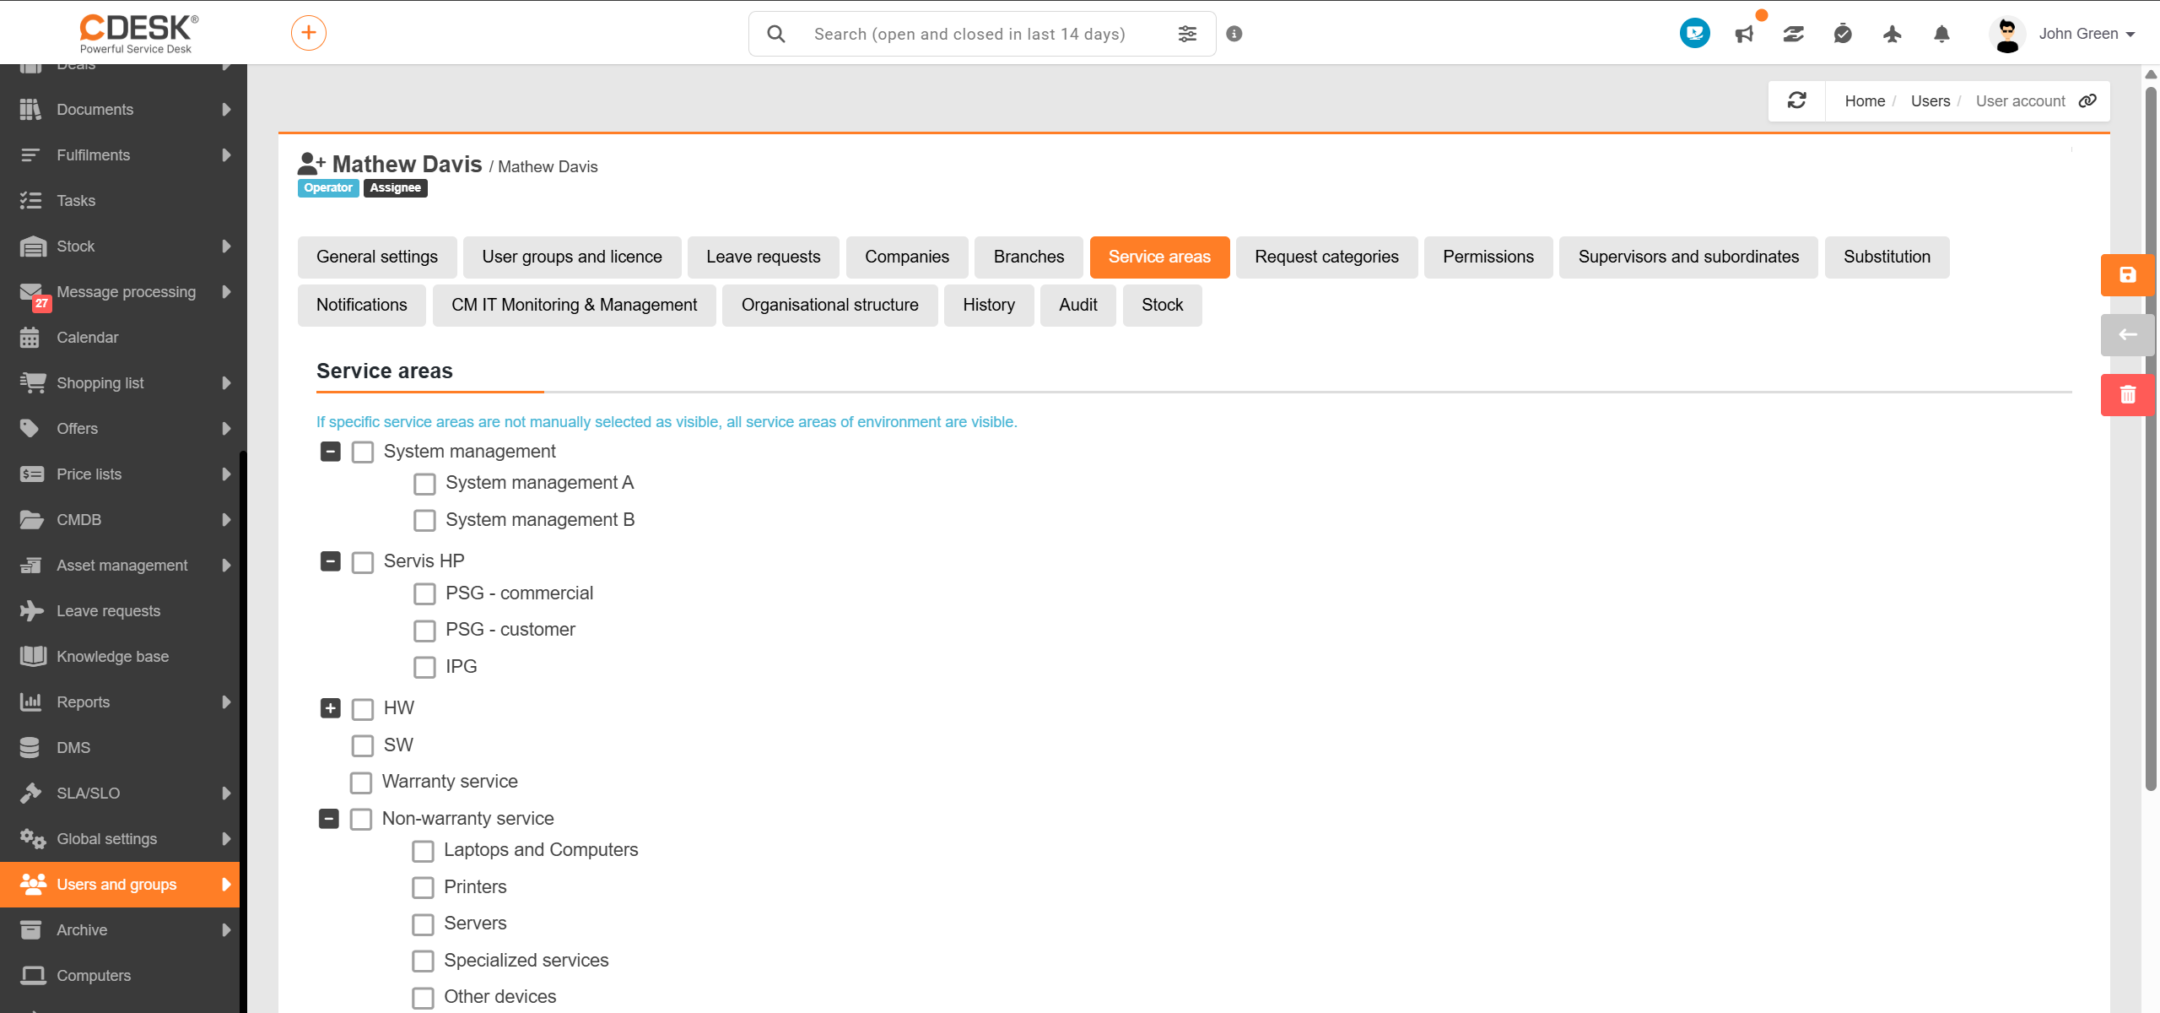
Settings for the visibility of the services field
Service fields categorise requests according to the field to which they relate, thereby enabling them to be clearly sorted and directed to the appropriate assignees. In relation to the user, they determine which fields a particular account works with – by selecting specific fields, you restrict which ones the user can see, and thus the range of requests to which they have access.
You can make a specific service field available by adding it to the selection on this tab. If you do not select any field, the user will see all service fields in the environment. Apply this tab when you want to restrict the range of the user’s work to selected service fields only. For detailed information on defining and working with service fields, see the documentation section ‘Service types, categories and fields’.
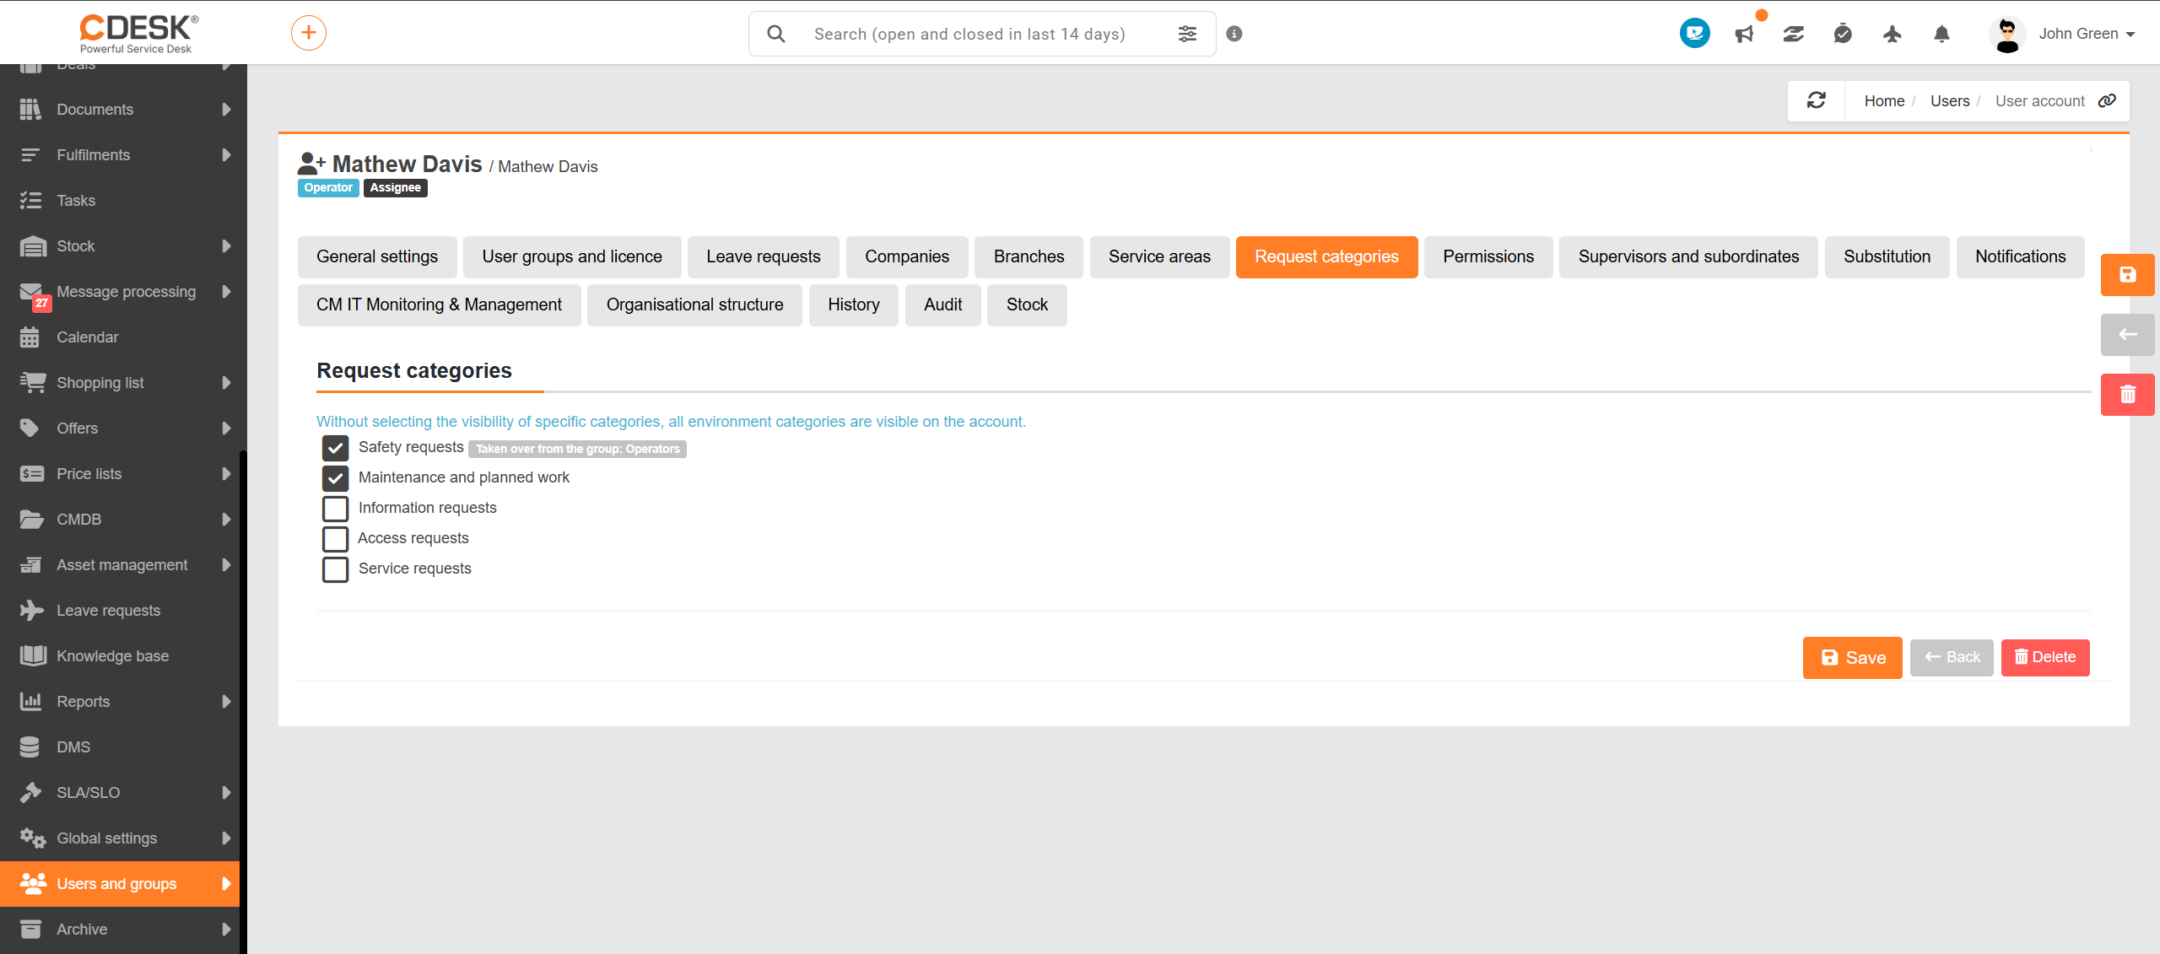
Settings for the visibility of request categories
Request categories classify requests according to their focus and thus serve to organise and evaluate them clearly. In relation to the user, they determine which categories a given account works with, and thus the range of requests the user has access to.
You can make a specific category available by adding it to the selection in this tab. If you do not select any specific category, the user will see all the categories in the environment. Detailed information on defining and working with requirement categories can be found in the ‘Types, Categories and Service Areas’ section of the documentation.
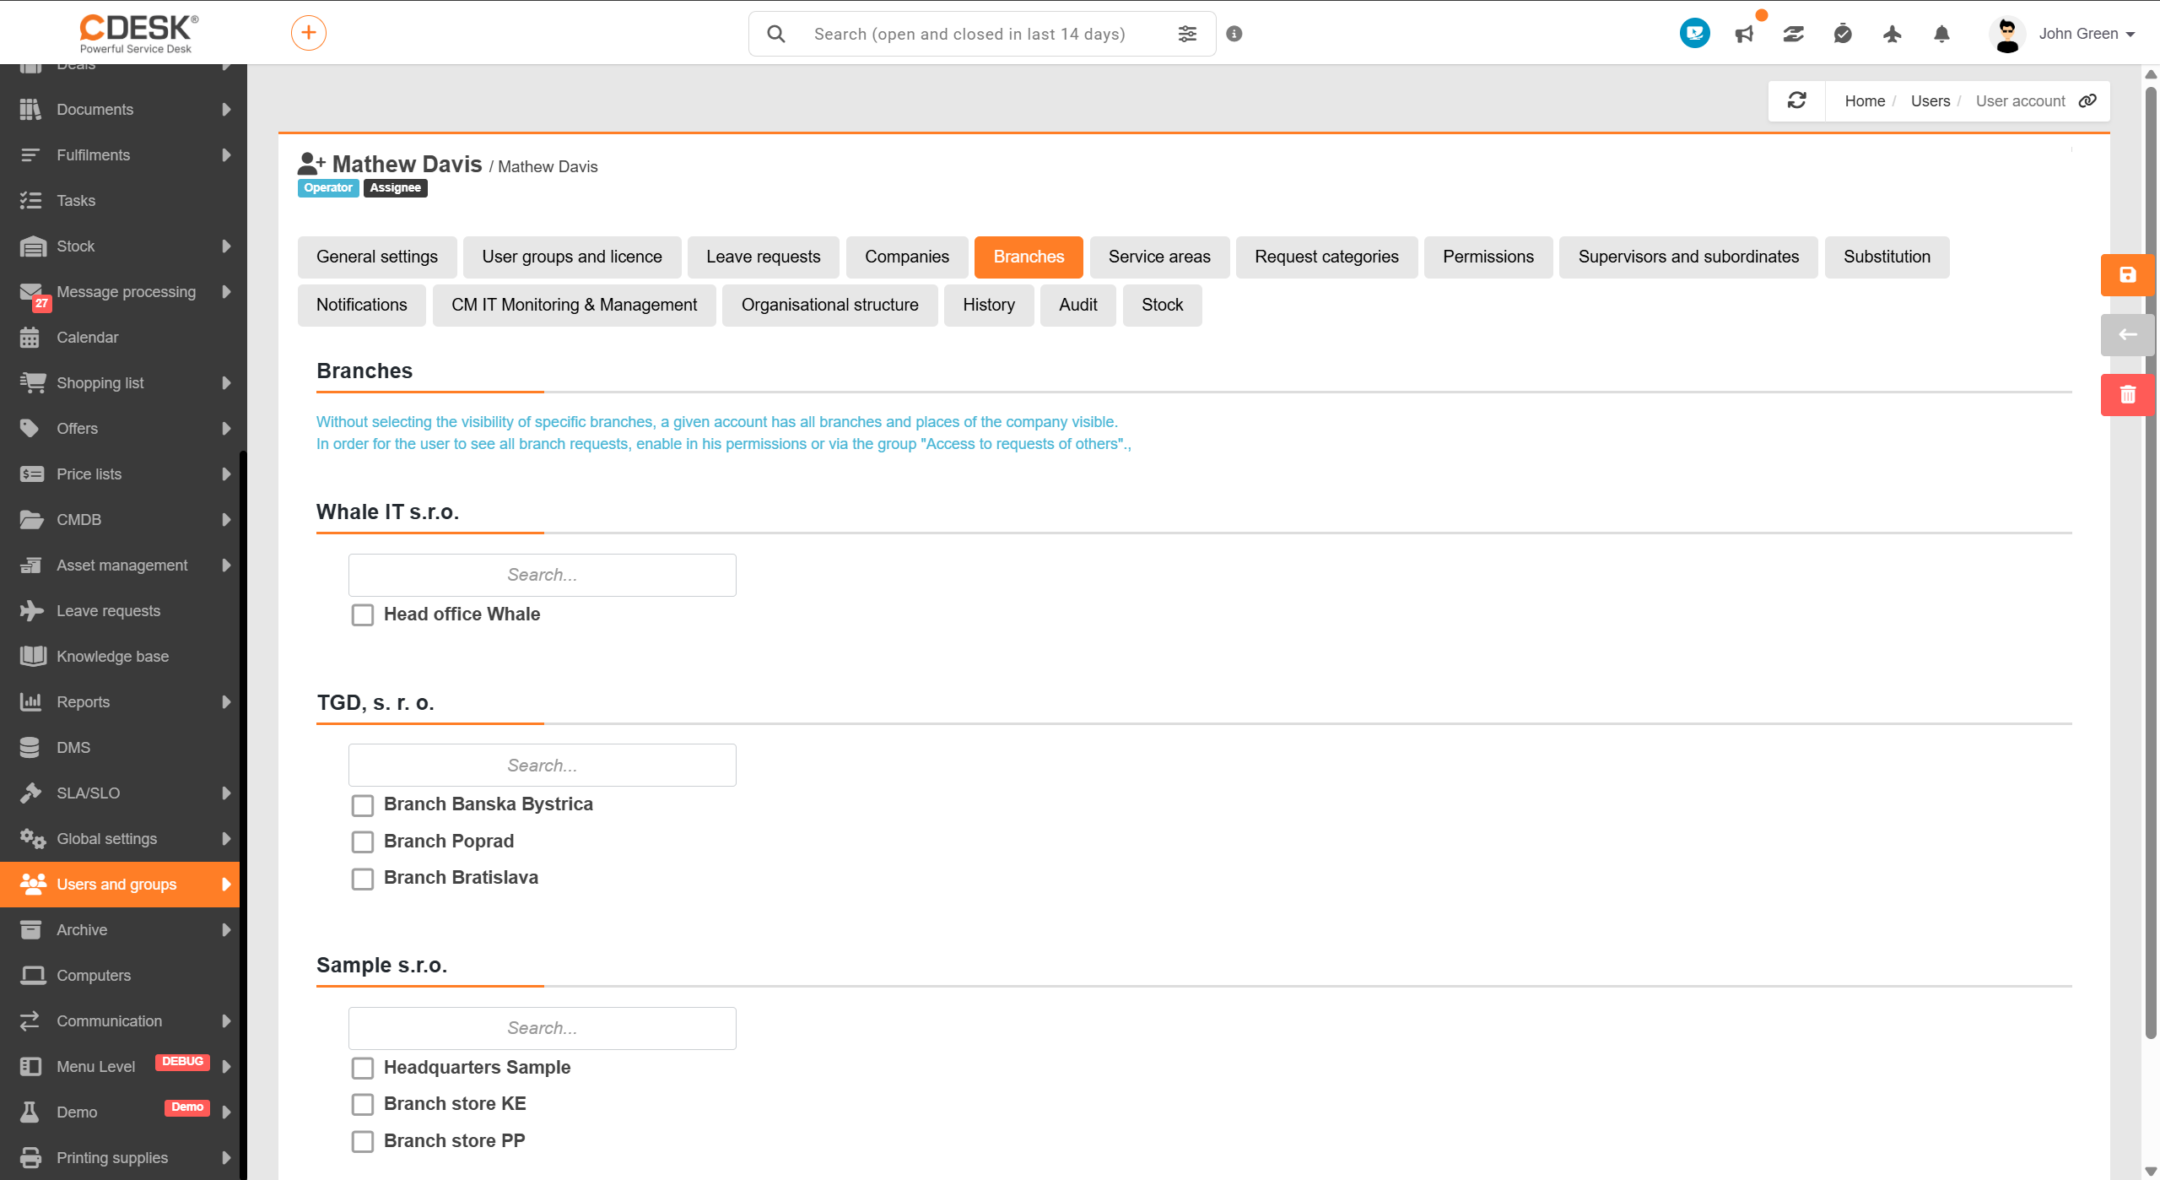
Settings for the visibility of branches and places
Branches divide the company into individual work centres and thus enable requests to be categorised more precisely. In relation to the user, they determine which branches a given account works with, and thereby the range of requests to which the user has access.
You can make a specific branch available by adding it to the selection on this tab. If you do not select a specific branch, the user will see all the branches assigned to their company. If they are also to see all requests relating to a particular branch, you must enable the relevant authorization for them – either directly on their account or via a group. Detailed information on managing access to request records based on branch and place can be found in the ‘Permissions and Access to Requests’ section of the documentation.
Note: This tab is displayed for accounts with assigned companies and is only available after the account has been saved for the first time. If your environment uses ‘places’ instead of ‘branches’, the tab is named ‘Places’ and is configured in the same way.
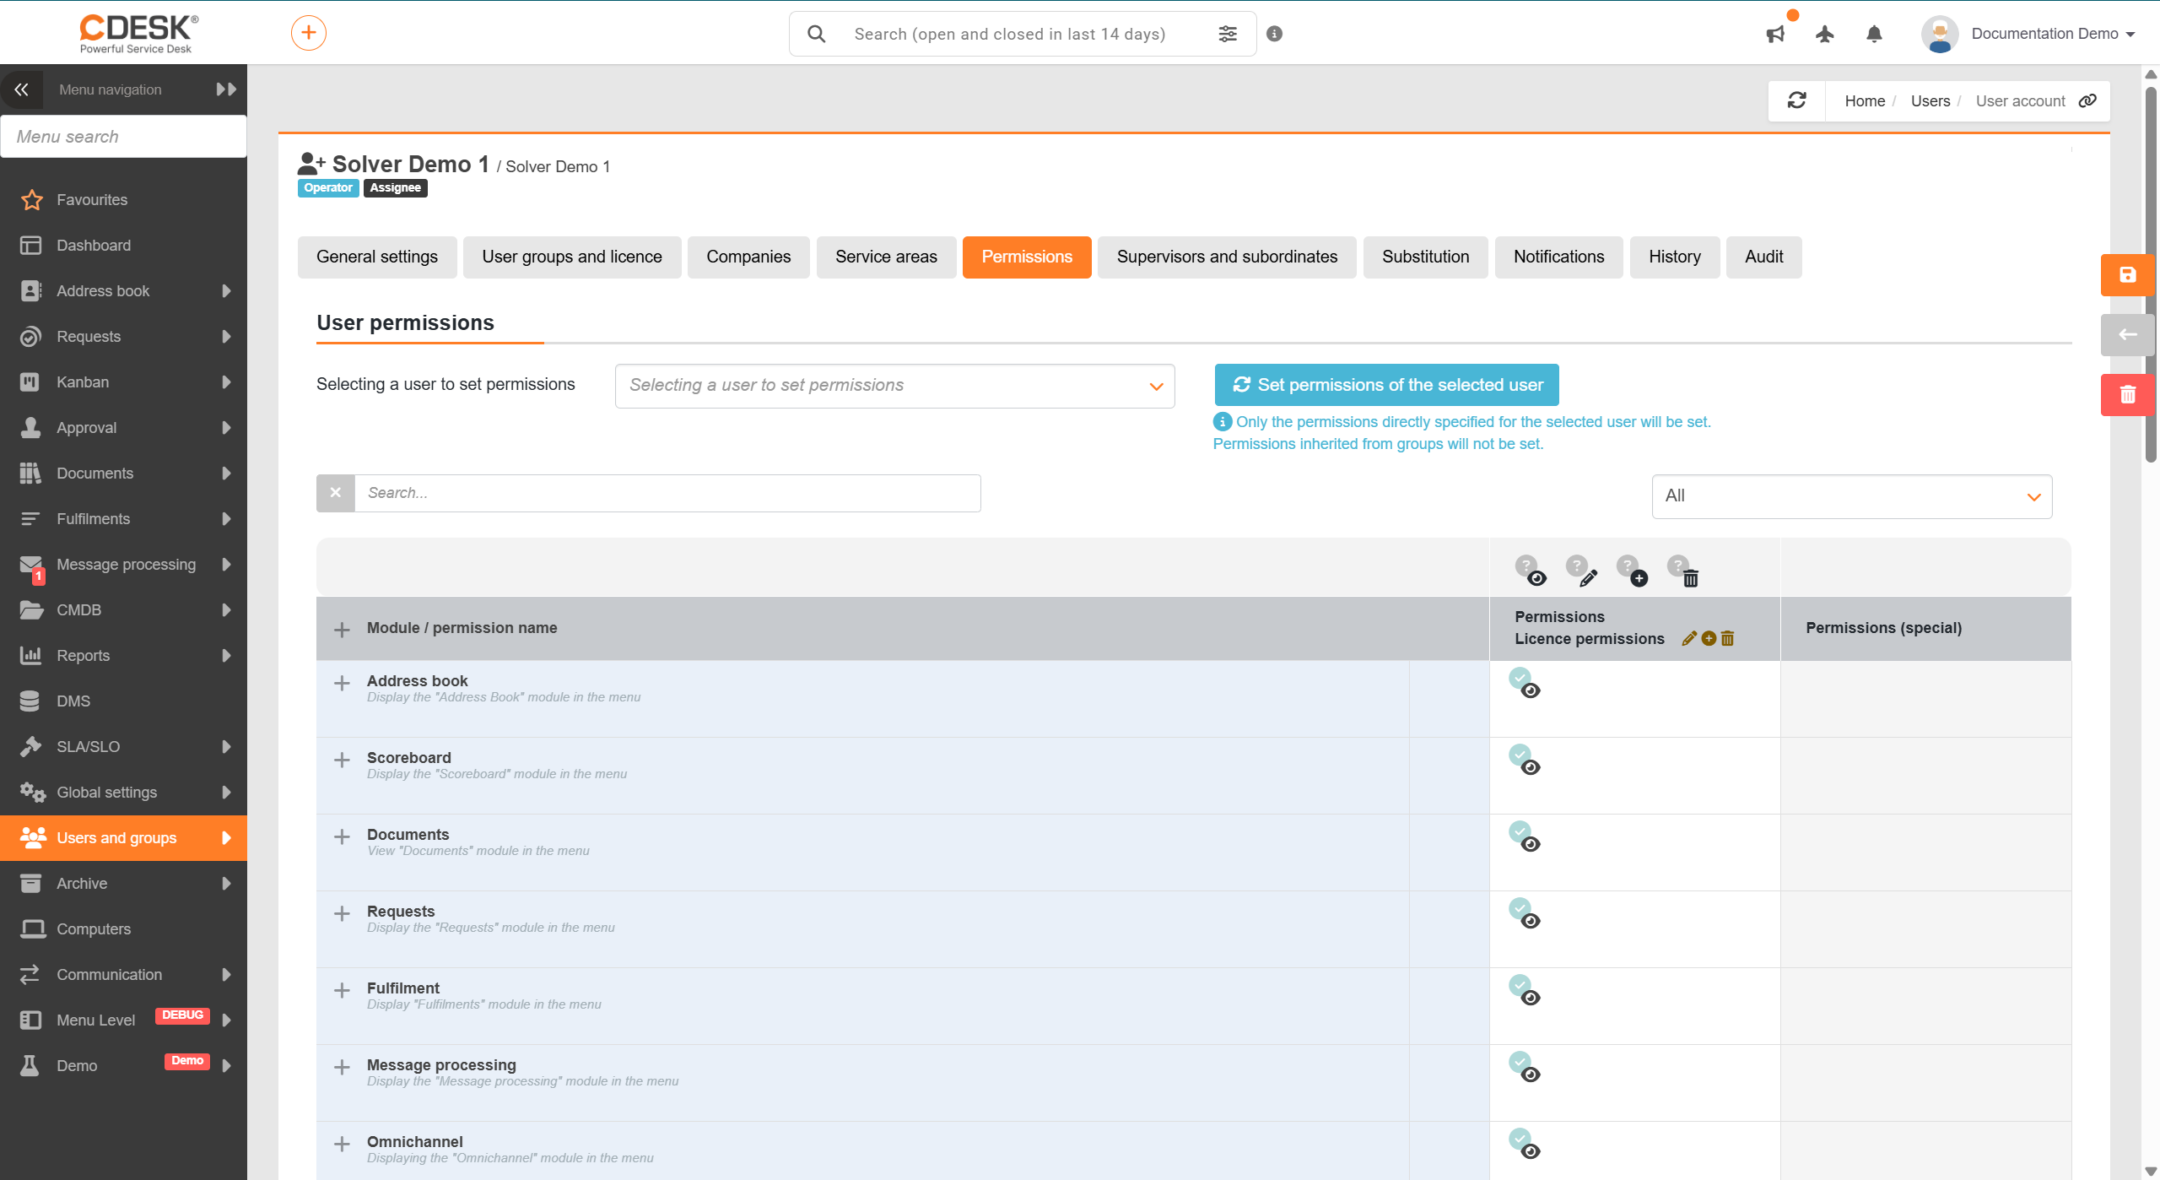
Authorizations
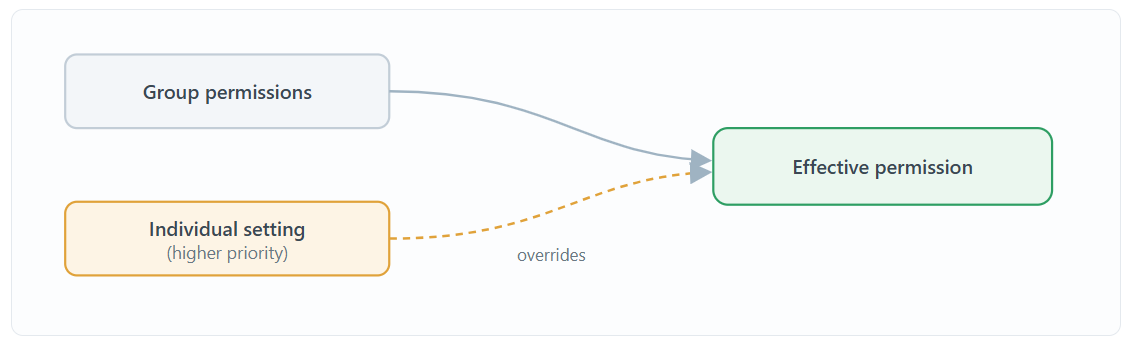
Authorizations determine which operations a user is allowed to view and perform in CDESK — for each module and record type, it is specified whether the user has access, can add, edit, delete or set permissions for others. They acquire these permissions either by taking them over from the groups to which they belong, or individually, directly within their own account.
Permissions are organised by modules and records. For each one, you can set individual levels (Access , Add
, Edit
, Delete
and Special permissions) to ‘Enabled’ or ‘Disabled’. Permissions set in this way supplement or override rights taken over from groups, with individual settings always taking precedence. The tab only becomes available after the account has been saved for the first time.
Identification of supervisors and subordinates
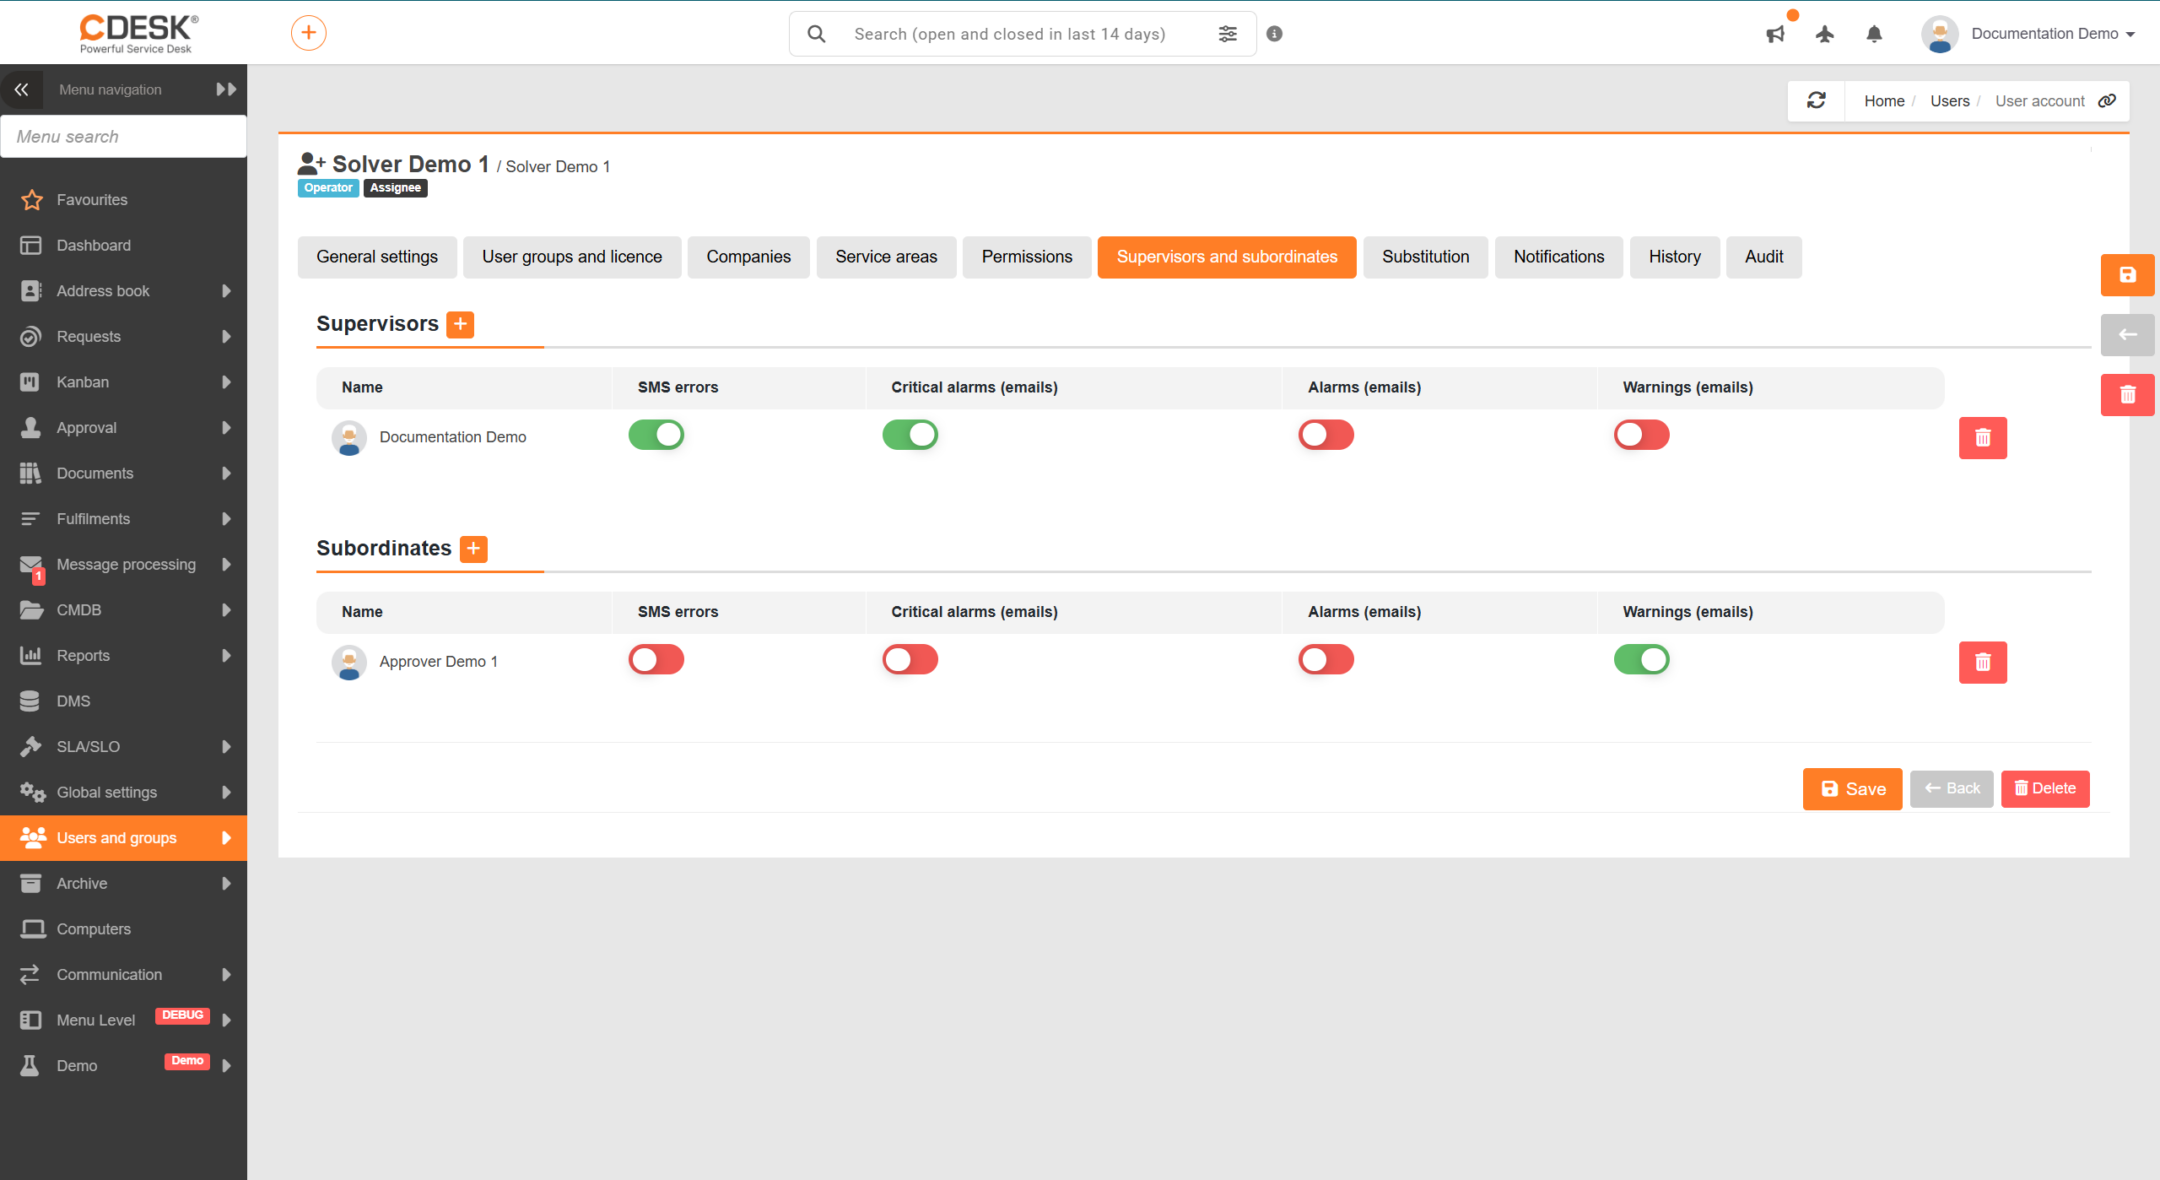
The ‘Supervisors and Subordinates’ tab is used to map the organisational hierarchy within CDESK – it specifies who is a supervisor to a given user and which users are their subordinates. The system utilises these relationships primarily during the approval process, when a record is forwarded to a supervisor for approval, and when notifying users of important events, such as alarms and notices about errors. At the same time, the supervisor gains an overview of which users fall under their responsibility.
To add a supervisor, click the ‘‘ button in the ‘Supervisors’ section and select a user. Similarly, in the ‘Subordinates’ section, you can add subordinates by clicking the ‘
‘ button. To delete an added record, click the ‘
‘ button in the relevant row. In addition to assigning roles, you can specify here who receives the various types of notices – SMS failure reports, common and critical alarms (by email) and warnings (by email). Accounts in the EasyClick group do not have access to supervisor and child settings.
Supervisors do not need to be entered manually; they can be imported automatically via synchronisation from AD/LDAP or Microsoft Entra ID. In the connector settings in CDESK, under ‘Assigning a supervisor to a user‘, enter the attribute under which the supervisor is listed in the address book (for example, ‘manager’). Only the supervisor is synchronised; supervisors from the same relationship are derived automatically.
Please note: Relationships are recalculated during each synchronisation, with links being not only added but also removed. Links entered manually in CDESK will therefore be overwritten according to the status in the address book. If a user does not have the relevant attribute filled in within the address book, the synchronisation will not alter their relationship.
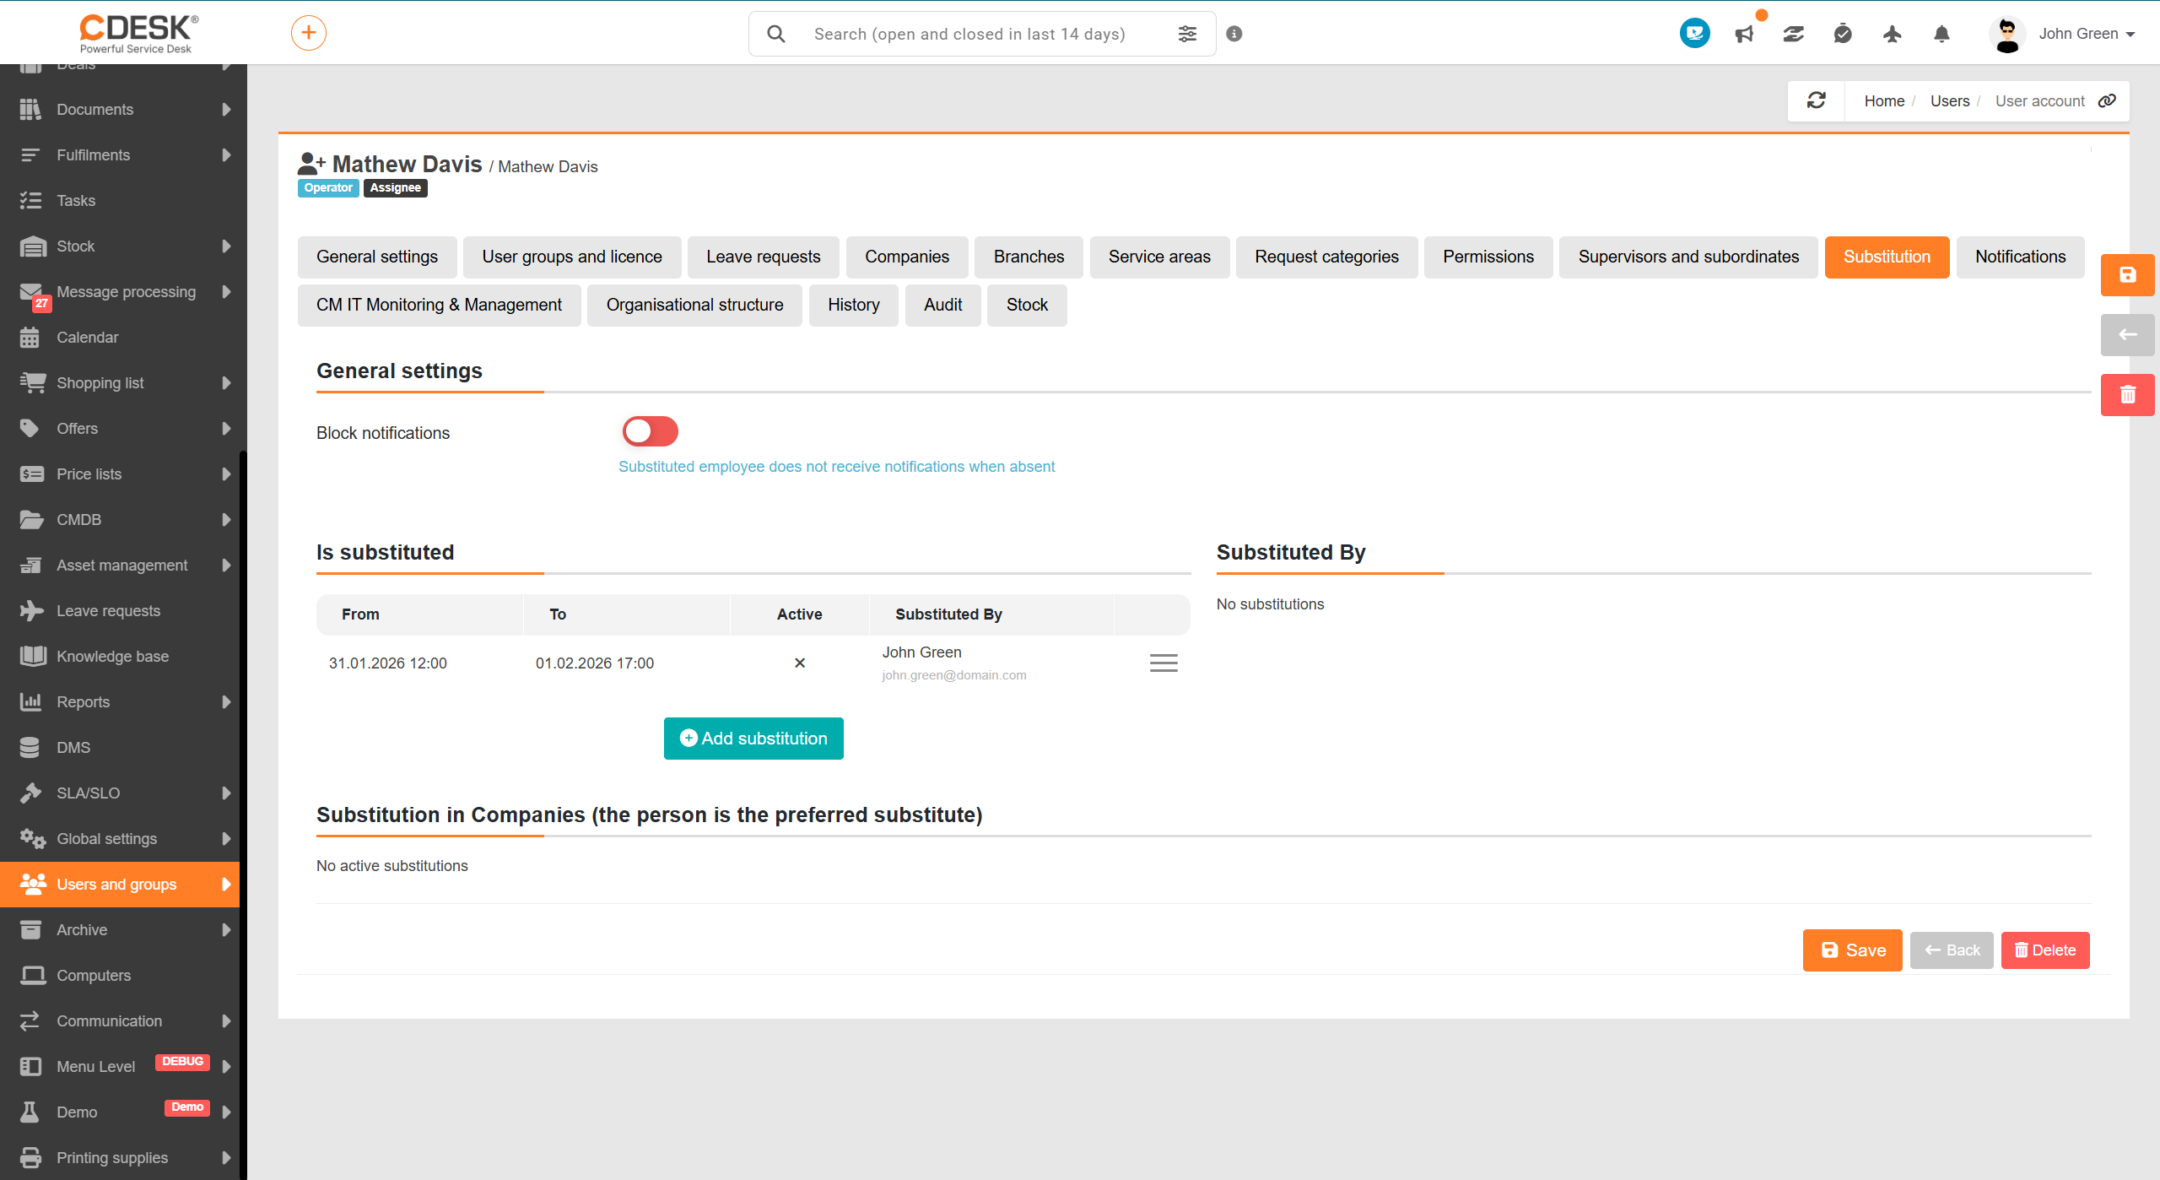
Substitution
The substitution feature ensures that a user’s tasks are not left unattended whilst they are away – for example, whilst on leave or on sick leave. The deputy takes over their records and notifications, so work continues without interruption.
The tab is divided into two sections:
- Is substituted – this section lists instances where the user is substituted by someone else.
- Substitution – this section, on the other hand, lists instances where the user substitutes other users.
In both lists, you can see the validity period (From, To), the ‘Active’ status and the other person’s name. If no substitution has been set up, the message ‘No substitution’ will be displayed.
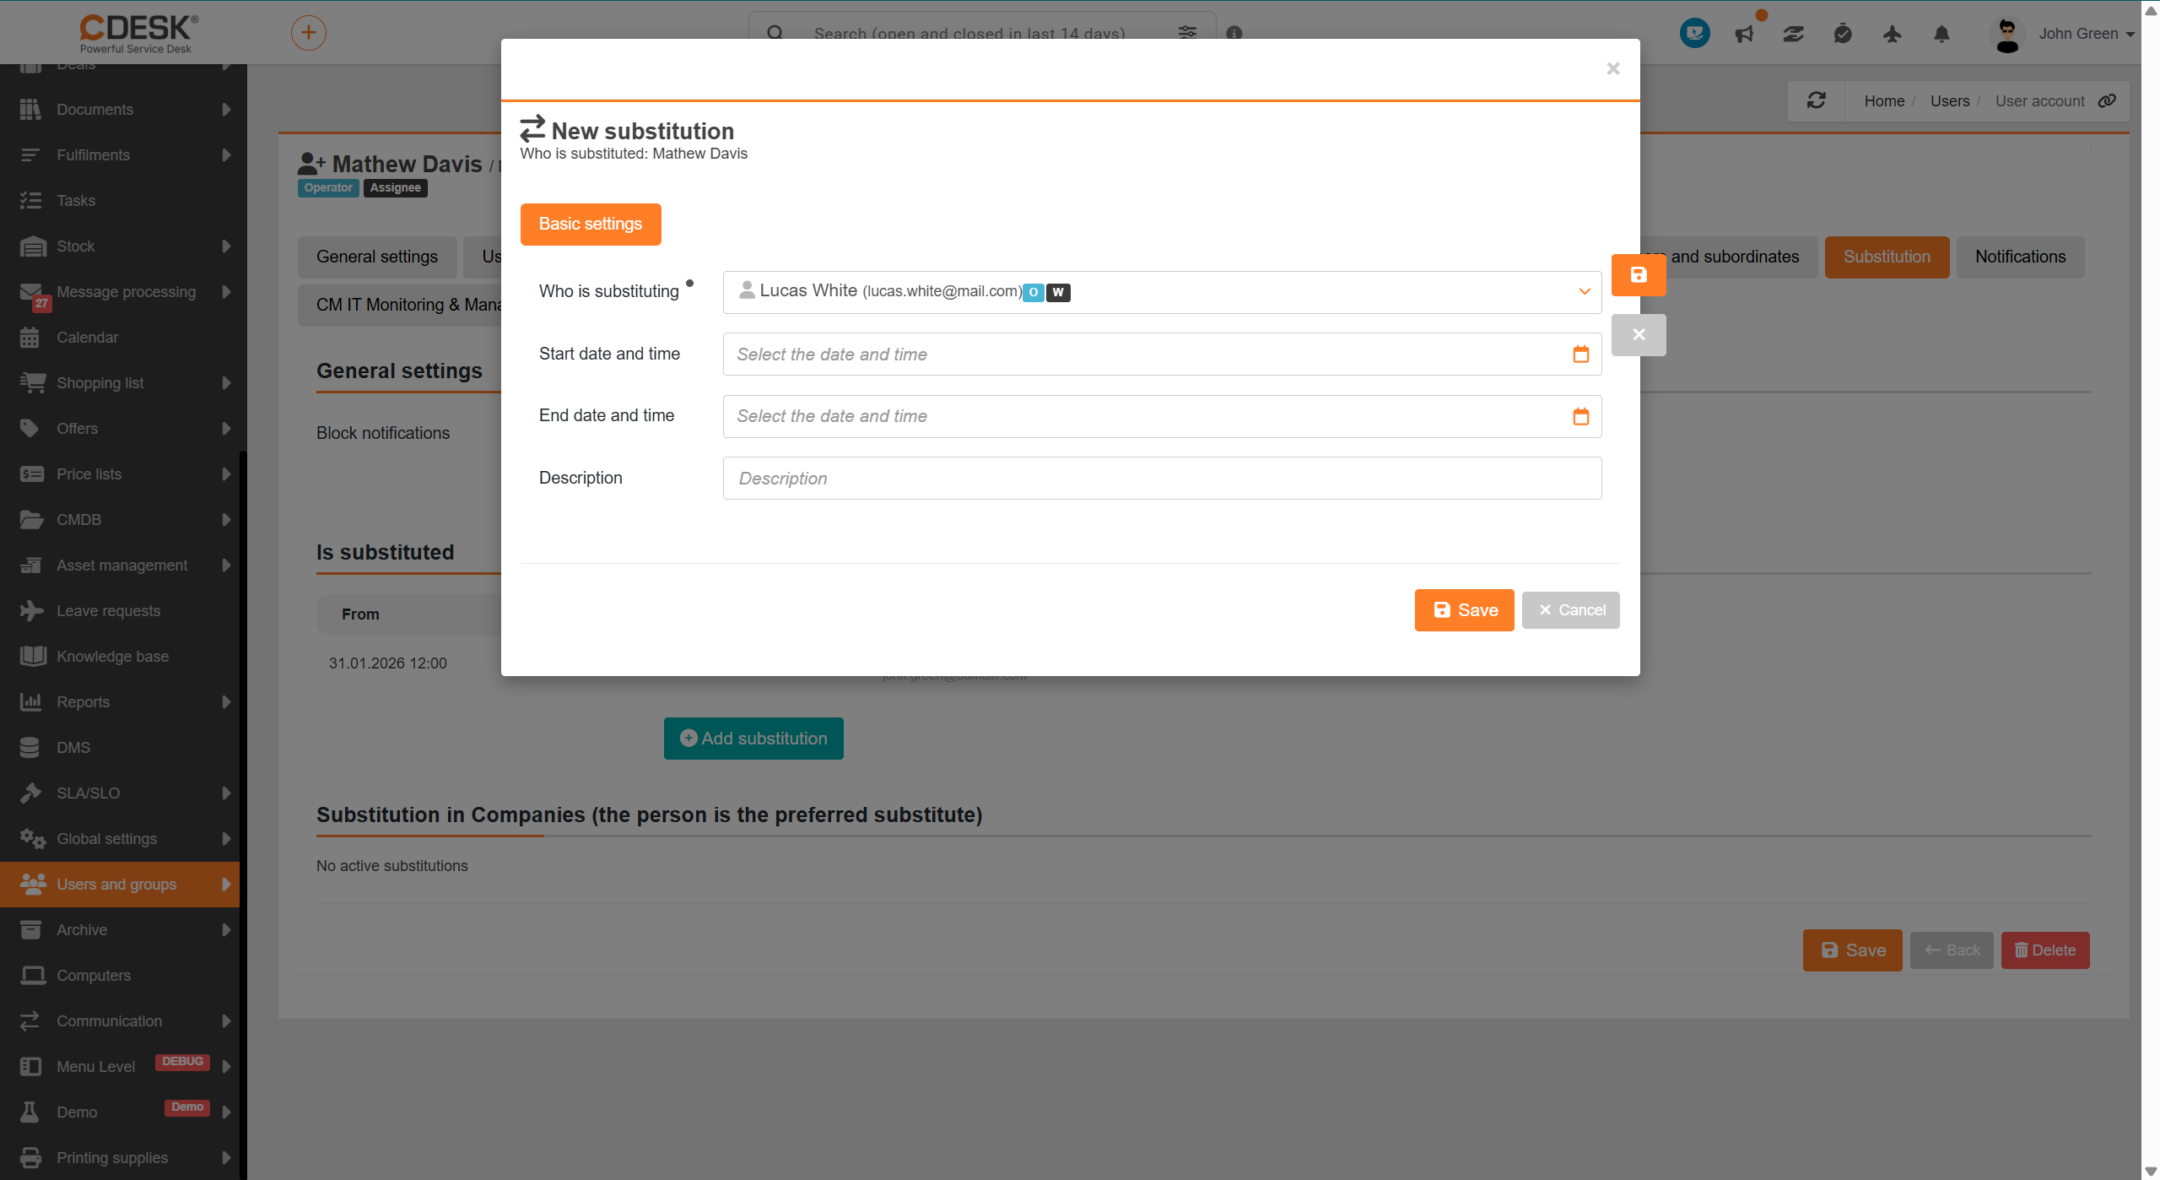
To add a new substitution, click the + Add substitution button. The ‘New substitution’ window will open, in which you must complete the following fields:
- Who is the substitute – the user who will take over the tasks. This is only selected after choosing the substituted user, as the system only offers those who are authorised to act as their substitute.
- Start date and time from and Date and time to – the period during which the substitution is valid.
- Description – additional information regarding the substitution, such as the reason for it.
Click the Save button to save the substitution. Once saved, the record will appear in the relevant list and, once it comes into effect, will be marked as Active. The current state of the substitution is also shown in the header of its form.
You can manage an existing substitution via the context menu on its row. Select Detail or Edit to open its form and amend the details. Select Disable substitution to terminate it before its expiry date; select Delete record to remove it. The system requires confirmation for both actions.
The ‘Represents in companies (is the preferred representative)’ section provides an overview of the companies for which the system will prioritise offering the user in question as a representative, together with the period of validity.
Note: Using the ‘Block notifications for the delegate’ toggle in ‘General settings’ section, you can specify that the substituted user does not receive notifications whilst they are away – these are instead received by their delegate. This tab is only available after the account has been saved for the first time.
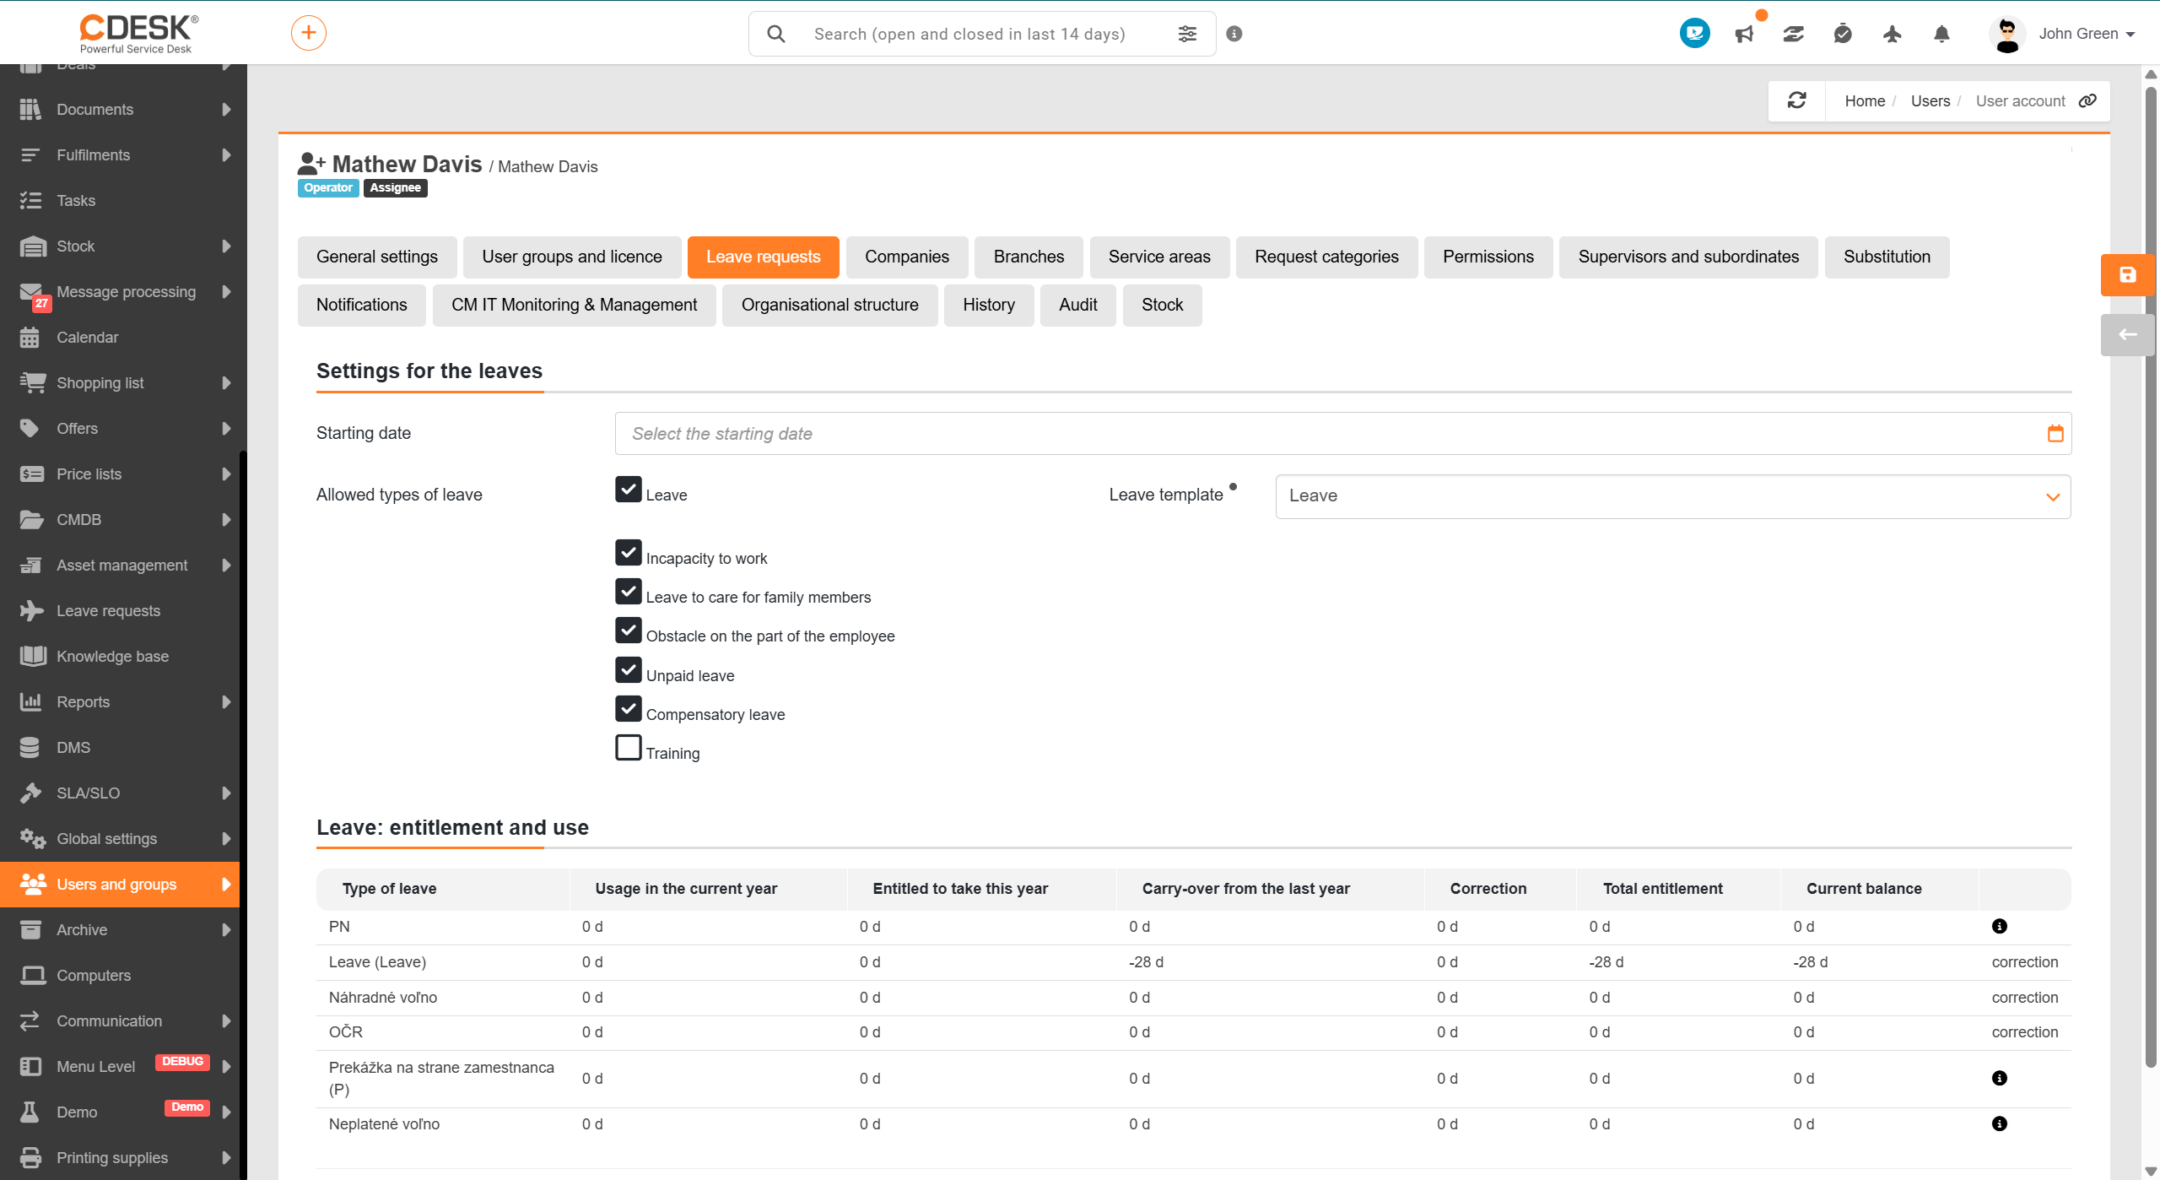
Requests for leaves
This tab is used to set a user’s entitlement to leaves and to monitor their usage. Based on these settings, the system calculates how many days off the user is entitled to and what their current balance is, from which days are then deducted when they request leaves.
In the Leaves Settings section, first enter the date in the Start Date field from which the user becomes entitled to leaves — the entitlement is calculated from this date. In the ‘Permitted Leave Types’ settings, then select the types of leave available to the user (for example, annual leave, compensatory leave or sick leave). In the ‘Leave Template’ field, select the template used to determine the annual leave entitlement. Save the settings by clicking the Save button.
Once saved, a table summarising the individual types of leaves will be viewed in the ‘Leave Entitlement and Usage’ section – ‘Usage in current year’, ‘Entitlement in current year’, ‘Carry-over from previous year’, ‘Adjustment’, ‘Total entitlement’ and ‘Current balance’. For types of leave without limit, an information icon is viewed instead of any figures.
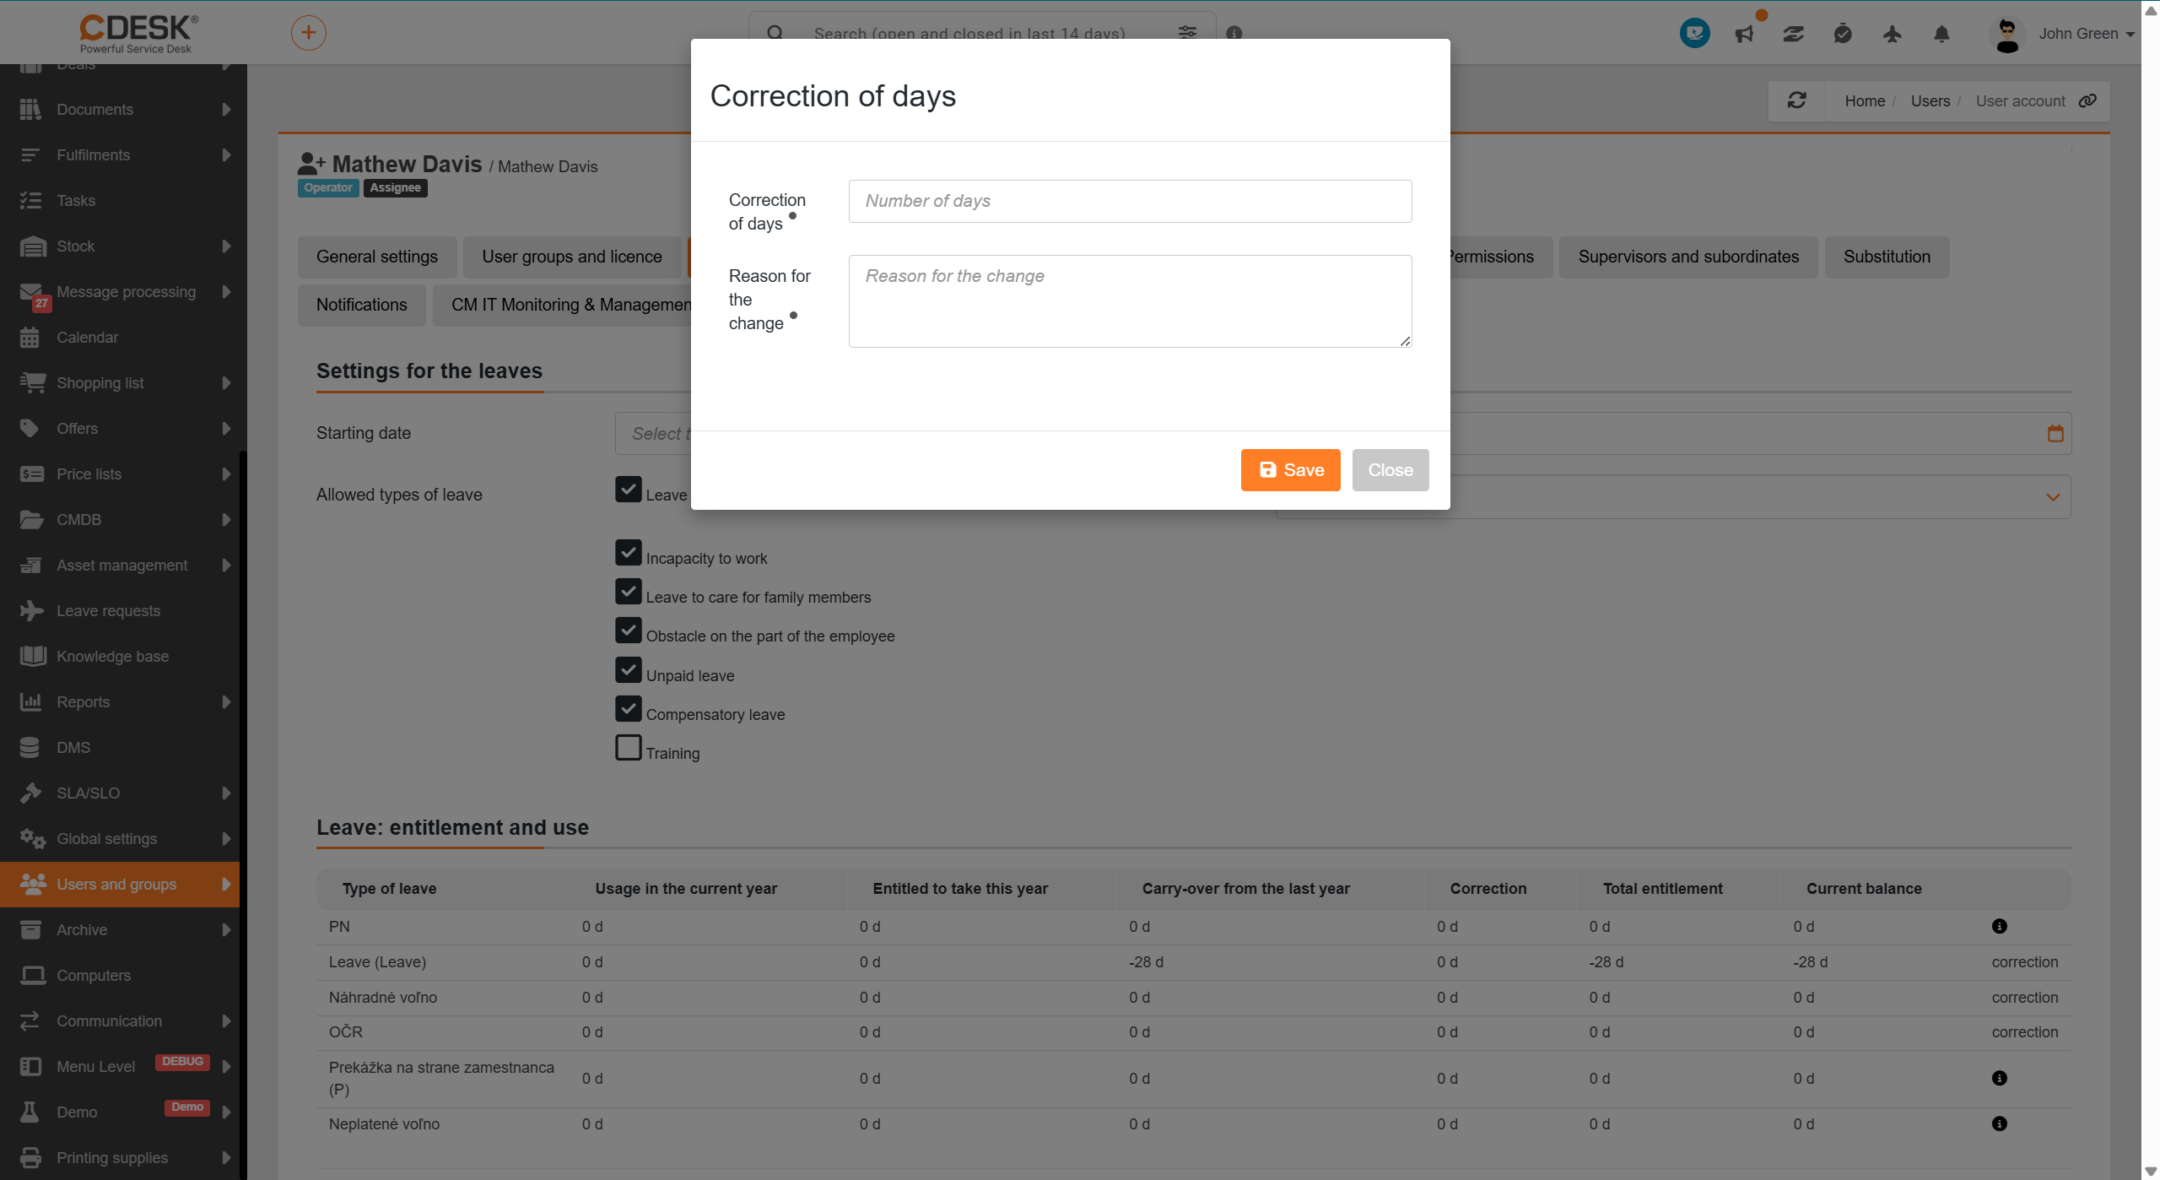
If you need to amend an entitlement manually (for example, to grant special leaves or correct a carry-over from the previous year), click on the ‘Correction’ option in the row for the relevant type of leaves. The ‘Adjustment of days’ window will open; here, fill in the ‘Adjustment of days’ field (quantity of days, either positive or negative) and the ‘Reason for change’. Both fields are required. Confirm the adjustment by clicking the ‘Save’ button. The value entered will be included in the total entitlement and balance. To view an overview of all corrections made to date, click on the value in the ‘Correction’ column.
Note: This tab is only available if leave tracking is enabled in your environment, and the entitlement settings will only be displayed after the account has been saved for the first time. The relevant permission is required to make any corrections.
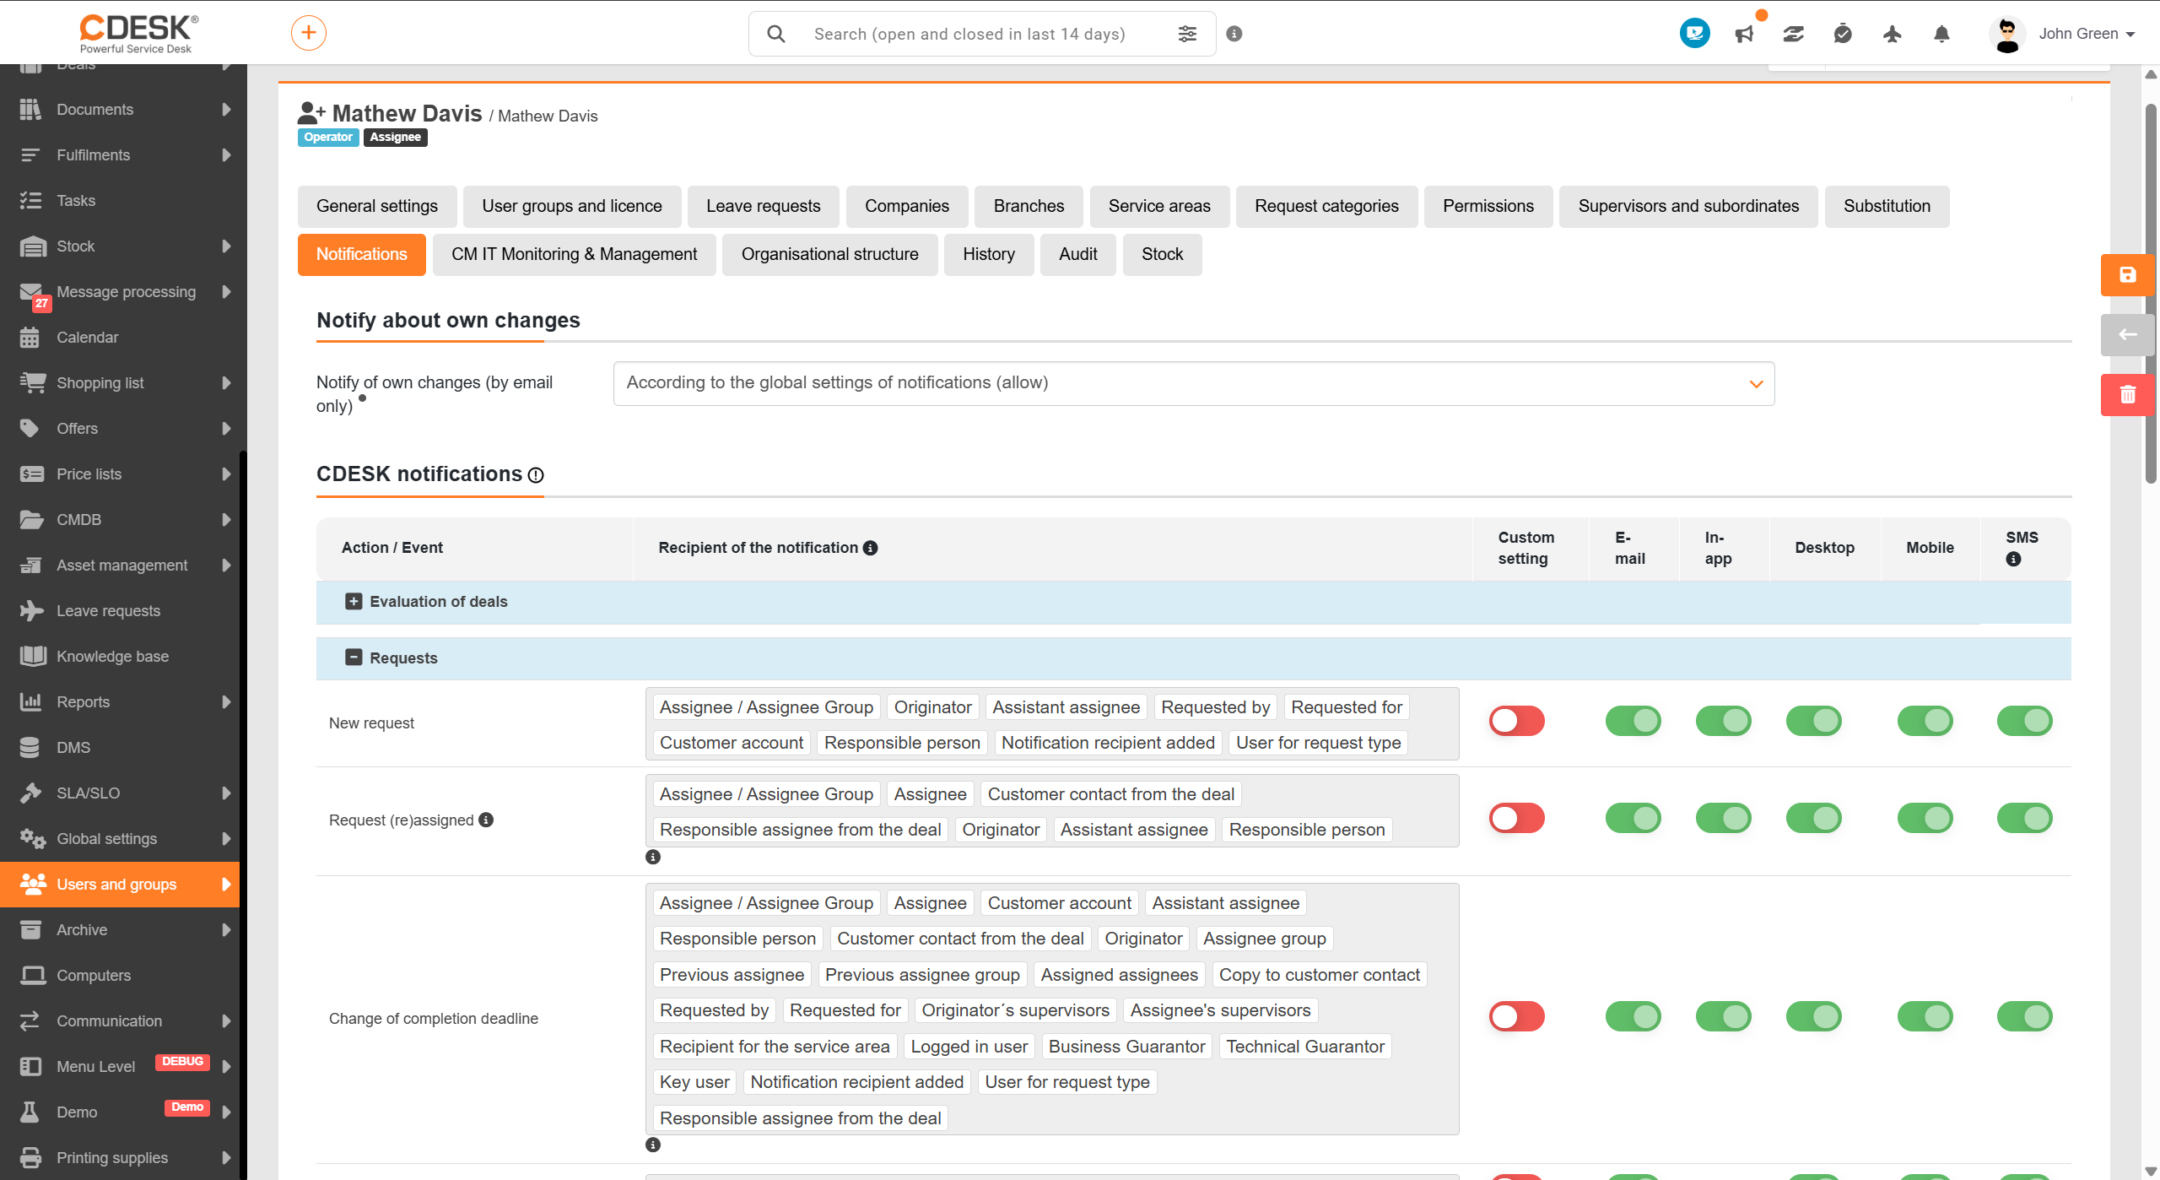
Notifications
Notifications inform the user about what is happening in the system — for example, a new request, a change to a record or an approaching date. They allow users to specify which events they wish to be notified about, ensuring they receive notices relevant to their jobs without being overwhelmed by the rest.
You can enable or disable individual types of notices in the CDESK notifications list. Use the ‘Notify me of my own changes’ toggle to specify whether the user should also receive an email about changes they have done themselves. If necessary, you can temporarily block notifications for an account. We cover the topic of notifications in more detail in a separate section of the documentation entitled ‘Notifications’.
Note: For customer contacts, a notification will only be sent if they have this option enabled in their own settings.
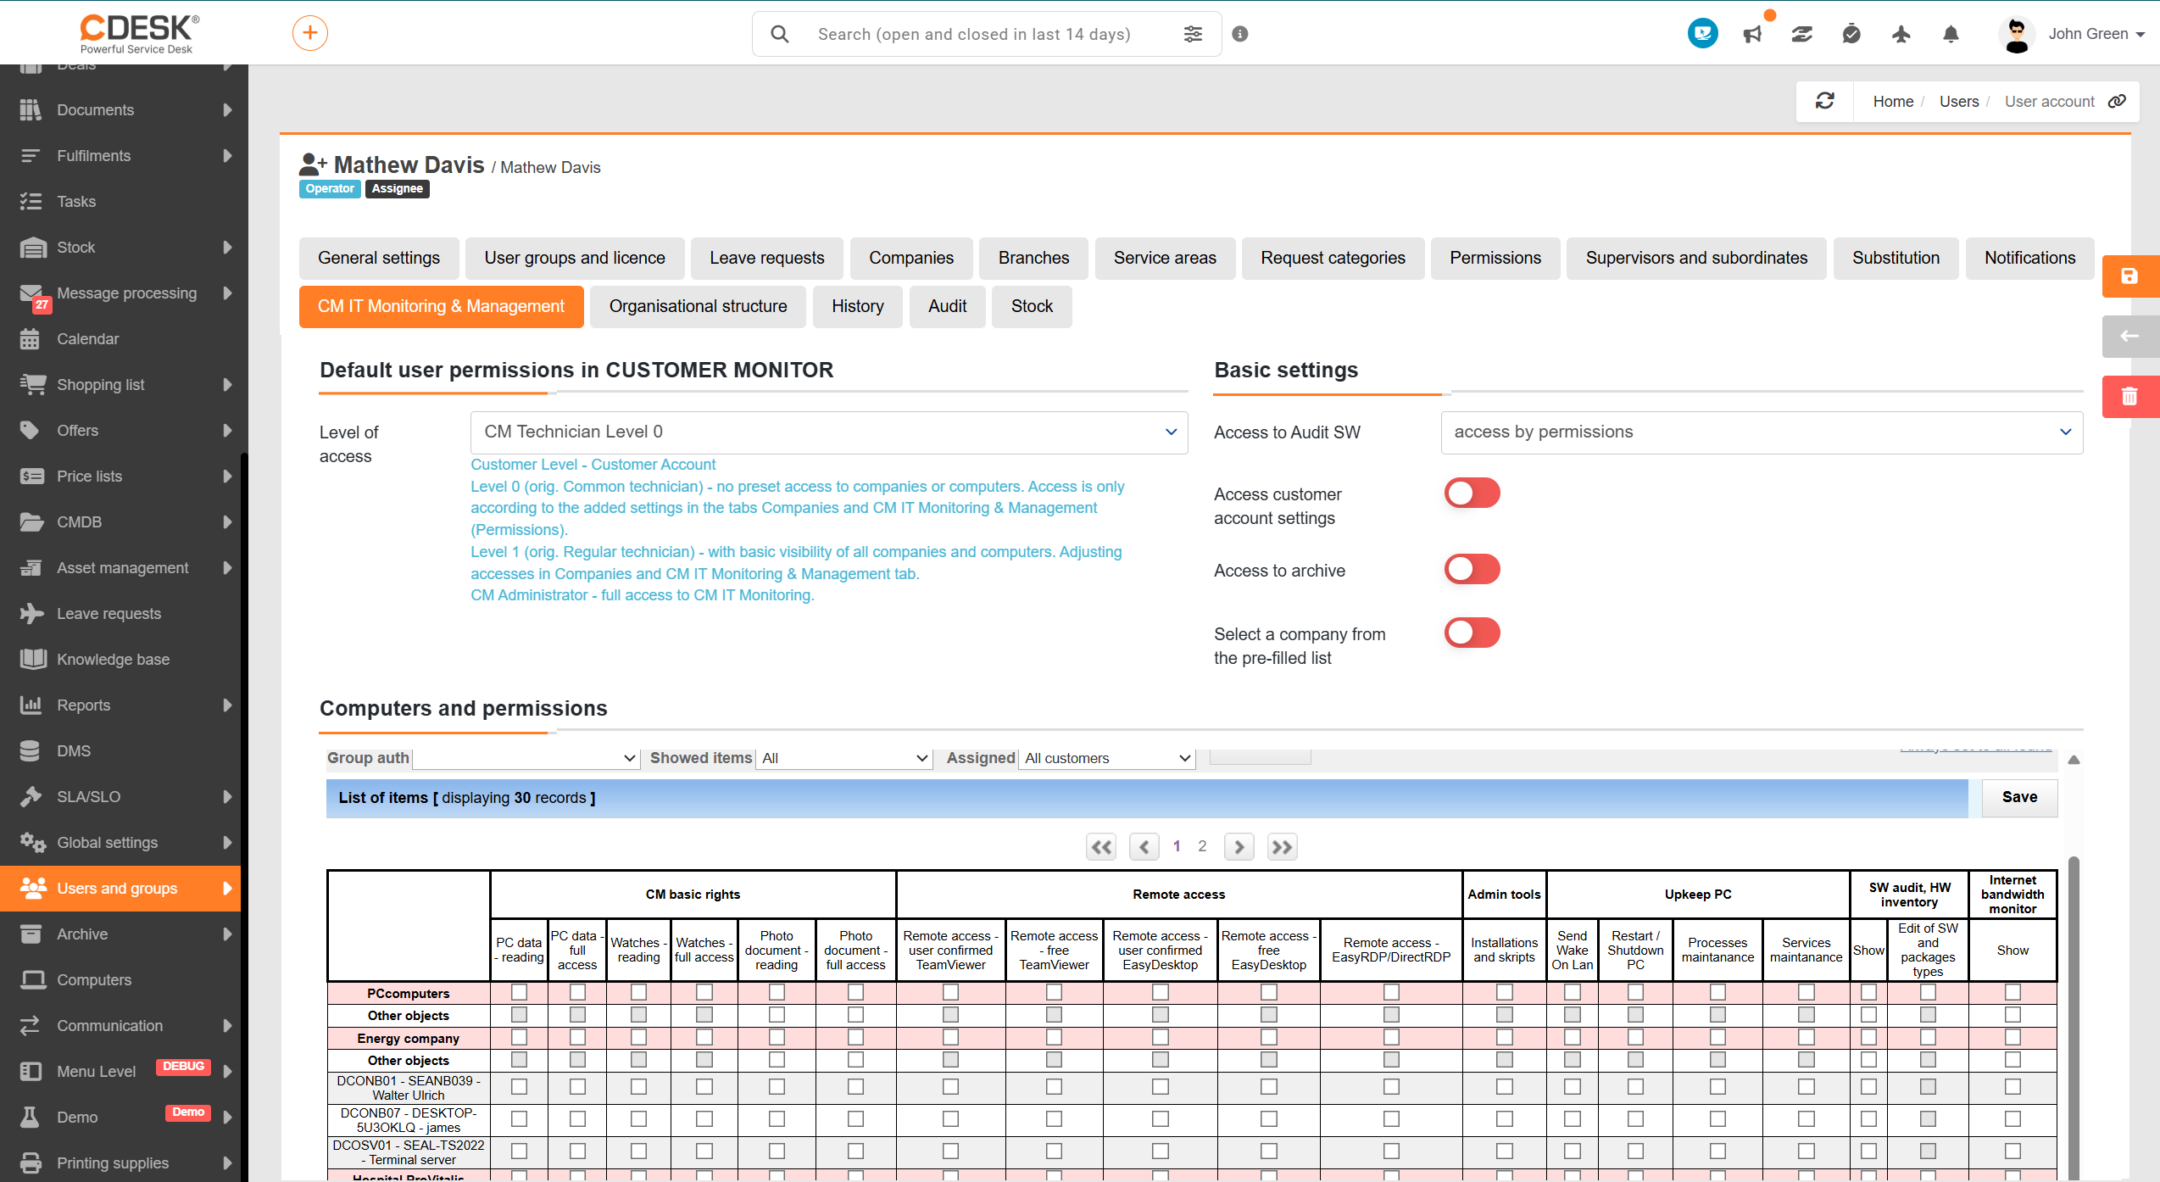
CM IT Monitoring & Management
This tab contains the settings for user access to IT monitoring. Here, you can select the access level (Level), which determines the range of pre-set visibility for companies and computers, and in the Computers and Permissions section, you can fine-tune access to specific computers and the associated permissions. This tab is only accessible to accounts included in the IT monitoring group; it is not displayed for other accounts. Further information is available in the separate documentation for the CM IT Monitoring functionality.
Organisational structure
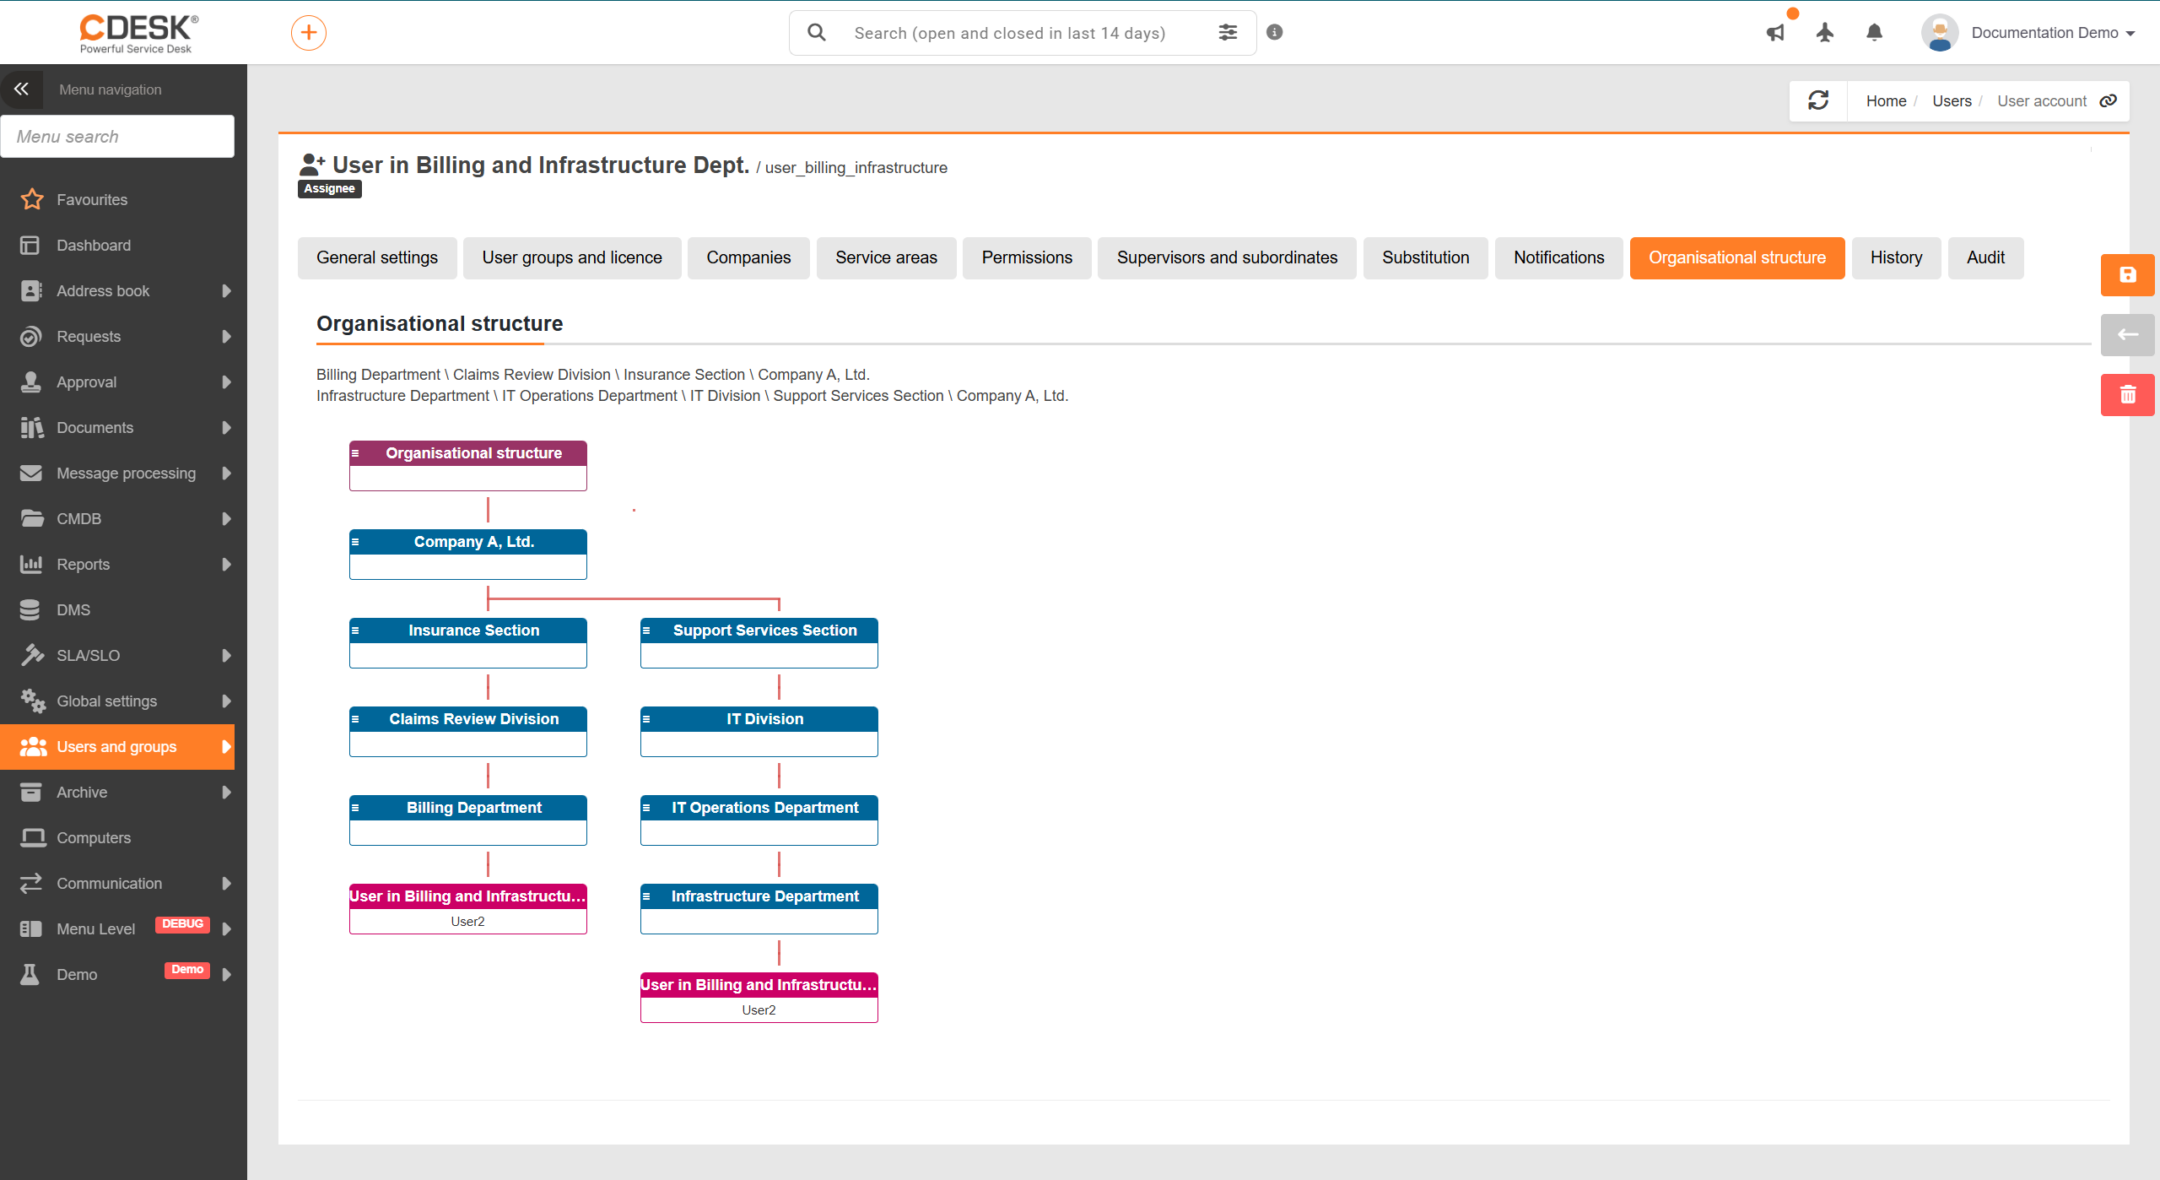
This tab views the user’s position within the organisational structure — which unit (division, section or unit) they belong to and, where applicable, which units they manage. This makes it clear where the person fits within the organisation, which is useful, for example, when seeking approval from a supervisor or when filtering records by unit.
The content of the tab is divided into three sections:
- User Assignment – a text list of the units to which the account is included. Each unit is listed with its full path within the structure, including parent levels, so it is clear exactly where it is located within the organisation. If a user is included in multiple units, all of them are listed.
- Graphical representation of the structure – a scheme of the organisational structure showing the user’s placement. Only the part of the tree relevant to their placement is viewed — from the highest level (the company) down to the units to which they belong.
- Managed departments – a list of the departments of which the user is the manager, together with their location within the structure. This location is particularly relevant during the approval process, when a record is forwarded for approval to the manager of the relevant department.
Note: This tab is used solely to view the position within the organisational structure. Units are defined in the organisational structure records and are synchronised with CDESK via the AD / LDAP connector. This tab is only available if the organisational structure records are enabled in your environment (Global Settings → Users), and it will only be viewed once the account has been saved for the first time.
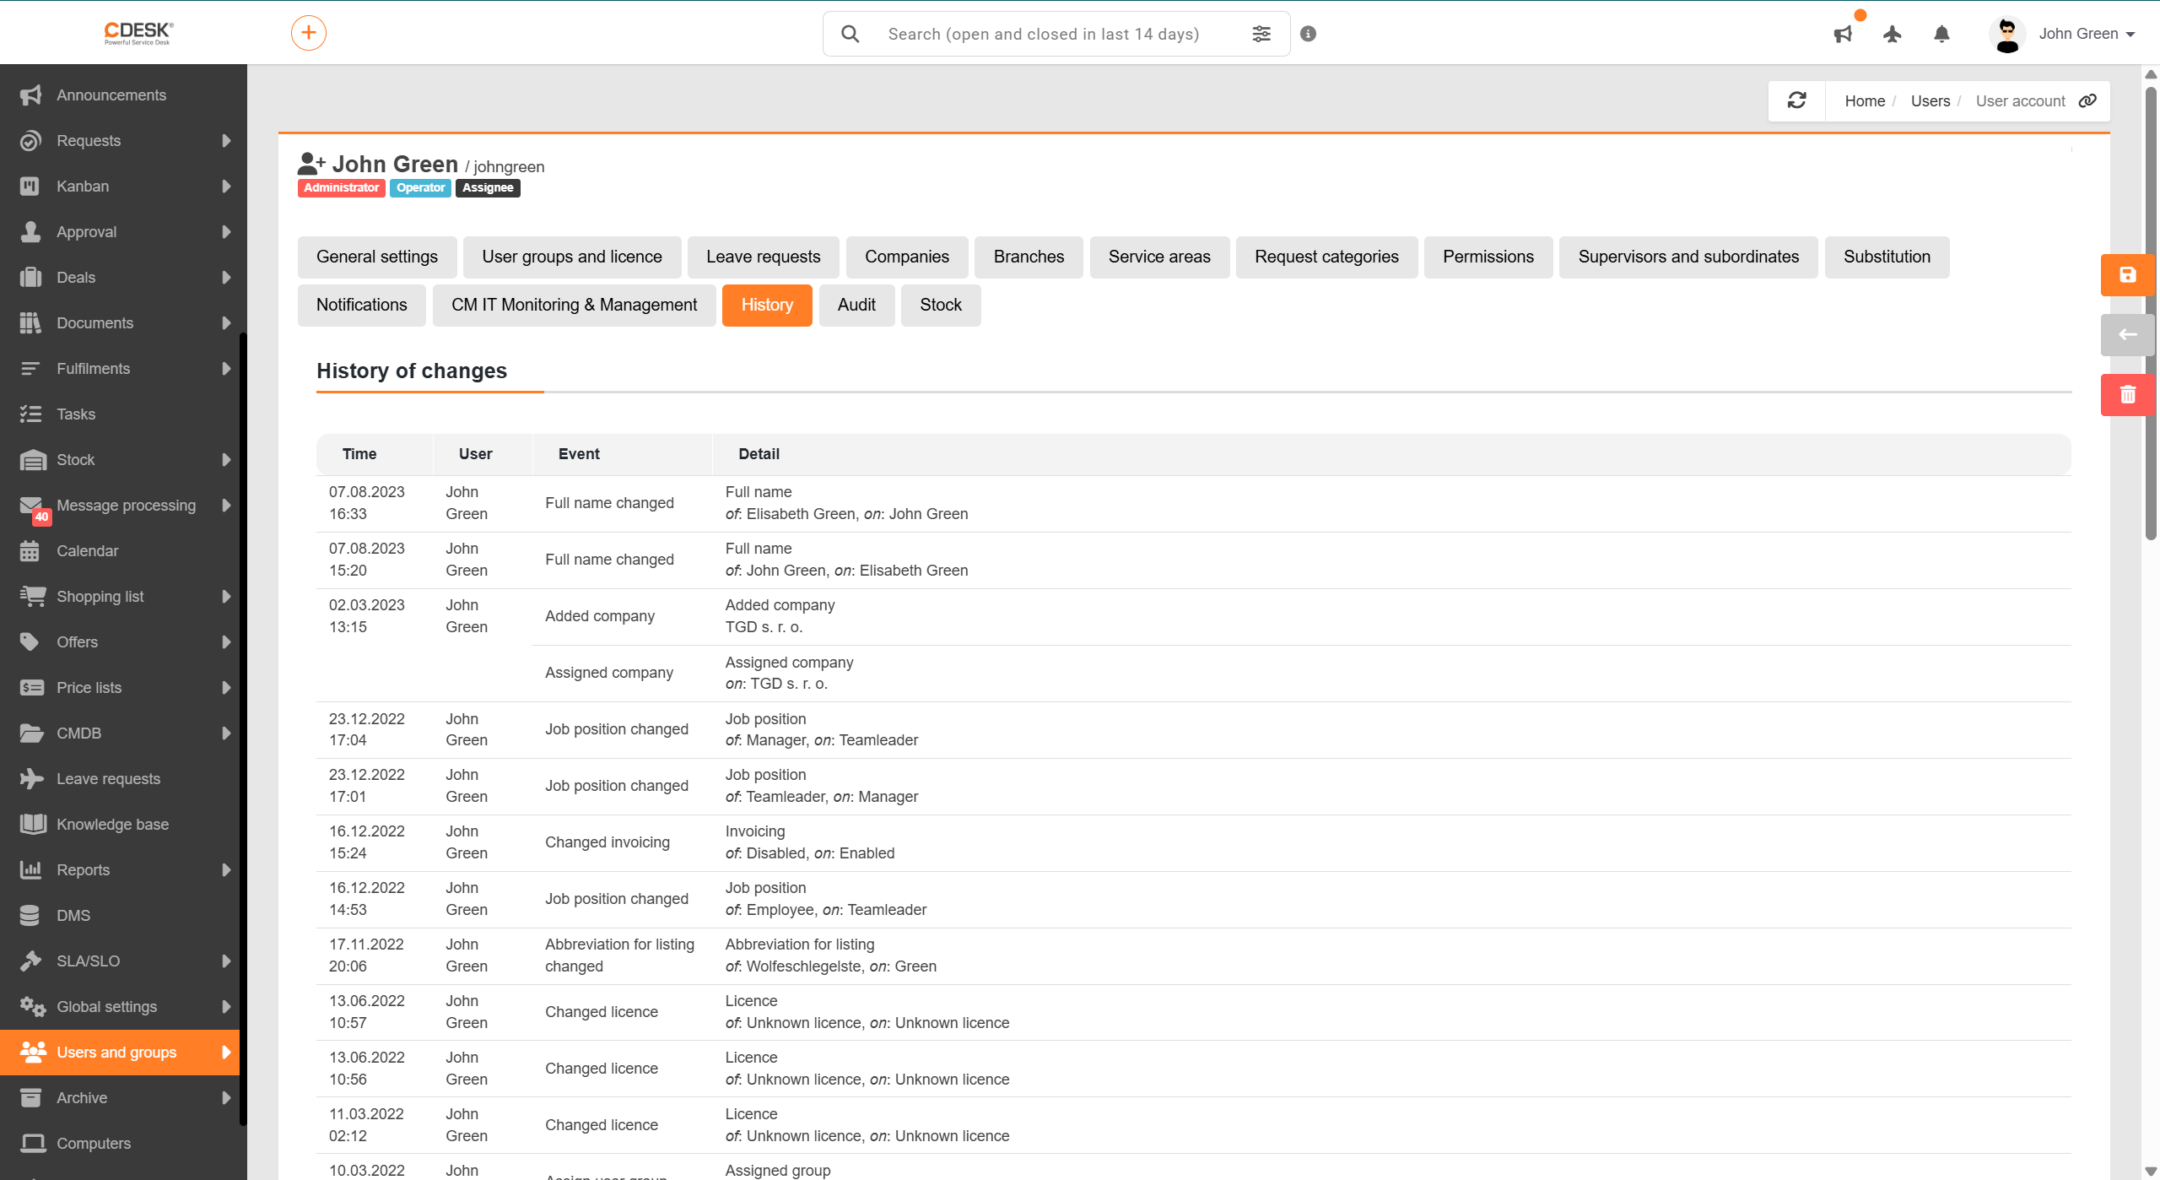
History
It displays an overview of changes made to the account in chronological order — for each change, you can see who did it, what the change involved, and what the original and new values were. It is used to trace back when and by whom a specific change was made.
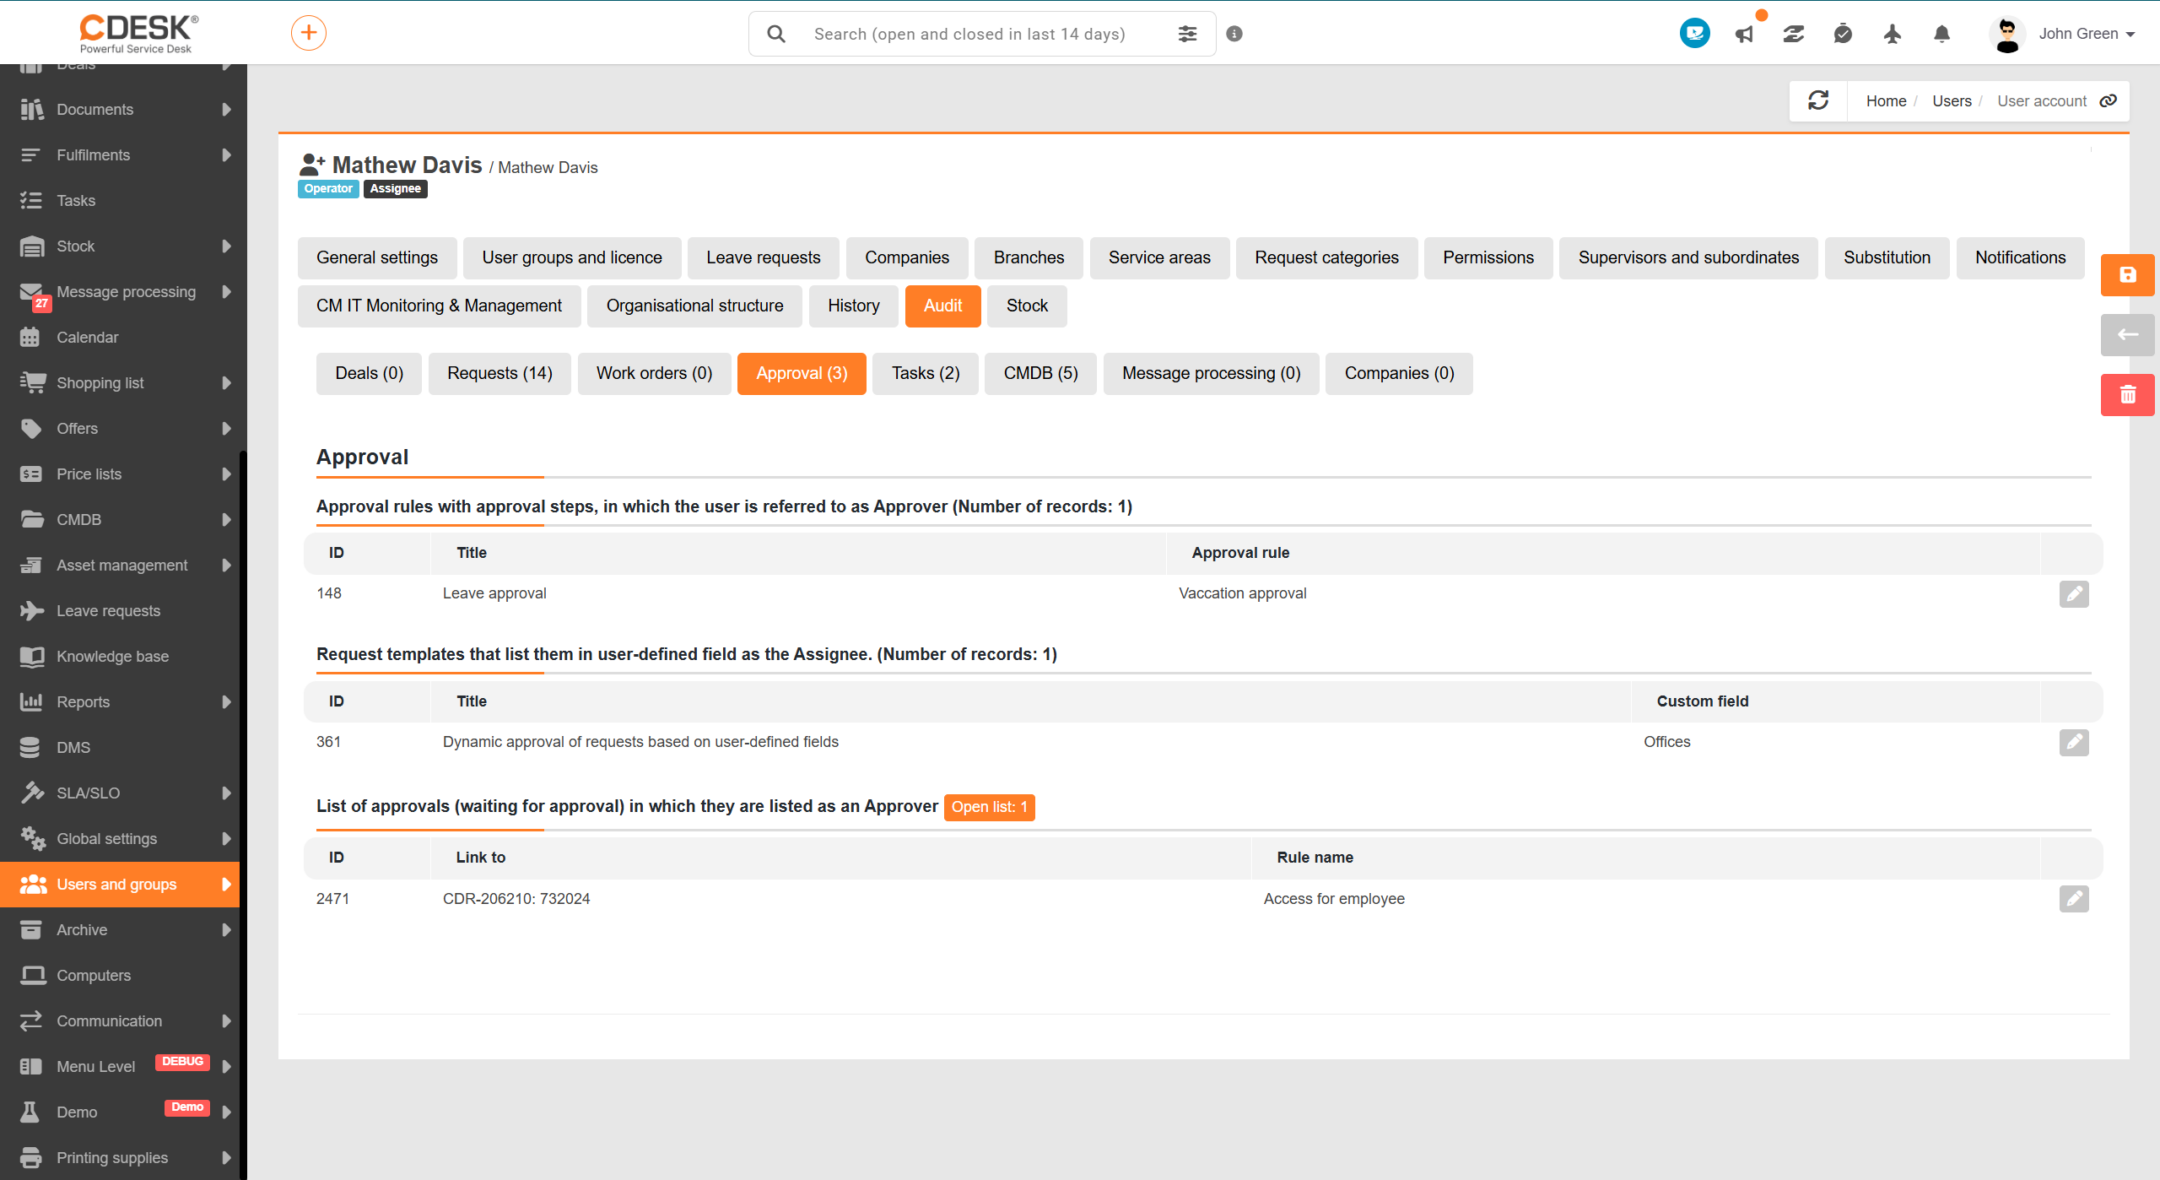
Audit
The audit provides an overview of where the account is applied within the system — that is, in which settings and open records across modules the user is listed as the assignee, approver, responsible person and so on. Unlike History, which tracks changes to the account itself, Audit shows the account’s links to other records.
You will find this tab particularly useful before deactivating or deleting an account. Before the account is decommissioned, you can thus identify which settings and work-in-progress records need to be dealt with and to whom they should be assigned, so that they are not left without an assignee once the user has left.
The overview is organised into separate tabs by module, with the quantity of records found shown for each one. This makes it clear at a glance where the account has relationships. The following tabs are available:
- Deals – open deals in which the user is listed as the responsible assignee.
- Requests – request service areas where the user is listed as the default assignee, request templates with their name in the assignee field, and a list of open requests they are handling.
- Work orders – work orders linked to this account.
- Approval – approval rules and their steps in which they are listed as the approver, request templates where they are the approver in the custom field, and approval processes awaiting their comment.
- Tasks – request templates containing tasks in which he is listed as the assignee, and a list of open tasks he is handling.
- CMDB configuration database – configuration items for which he is listed as the approver, item owner, owner or business owner.
- Message processing – email addresses for which he is set as the responsible assignee, and message processing rules with actions in which he is listed as the assignee.
- Companies – service area settings for individual companies where he is listed as the default assignee.
Individual records can be opened and edited directly from the overview, or you can view the full list in the relevant module by clicking the ‘Open list’ link.
Warehouse
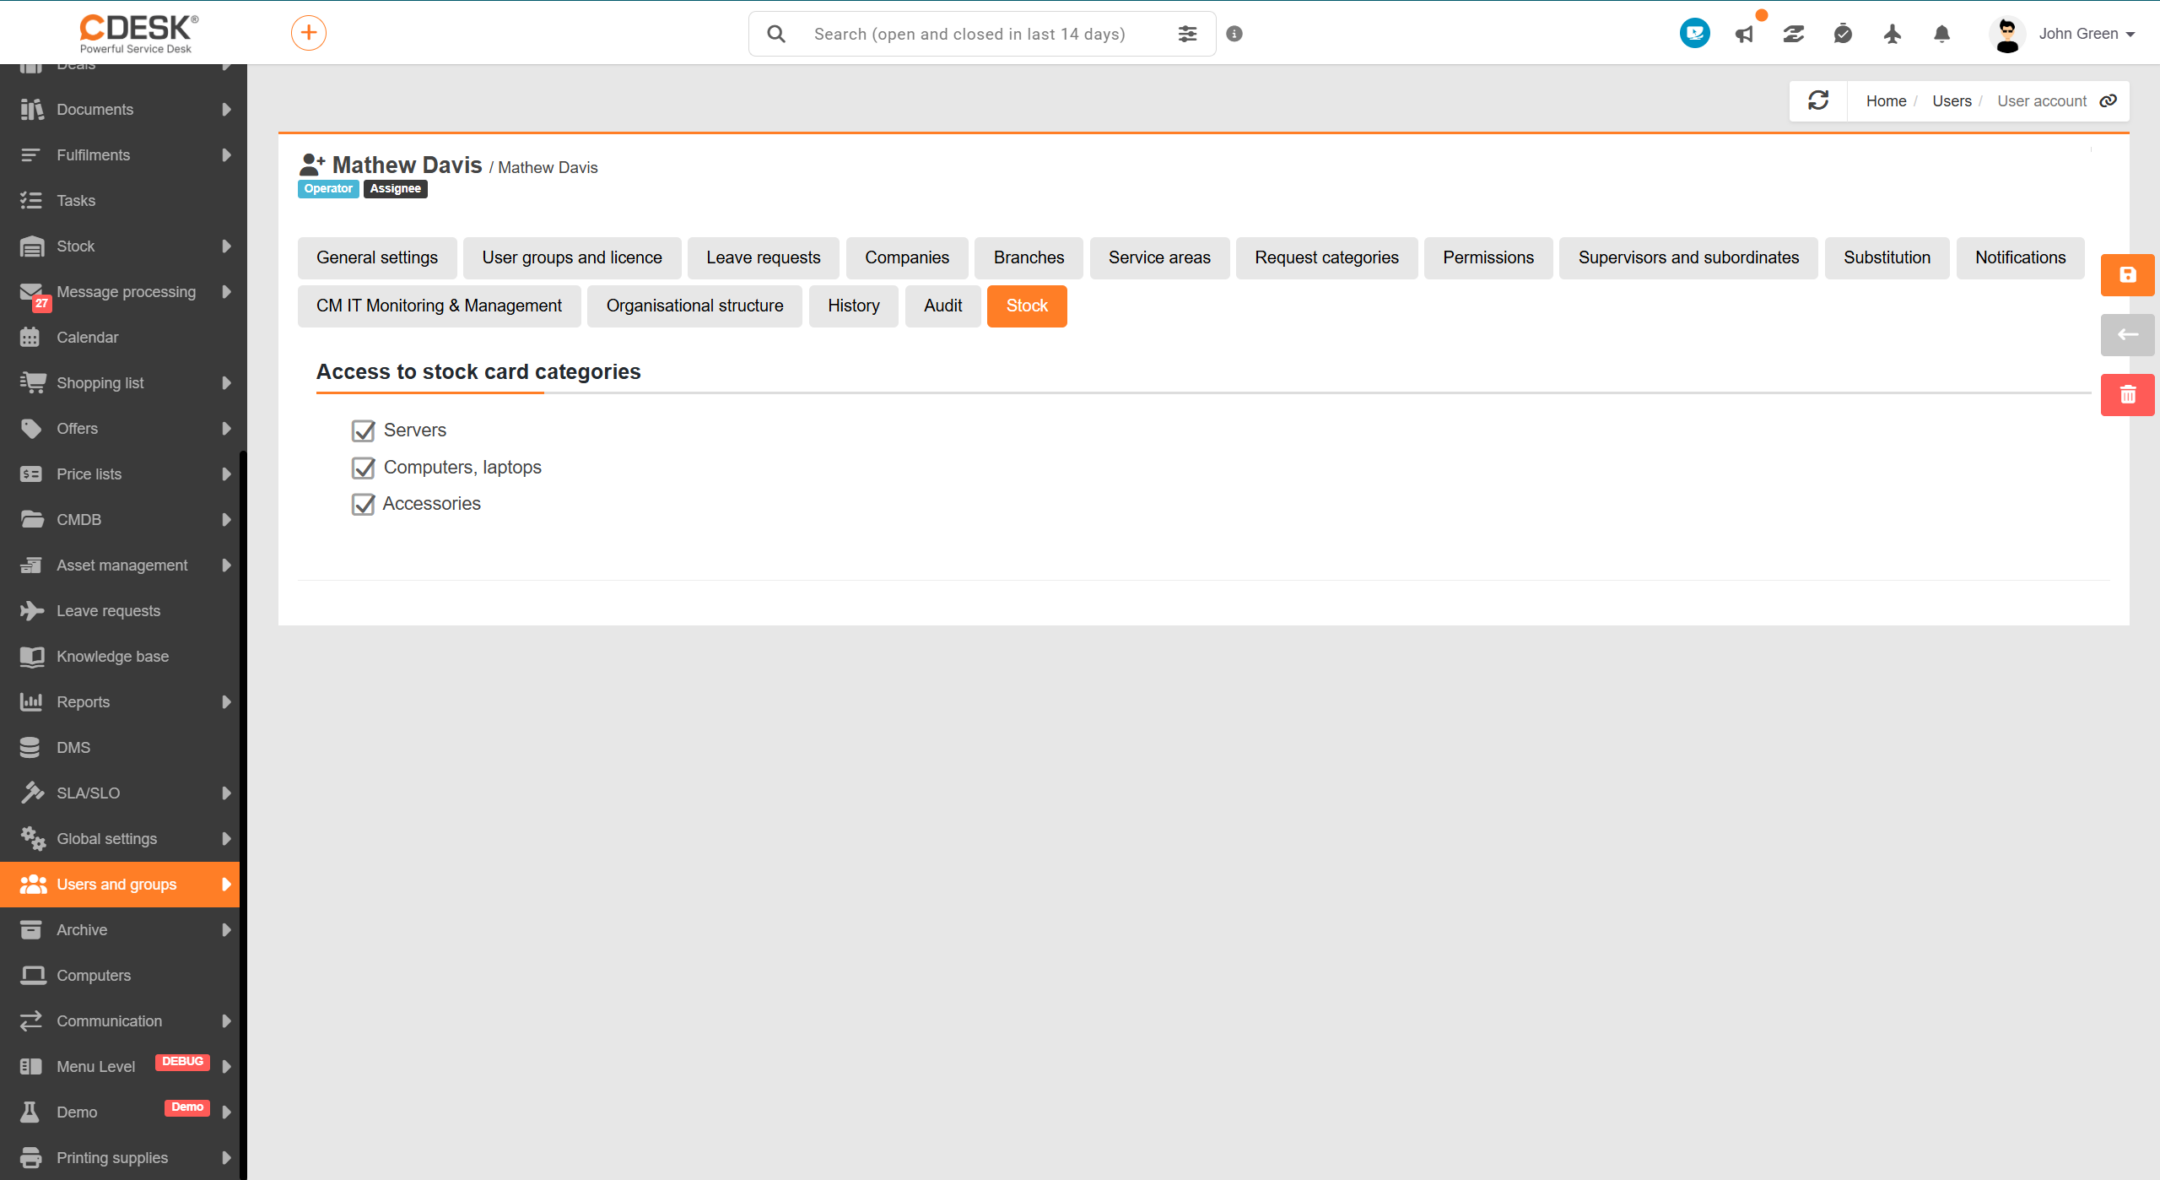
This tab controls access to stock card categories. Stock cards are organised into categories, and these settings allow you to specify which categories the user is permitted to work with. This makes it possible to restrict the range of stock available to an account to only those categories required for their work.
You can assign access by selecting the required categories from the list. You can select one or more categories at a time. In addition to the categories included directly on the account, the list also views categories taken over from the groups to which the user belongs – these are marked in the list and cannot be removed from the account, as they result from the user’s group membership.
Note: A newly created account is automatically assigned all the stock card categories recorded in the system. If a user is to have access only to selected categories, the others must be deselected. Categories created at a later date are not automatically assigned to existing accounts.
Please note: This tab is only viewed if the Warehouse module is enabled in your environment, and it is only available once you have saved the account for the first time.