


This tab is used to create call queues and voice menus. The tab is part of the ‘Configuration’ scenario in CDESK – if call routing is managed by Zadarma, queues are not configured in CDESK and the tab is not displayed.
A queue is a group of extensions to which an incoming call is routed. You can create a new queue by clicking the ‘New Queue’ button; to edit the settings of an existing queue, click the pencil icon on its card. The queue tab clearly displays the selected strategy, assigned extensions, agents on duty, and whether calls in this queue generate requests, fulfilments and deals.
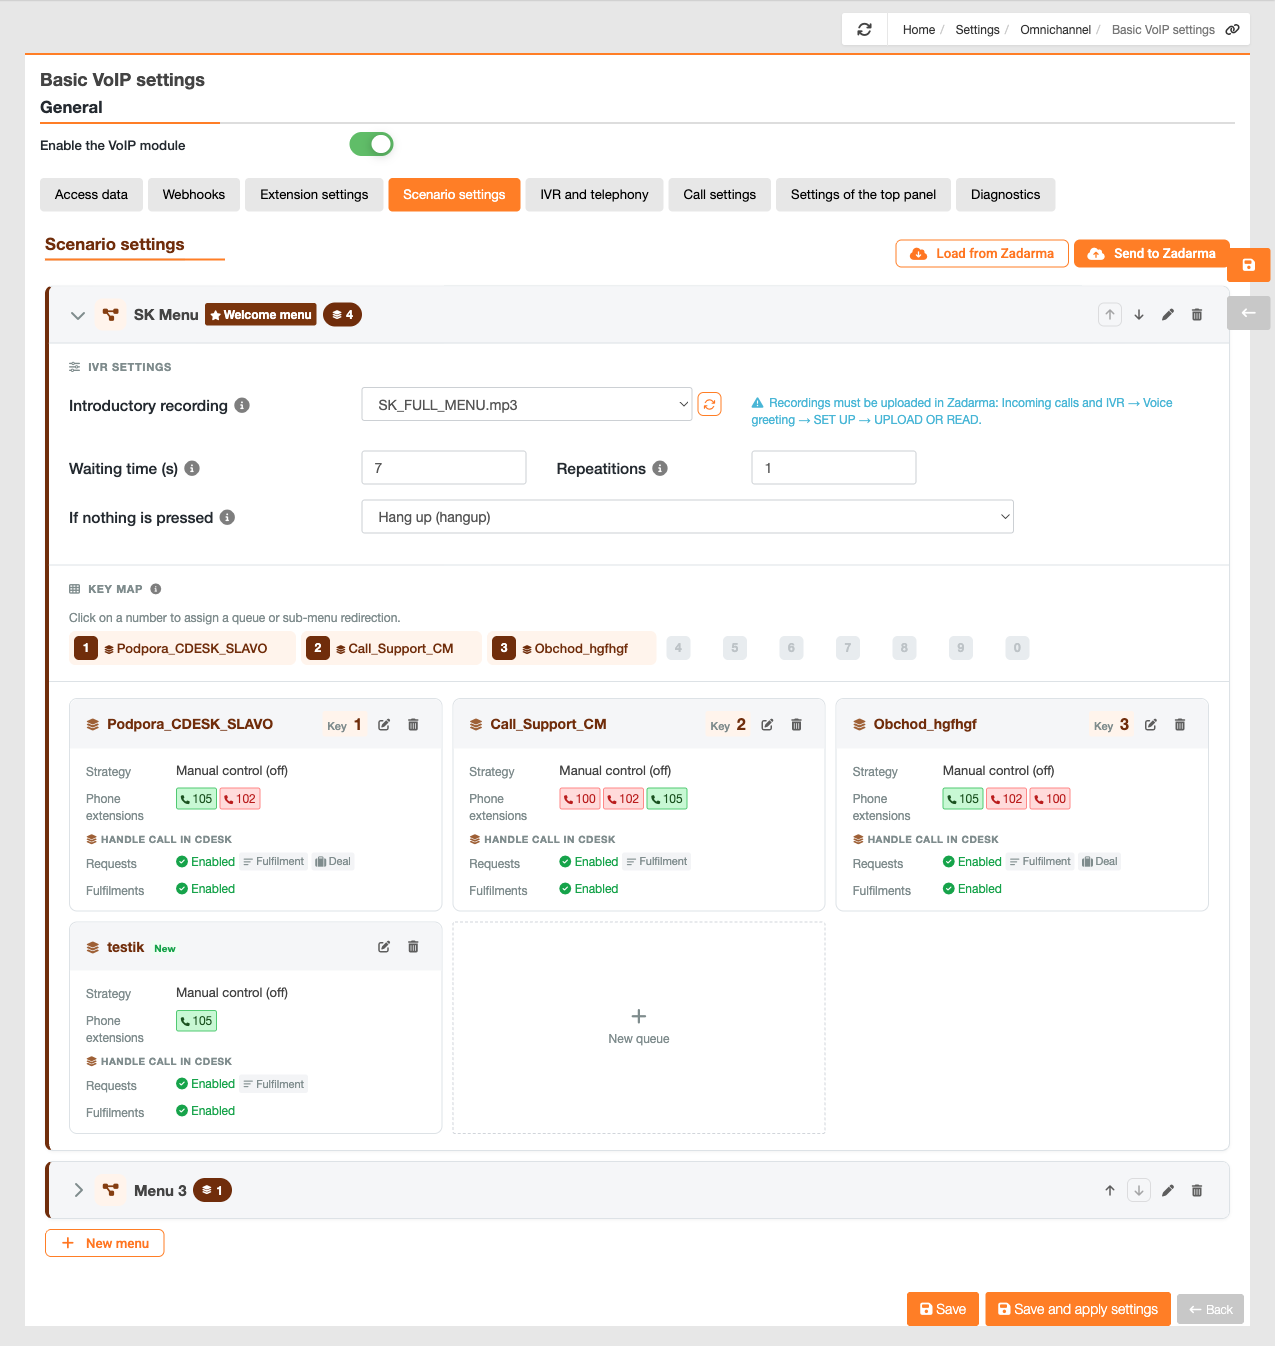
You can open the queue settings by clicking on the queue tab. They are divided into three tabs – Basic Settings, Queue Extensions and Call Handling in CDESK. The number next to the second tab indicates how many extensions are assigned to the queue, and the mark next to the third tab indicates that calls from this queue are being logged. Changes are only applied when you click the Save and Apply or Apply button; clicking the Cancel button closes the window without saving.
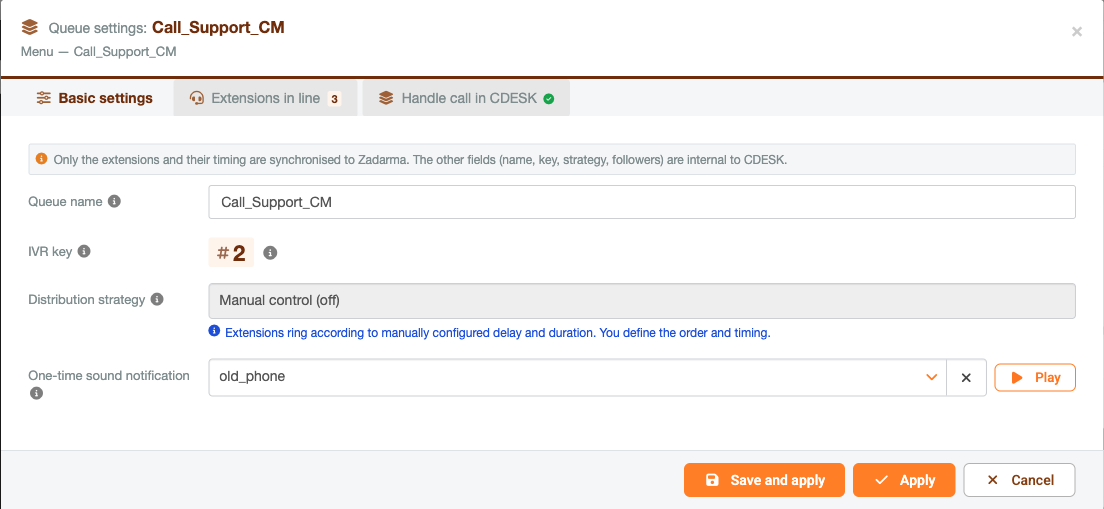
Basic settings for the range
- Series name – the name under which the series appears in CDESK and on the switchboard.
- Auto-attendant key – the key that allows a caller to access this queue from the voice menu. The key can only be selected when creating the queue; it cannot be changed via Zadarma.
- Distribution strategy – the method by which a call is offered to individual extensions. The individual strategies are described below. In the ‘Configuration’ scenario in CDESK, this field is read-only as it is technically impossible to implement the other distribution strategies.
- Audio notification – signals an incoming call to the queue with an audio notification that is played once. Using the button
Note: Only the extensions and their timing are synchronised to Zadarma from the queue settings. The other fields – name, key, strategy and followers – are internal to CDESK. The queue settings window itself also draws attention to this fact.
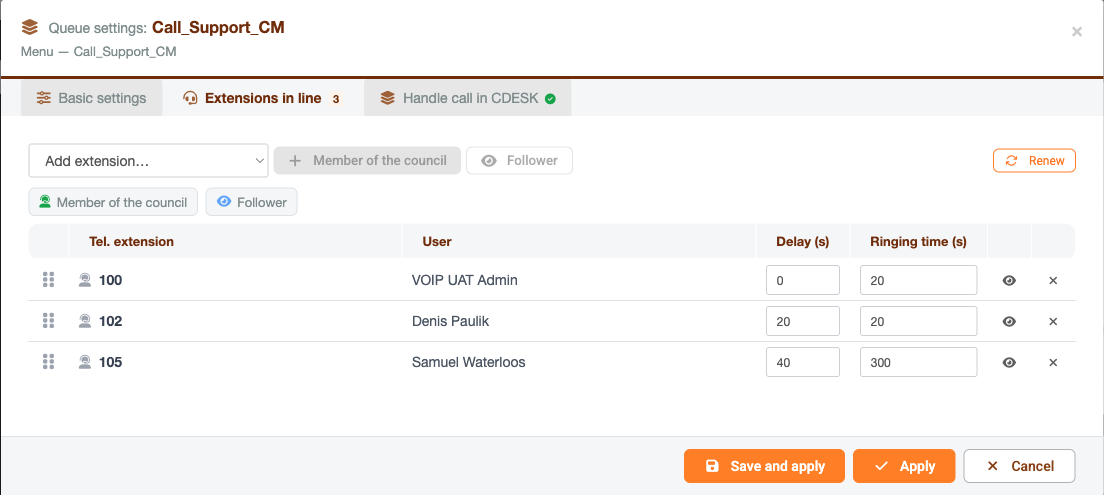
Extensions in line
This tab is used to specify who is in the ring group and in what order the phones ring. To add an extension, select it from the ‘Add extension’ field and then click the ‘Group member’ or ‘Listener’ button – this assigns a role. The ‘Renew’ button retrieves the current list of extensions from the switchboard.
The assigned extensions are listed in a table with the columns ‘Extension’, ‘User’, ‘Delay (s)’ and ‘Ring Duration (s)’. The Delay specifies how many seconds after the start of the call the extension will begin to ring; the Ringtone Duration specifies how long it rings for. This allows you to set up sequential ringtones – the first extension from zero seconds, the second from twenty seconds, and so on. You can change the order of the extensions by dragging the handle at the start of the row; to remove an extension, click the cross at the end of the row.
The difference between a board member and an observer is a practical one. A panel member’s voice device rings. A follower can only see the call – the quantity of waiting calls is displayed next to the telephone icon, and they can answer or forward the call, but their device does not ring. An icon indicating the status is displayed next to each assigned extension: green means the agent is available, red means they are in ‘Do Not Disturb’ mode. Unregistered extensions are shown in red in the list, whilst registered ones are shown in black.
When you change the members of a queue in CDESK and save the changes, the changes are automatically carried over to the switchboard, so that Zadarma begins routing calls according to the current state. A key can only be assigned to a group when it is created; in the key map, a group that already has a key assigned to it is viewed in grey with a padlock icon.
Only an extension behind which an operator is actually available is considered available – i.e. logged in to CDESK, or with a registered SIP or mobile extension, and with Do Not Disturb mode disabled. A new extension assigned to which an operator has not yet logged in, and an unassigned extension, are treated as offline and calls are not routed to them. If no one is available in the line, an ‘empty line’ alert is played instead of the line ringing without an answer.
Call distribution strategies
The strategy determines which extension is offered first. The following options are available:
- Manual control (off) – extensions ring according to manually set delays and durations. You determine the order and timing.
- Random distribution – calls are distributed randomly amongst the available extensions. Zadarma selects an extension automatically.
- Round robin – calls are distributed evenly. Priority is given to the extension that has been silent the longest. All calls are counted.
- Least Recent – priority is given to the extension that has been silent the longest. Only answered calls are counted.
- Round robin with memory (rrmemory) – priority is given to the extension that has received fewer calls. All calls are counted.
- Fewest calls – priority is given to the extension that has received the fewest calls. Only answered calls are counted.
Notice: In the Configuration scenario in CDESK, only manual control is available and the strategy field is read-only. This is because the other strategies are determined by the switchboard, which is incompatible with sequence recognition in CDESK.
With the CDESK manual strategy, the system confirms the availability of board members before call forwarding; if an extension is unreachable in both CDESK and on the phone, it is skipped – the call rings the first available extension. At the same time, if a call is actively declined, it will return to the voice menu and will not be transferred to the next operator; this is a feature of the switchboard’s manual mode, not a fault.
Call handling in CDESK
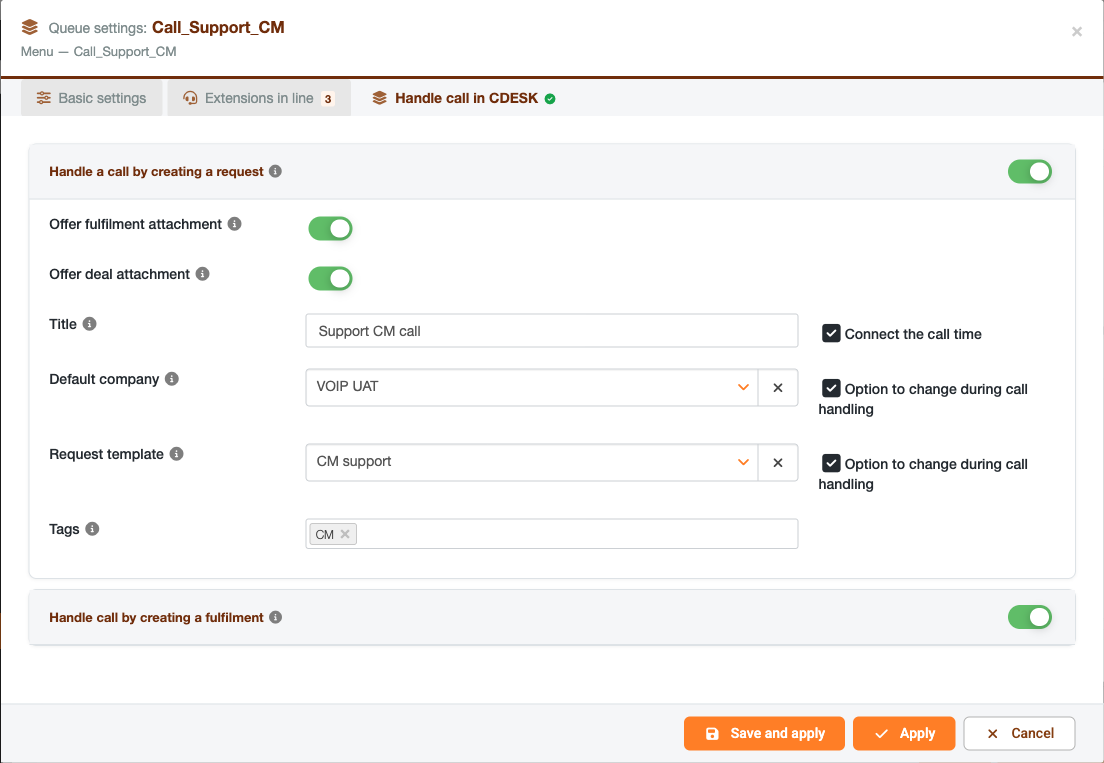
This section of the queue settings determines what should happen to a call from a given queue in CDESK. Precisely because the settings are separate for each queue, a service queue can generate different requests to those generated by a invoicing queue.
- Process call by creating a request – during and after the call, a form displaying the call details will appear to create a request.
- Offer link fulfilment – when creating a request, the option to link a fulfilment to it is offered.
- Offer to link a deal – when creating a request, a selection of company-linked deals will be offered.
- Resolve call by creating a fulfilment – during the call, a form to create a separate fulfilment will be viewed.
- Call name and Attach call time – the time at which the user made the call will be inserted into the call subject and also into the created request.
- Default company – the company that will be pre-filled when creating a request from this queue. By selecting the ‘Allow changes during call handling’ option, you allow the operator to change this directly during the call. Automatic recognition of the contact and the company to which the contact is assigned takes precedence over these settings.
- Request template – the template used for requests in this category. Only templates available for the selected company are offered, and here too it is possible to allow changes when answering a call.
- Tags – a list of tags that are suggested to the operator as the subject of the call. The selected tag is carried over to the field
Please note: If you disable the option to make changes whilst a call is in progress, the field will no longer appear for new calls. For existing calls made whilst these settings were enabled, the field will remain.
Voice menu (IVR)
The voice menu is the first thing a caller hears and allows them to select where the call is routed by pressing a key. You can create a new menu by clicking the ‘New Menu’ button; it will only be sent to Zadarma once you click ‘Send to Zadarma’, so you can prepare it in advance.
In the key map, click on a number to assign a queue, sub-menu or voicemail to a key. In the menu settings, you can specify the introductory message, the wait time before a key is pressed, the number of recurrences and the action to take if the caller does not press anything. If you’ve already finished your configuration in Zadarma, you can import the queues, extensions and voice menu into CDESK.
You can reorder the menus using the arrow keys. Scenarios within a menu are automatically sorted by their assigned key, with ‘0’ at the end and scenarios without a key assigned following them.
Note: Audio recordings for the voice menu are uploaded via the Zadarma portal under Incoming calls and IVR → Voice greeting → SET UP → UPLOAD OR READ. In CDESK, you simply select them from the list; click the ‘Renew recording list’ button to reload the list. This path is also shown directly within the application next to each field where you select a recording.